Recipes from an Edwardian Country House

Recipes from an Edwardian Country House is a book that was repackaged from an earlier book. Frankly, I hate it when publishers do this sort of thing, as I often have the first book and then end up with another copy of the same book .

Seasonal Recipes From The Garden

For a long time my cable provider didn't provide a PBS station. It seemed weird, no PBS, but I learned to live it. After changing providers, I suddenly had PBS again.

Favorite Recipes of Famous Men

We are suckers for collections of recipes by "famous" folk. So naturally, Favorite Recipes of Famous Men a 1949 cookbook collection by Roy Ald is a great one.

Spoonbread and Strawberry Wine

There is not a single member of Norma Jean and Carole Darden's family that you want to hang out with. While most of them are gone now, they live on in this delightful cookbook and memoir.

Recipes from an Edwardian Country House

Recipes from an Edwardian Country House is a book that was repackaged from an earlier book. Frankly, I hate it when publishers do this sort of thing, as I often have

Tuesday, October 28, 2014

Favorite Recipes of Famous Men

We are suckers for collections of recipes by "famous" folk.  So naturally, Favorite Recipes of Famous Men a 1949 cookbook collection by Roy Ald is a great one.  Let's be honest, there are very few recipes in famous collections that will have you says, "I'm going to go right out and make that dish!"  But these types of books are great fun.

First, it is always fun to see who is considered "famous" at different time.  In Favorite Recipes of Famous Men the introduction is written by Eddie Cantor. The men in this book are mostly actors with a smattering of singers.  The is Jimmie Durante, Red Skelton, Edward g. Robinson, Gene Autry, Cary Grant and more.

There are the ever appetising dishes like Meat a la Tyrone Power. Rudy Vallee's Scrambled Eggs Valle Style.  Spaghetti Fairbanks,by--you guessed it-- Douglas Fairbanks, Jr. There famous guys do love to name their dishes after them...or their mothers.

As one might imagine, there are a lot of meat and potato s, a dessert or two and some real interesting, if odd dishes.  This zippy dish from the debonair Rex Harrison is one of our favorites...

Clam Juice Stiffener

3 cups clam broth
1 1/2 tablespoons lemon juice
1 teaspoon confectioners' sugar
1/4 cup catsup
1 teaspoon Worcestershire sauce
2 teaspoons horseradish, freshly grated
Salt to taste

Combine all ingredients.

Ah those pesky famous guys...


Monday, October 27, 2014

MUSHROOM QUINOA

The first time I bought quinoa, I cooked it without any seasonings. I tasted it, shrugged my shoulders and then put it back in the pantry. This COULDN'T be the same quinoa that people were raving about could it?

What I found out (much later) was that you have to add stuff (veggies, spices, etc.) to the quinoa and then something magical happens. Quinoa takes on the persona of whatever you cook it with......want beefy? cook it in beef broth, want it spicy? cook it with Rotel tomatoes. You can't goof it up, like I said it's almost magical.

So, lately, I've been experimenting with more quinoa recipes and I have created this new one that I really enjoy.  I hope you do too!!


MUSHROOM QUINOA
3/4 cup chopped onion
6 large mushrooms
1 large carrot
1 cup peas
1 cup quinoa (rinsed and drained)
2 cups beef broth (I like canned beef consume)
2 teaspoons beef bullion (or 2 cubes)
1/4 teaspoon black pepper
1/4 teaspoon cayenne

Prep work: Remove stems from mushrooms and put them in the food processor along with the carrot. Pulse them until they are about the size of a pea. Next hand slice the mushrooms fairly thickly and set aside. Note: add as many of your favorite veggies as you want.

Saute onions then scoot them over to edge of pan. Add the mushrooms and sauté them (in the onion pan) until you get some toasty brown color on the edges.

Put EVERYTHING into the pan and bring to a boil; reduce heat and put a lid on it. Use the same "simmer speed" and cooking time that you would use for rice (about 15-20 minutes) A better description would be, if your simmer is fast.....cook for 15 minutes, if you have it turned down pretty low, cook for 20 minutes. That's it!!  Just fluff it with a fork and eat!!

Depending on how many veggies you pack into this recipe (there is no limit), you should get 5 or 6 cups in the final dish. I freeze it in one cup measures. No need to defrost, just microwave uncovered for 2 minutes. It makes a great (and filling) lunch, with no guilt !!

 
ENJOY !!
 
Quinoa is known as a super food for many reasons. The description of most of those reasons are words that I don't use every day, like flavonoids, phylonutrients, antioxidants, etc.
 
For me, my reasons for enjoying quinoa are: it's quick and easy to prepare, it will take on any seasonings you like and most of all, I can eat a big bowl of this and it doesn't effect my blood sugars very much at all, plus it's gluten free!! I hope you try it.

Friday, October 24, 2014

The Bachelor and the Chafing Dish

Long before the microwave, the student, spinster, poet, or bachelor kept a chafing dish in their humble garret.  Yes, that chafing dish was nearly as big as your whole microwave.  Yes, it does seem a bit counterintuitive that a single person or couple would procure something as large as a chafing dish to cook for one or two people, but they did. 

Much like the microwave, the chafing dish spawned a collection of cookbooks to go along with its cult status (One even has the word "cult" in the title!).  In order to get the word out about this wonderful kitchen implement, Deshler Welch wrote The Bachelor and the Chafing Dish.   Welch waxes poetic on the dish:

"The new chafing-dish--which is a most delightful evolution--is accomplishing much more as a civilizer.  It is certainly an important factor nowadays in breaking formality and bringing people around a festive board under the happiest of circumstances. Its very general use by both men and women, its convenience for a quick supper and for a dainty luncheon, and its success as an economical provider where it is necessary--all this is putting the chafing-dish upon a queenly dais."

He then proceeds to make a midnight snack of Welsh Rabbit and calls for two pounds of cheese.  That's a lot of cheese toast for a bachelor--especially at midnight!

Welsh's book was written at the very end of the Victorian Era and just a few years before the Edwardian Era.  It was a kind of precursor to the changes that one would see at beginning of the twentieth century, even though the great manner houses were still flourishing, if only on borrowed money. 

Interspersed with rather tame recipes, the book has a bit of history, a bit of poetry, and a few line drawings to keep our bachelor amused. Frankly, even the most lame of bachelors could cook with this book in hand a fine looking chafing-dish!

Try this recipe:

Ham

Put half a walnut of butter into the chafing-dish, and , when melted, add two tablespoons of jelly--and fruit--a dash of red pepper, and half a glass of sherry.  Place sliced or cut-up ham in this and simmer for a few moments.  Dried beef may be served the same way.

Serve this up and you will be on Match.com hunting a wife in no time!


Tuesday, October 21, 2014

Shrubs

We love shrubs.  During the summer, we get gigantic boxes of blueberries and look forward to a good blueberry shrub.  Over at Lucindaville, our reoccurring drink posts, Cocktails At The Burnpit, featured the Last Hurrah, our farewell to summer cocktail featuring both blueberry shrub and vodka. We always keep a bottle of Pok Pok Som Drinking Vinegar on hand. So as soon as we heard that Michael Dietsch was writing a book about shrubs, we  clicked the pre-ordered button. 

Shrubs are not terribly hard to make.  They are basically a mashed fruit or vegetable, some sugar, some vinegar, steeped and strained.  That being said, the thought of moving past blueberry or raspberry seemed a bit difficult.  Well, not if you have Shrubs.

Dietsch starts out with history of shrubs, filled with references to many cookbooks, bar guides, and botanical treatise...and we do love a good cookbook reference!  Then he moves on to shrub recipes for every occasion.  Yes, there is Benjamin Franklin's Shrub as well as Martha Washington's.  There are simple fruit shrubs and a veggie shrub here and there.  Great combinations here and there and finally a collection of cocktails featuring the delightful shrubs in the book.  Our burnpit is going to jumping!

A lot of times, we need a single stalk of celery for something.  Then, we have a big bunch of celery that just sits in the crisper getting limp.  This is the perfect antidote to that occurrence.

Celery Shrub

1 pound of celery, leaves still attached
1 cup sugar
1 cup apple cider vinegar

1. Wash celery stalks and, if necessary, scrub with a vegetable brush to remove dirt.

2. Cut the stalks into 1-inch pieces.

3. Add the celery to blender and and cover with about 1/2 cup water.

4. Start the blender on low, and as the celery starts to get chopped up, turn the speed up to puree.  If after about 30 seconds, the mixture is still very thick and chunky, add a little more water.

5. Place a fine mesh strainer over a bowl.  Line with a piece of cheesecloth if desired. Pour the celery mixture through the strainer. Press or squeeze the celery puree to express the juice into the bowl.

6. Pour the celery juice into a jar.  Add sugar and cider vinegar.  Cap the jar and shake to combine.

7. Refrigerate, shaking well every other day or so to dissolve the sugar.

If you have never had shrub, you are missing out!  Now you know exactly what you are missing and how to remedy that situation.  Now grab up a copy of  Michael Dietsch's Shrubs for yourself or some other cocktail maven.  They will be king of the bar...or queen of the burnpit.

Wednesday, October 15, 2014

Fifteen New Ways for Oysters


Sarah Tyson Rorer, known in her books as Mrs. Rorer, was a prolific writer of cookery books in the late 1800's and early 1900's.  Over 50 books and countless articles bear her byline. 

Born in 1849, she spent a great deal of time with her father, Charles Tyson Heston, who was a pharmacist. In her father's laboratory she learned about chemistry and laboratory work methodology. She would use this interest in science in her writing on food. In 1871 Sarah married to William Albert Rorer and had three children, only two survived. Her curiosity never waned and in 1879 she enrolled in a cooking course at Philadelphia's New Century Club and soon she was teaching the classes.  She was so successful that she started her own cooking school in 1882.  The Philadelphia Cooking School not only offered cooking classes, it offered chemistry classes and classes on diets for both the healthy and infirmed.

Her fame spread as she began writing a column in Philadelphia's Table Talk magazine and in the national Ladies Home Journal.  He first cookbook, Mrs. Rorer's Philadelphia Cook Book was published in 1886. She was a direct and pithy writer.  She debunked popular thoughts on fish with this statement:

"Fish is not brain food, because no fishermen of my acquaintance are overly brilliant."
She advocated no activity after a large meal, no fried foods, no food in the morning, and lots of fresh air.


Along with her full length manuscripts, she published a series of small, pamphlet-like books, among them, Fifteen New Ways for Oysters, published in 1894.  It was just that -- 15 recipes for oysters.  This is one of them:

Baked Mushrooms

Peel and cut short the stems from a pound of good sized mushrooms;put them in a baking pan, gills up; put a tiny bit of butter on each; sprinkle with salt and pepper. Run them in a hot oven for fifteen minutes; then pour in the pan about a gill of cream and one gill of oyster liquor that has been boiled  and strained; bring to boiling point. Dish the mushrooms, cover them over with the oysters, add two tablespoons of sherry to sauce.  Make it very hot and pour it over.

Mrs. Rorer was quite the writer and really needs a biography!  There are a lot of Mrs. Rorer's books out there, so keep an eye out in dusty old bookstore!


Sunday, October 12, 2014

PEANUT BUTTER WHIPPED CREAM

I came up with this idea one afternoon and (right out of the chute) it was a keeper.  Whipped cream that has a mellow peanut butter taste... the perfect addition to ANY dessert!!

Make this part a few minutes ahead of time, so it can cool just a little:

1 cup Reece's Peanut Butter Chips
2/3 cup heavy whipping cream

Microwave the above just until the cream gets steamy hot, but not boiling. In my microwave this takes about a minute. Remove from the microwave and whisk until the melted mixture is smooth.

Add
1/4 cup brown sugar
1 teaspoon vanilla extract

Whisk until smooth and set aside to cool a little.

With electric mixer, start whipping 1 1/2 cups heavy whipping cream.
When it gets about "half way" to being whipped cream, slowly drizzle in the peanut butter chip mixture.

Continue whipping until it gets to the consistency you like.


ENJOY !!

Thursday, October 9, 2014

BACON HASSELBACK POTATOES

As I understand it, Hasselback potatoes originated in Sweden as far back as the 1700's and there are a lot of variations. Basically it is an unpeeled baking potato that has been partially sliced, buttered and baked. The outside is crispy, salty and chewy but the inside of the potato is smooth and moist. They are very easy to make, delicious to eat and pretty enough to serve over the upcoming holidays.

A word of warning about these photographs: I didn't realize that the photos were on the blurry side until we finished dinner, so I couldn't re-take them. Sorry about that.

 
This version has bacon in it !!
 
There really isn't a specific recipe, but I do have a few tips that will help you in the process.

Things to do ahead of time: 

Lay 1 strip of good quality smoky THICK bacon (for every 2 potatoes) on a flat surface and freeze for about 30 minutes. This will help you slide the bacon down into the cuts of the potato.

Use meaty bacon

Bring a pot of water (large enough to hold the potatoes) to a full boil.

Wash the unpeeled potatoes, scrubbing them with a vegetable brush, then drying them with a paper towel.

Next, it's time to cut the slices into the potato. Because it is easy to cut too far, it's better to use some sort of cutting depth guide. Personally, I lay the potato between 2 spoon handles and use a sharp (thin bladed) knife to cut down only as far as the spoon handles.

 
Next, put the potatoes into the pot of boiling water. Let boil 4 minutes for larger potatoes and 2 minutes for medium potatoes. Gently lift them out and pat them dry.

Coat the potatoes with melted butter, making sure it gets down into every cut (just don't try to PRY the slices apart too much).

After you've buttered the potato, insert 3 pieces of frozen bacon (evenly spaced) into the potato. Make sure the bacon is big enough to be a little wider and taller than the potato because it will shrink as it bakes.


Butter again and then sprinkle with kosher salt and coarsely ground black pepper.

Bake at 350° (2 hours for large potatoes and 1 1/2 hours for medium potatoes). Dab them with a little butter about half way through.

The last 5-10 minutes of baking, melt a little butter and add a finely sliced green onion(optional) and half a clove of minced garlic. Let the garlic toast in the butter JUST A LITTLE, then drizzle the garlic butter over the potatoes and bake a few minutes more.

Carefully lift the potatoes out of the baking dish with a sturdy utensil.


The potatoes have a smooth and slightly smoky flavor. Picky-picky husband loved them.  Like I said, sorry about the poor quality of todays photos.

ENJOY !!

Thursday, October 2, 2014

Merchant of Sonoma


As one might expect, we just love Williams-Sonoma.  So it is fitting and proper that we feature Merchant of Sonoma on Chuck Williams 99th birthday.  William Warren's Merchant of Sonoma tells the story of Chuck Williams and his now famous cookery store.

On May 1, 1953, Chuck Williams saw Paris for the first time...and as they say, the rest was history.  Williams was a fine amateur cook living in the sleepy village of Sonoma.  He was looking for a business opportunity when he ran across a  hardware store.  The building would house a couple of other small businesses and provide an income. He would keep the hardware store and add a few household items.  It would be a big move, so he left with friends for a trip to Europe.

In Paris, Williams found wonderful items to stock a kitchen.  Items that were unknown to most of America.  Williams loved the simple foods and fancy cookware and an idea was born.  Williams kept his hardware store, but gradually realized that the hardware he wanted to sell was the hardware for the kitchen.  Williams began importing items he had seen in France to Sonoma and selling them in his shop and through the mail.  

Clearly, it was an idea whose time had come.  It is still coming.  Along with hardware, Williams included a few select pantry items.  One of his first was Italian balsamic vinegar.  This simple salad was one of Williams' favorites.  He carefully explains that in Italy, the oil and vinegar are not mixed together. A salad is tossed first in the vinegar, then tossed in the oil.  They believe the oil holds in the vinegar and prevents it from dripping to the bottom of the bowl.

Blacksmith Salad

6 servings
1 large or 2 small heads butter lettuce
1 piece Parmesan cheese, 3 oz.
2 tablespoons balsamic vinegar
Pinch of salt
1/3 cup extra virgin olive oil

Chill salad bowl but do not allow it to become too cold or the lettuce leaves will stick to it. 

Discard any tough or discolored outer lettuce leaves. Separate, rinse and thoroughly dry remaining leaves, then tear any larger leaves into pieces. Place in chilled salad bowl. Using vegetable peeler, slice Parmesan cheese into very thin chips and scatter over lettuce. Sprinkle with vinegar and salt and toss well. Drizzle oil over top and toss again. Serve on individual plates. 

With his expert eye for detail and his love of great food, Chuck Williams built an empire, an adult candyland for the home cook.  

                                                         Happy Birthday Mr. Williams.

Tuesday, September 30, 2014

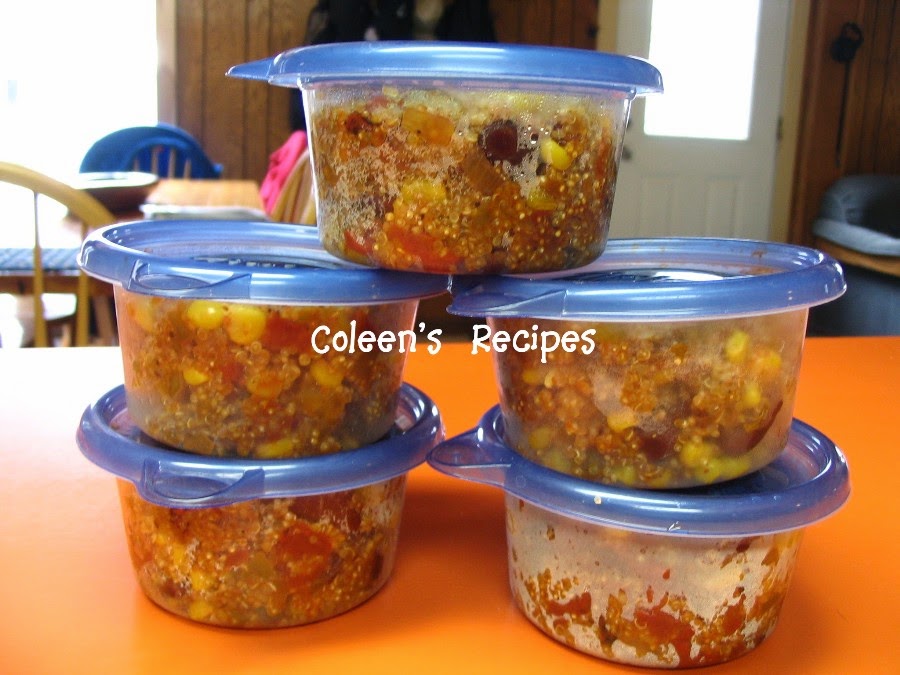
MEXICAN QUINOA SKILLET

A friend of mine tipped me off to this fantastic recipe at http://damndelicious.net  It provides that COMFORT FOOD taste AND it is totally healthy for you (a rare combination)!! This recipe is super quick and easy to make!!  It is definitely going directly into my 5 star recipe box and I will be freezing single portions of it for my busy day quick hot lunch!! I even enjoy this cold!!


In a large skillet place:
1 tablespoon canola oil
2 cloves garlic minced
1 seeded and chopped jalapeno (optional)
1/2 cup chopped sweet onion 
 
Saute above ingredients for a couple of minutes or until the onion starts to smell sweet, then add:

1 cup quinoa
15 ounce can drained kidney (or black) beans
1 cup beef broth (or vegetable broth)
14.5 ounce can fire roasted tomatoes (undrained)
1 cup corn  (I used frozen)
2 teaspoons chili powder
1 teaspoon ground cumin
1 1/2 teaspoon salt
1/4 teaspoon black pepper
4 ounce can diced mild green chiles

Sautee onions, then add everything else. Stir well, and bring to a boil. Lower heat and put the lid on and simmer for 15-20 minutes (depending on how hot your pan is).  After 20 minutes:

Turn off the heat and add:
1 peeled and diced avocado
Juice of 1 lime (optional)
2 tablespoons chopped fresh cilantro (optional)

Toss and serve immediately.


NOTE: leave out the jalapeno if you don't like spice-heat.

NOTE: Quinoa is a high protein grain that is VERY healthy for you and is an excellent addition to anyone dealing with diabetic issues.

NOTE: When I don't include the jalapeno, I increase the chili powder to 3 teaspoons.

NOTE: This freezes very well (before you add the avocado). I put it in one cup containers and freeze them.  To eat, put it in the microwave frozen and heat for 2 minutes, THEN add the avocado. It makes a great lunch.

NOTE: My all time favorite way to eat this (and maybe it is just me), but I love it steaming hot, topped with a scoop of fat free cottage cheese.  Yum.

Tuesday, September 23, 2014

HOMEMADE VANILLA EXTRACT

The Halloween/Thanksgiving/Christmas baking season is just around the corner and I decided to stock the pantry with baking supplies.  Well, I was shocked at the increased price of good quality vanilla; some of it is as high as $15 for just a few ounces!!

With that in mind, I decided to make my own vanilla, although I had NO CLUE how to do it. After some Internet research, I was thrilled to learn that the process was SUPER EASY and only takes TWO ingredients (vodka and vanilla beans)!!


At first I was concerned because vanilla beans are not always in my budget. I like McCormick brand spices, but their price for TWO vanilla beans is over $10!! Homemade vanilla extract would be outrageously expensive at those prices, so back to the Internet.

I discovered that the best vanilla extracts are NOT made out of the same kind of vanilla beans that you bake with (whew!! That was a relief.). Vanilla extract is made with Grade B vanilla extract beans (I didn't even know there was such a thing). Google it and you will find a lot of places to buy them. Just make sure they are labeled MADAGASCAR BOURBON EXTRACT GRADE B VANILLA BEANS.

The 6" beans aren't very pretty to look at (they aren't plump and supple and you CAN NOT bake with them), but they make GREAT extract. When you order them, they will arrive looking like this:
Supplies
1 quart of vodka  (see note)
4 ounces of Madagascar  Grade B extract vanilla beans

This makes a LOT of vanilla, but I have in mind to put it in pretty little bottles and tuck it into holiday gift baskets, so a quart of extract is a good thing.

TIPS: 
Don't waste your money on expensive vodka, thinking that this will make better vanilla...it does not.  Good news!! The cheapest vodka works just as well as expensive vodka for this project!!

You will need a jar that is a bit bigger than a quart since the vodka AND vanilla beans have to fit in it (I learned that the hard way).

Cut the grade B extract vanilla beans into 1/2" pieces and put them into the quart of vodka..........that's it!!  Now all you have to do is shake the bottle a little (every few days) and after a month, it will be extract!! What could be easier?

Before using the extract (or giving it away), strain the spent vanilla bean pieces out of the extract. If you don't want ANY vanilla seeds in the extract, run the finished product through a coffee filter.


Decorative bottles like this are available online for about $2.50 each, they would make a pretty gift.

This extract will be good forever, or until the very last drop. No need to refrigerate it.


This photo is only 2 weeks into the extract process
(see how rich it looks already?)
For those of you who are concerned that homemade vanilla
is not as "strong" as commercial vanilla...never fear!!
This homemade vanilla is very potent (in a good way) and
you will LOVE it!!
 
ENJOY!!!

Saturday, September 20, 2014

Requiescat in Pace -- Polly Bergen

A while back we featured Polly Bergen's etiquette book over at Lucindaville.  In 1977, Bon Appetit featured her chili recipe.  We believe this is it.


POLLY BERGEN'S CHILI

6 medium onions, finely chopped
6 medium green peppers, finely chopped
2 cloves garlic, minced
Cooking oil
4 pound ground beef round OR chuck
4 (16-ounce) cans Italian-style tomatoes
4 to 6 (16-ounce) cans kidney beans, drained
2 (6-ounce) cans tomato paste
1 cup water
Salt and pepper
1 teaspoon red wine vinegar
3 whole cloves
2 bay leaves
2 tablespoons chili powder OR more to taste
4 drops Tabasco sauce
Sugar

In a large skillet, brown onion, peppers and garlic in oil until golden.

In a separate skillet, brown ground meat in batches. Separate meat with a fork and cook until all meat is browned. Drain off excess oil.

Place onion, green pepper, garlic and meat in a large pot. Add undrained tomatoes, kidney beans, tomato paste, water, salt and pepper to taste, vinegar, cloves, bay leaves, chili powder and Tabasco sauce.

Cover and simmer over low heat 1 hour. Add sugar to taste. Simmer uncovered for another hour. Remove cloves and bay leaves before serving.


She was a classy lady.

Friday, September 19, 2014

Barbeque'n With Bobby

What makes a great pit master?  Well, in Bobby Seale's case you found the Black Panther's, disrupt the 1968 Democratic Convention, go to jail, get arrested again and again and -- oh yes, make really great barbeque.

Well it may not be the most conventional resume for a cookbook author, but it may be the most interesting.What can one say?  Even revolutionaries gotta eat.  Don't for a moment think that you are going to get some ribs spread with Kraft Sauce stuck in an oven.  This is Bobby Seale. The man knows his 'que and there are no shortcuts.  His "quick" barbeque sauce has 18 ingredients! 

Pork is not the only white meat out there.  Bobby grills chicken, turkey, game hens, fish, and beef.  His marinades, rubs, and sauces are complex and involved -- he leaves no stone unturned. 

While the cookbook was published in the late 1980's, it has a very modern feel.   Much of his attention turns to sides and vegetables to accompany the barbeque, though many would make fine meals, in and of themselves.

Seal if fond of "goobers" and points out that the goober is a generic African word that refers to nuts in general, not the peanut in particular.  In this recipe the goober of choice is the black walnut.

Goober Carrot Raisin Slaw

4 medium sized carrots, washed and finely grated
1 cup cabbage (white or red), finely grated
1 1/3 cup raisins
1 cup crushed black walnuts
1 cup mayonnaise or salad dressing
1/2 teaspoon each ground black pepper, onion parsley salt (or to taste)
Parsley for garnish

In a 3- or 4- quart bowl, combine and mix together grated carrots, cabbage, 1 cup raisins, and walnuts with mayonnaise or salad dressing.  Season to taste with black pepper and onion parsley salt. garnish with bits of fresh parsley and the remaining 1/3 cup of raisins.
 As Bobby Seale says,

"Thousands of culinary experts, particularly in the South, guard and keep their secret recipe methods.  I happen not to be one of them."

Take him up on his barbeque knowledge.


Wednesday, September 17, 2014

GRANDMA's BREAD AND BUTTER PICKLES

When I was a little girl I watched my (very German) Aunt Welentina Ezlinger make pickles in her basement. I climbed up on a stool and watched her line up the hot jars and put "seeds" in each one. She then packed the jars tight with cucumbers from her garden and poured a hot vinegar liquid over them. That was almost 60 years ago, but I remember it like it was yesterday. I was so impressed!! I think of her when I make this recipe.

We love these bread and butter pickles!! They are fresh and bright tasting and are worlds better than commercial pickles!!


GRANDMA's BREAD AND BUTTER PICKLES        6 PINTS
 
4 cups water
1/4  cup pickling salt (not regular salt)
10 large pickling cucumbers
ice cubes (I use 2 trays of ice cubes)
3 cups sugar
2 cups water
2 cups apple cider vinegar
2 teaspoons ground turmeric
2 teaspoons mustard seed
1/2 teaspoon celery seed
 
Wash the pickling cucumbers and slice them into 1/8" slices (I cut mine just a tad thicker than 1/8").
 
 
In a LARGE bowl, mix 4 cups water and 1/4 cup pickling salt until well dissolved. Add cucumbers and ice cubes and gently swirl, making sure the slices are all submerged.  Let cucumber slices soak for two hours.
 
After 2 hours, drain the cucumbers (throw away the liquid) and rinse completely with fresh water (I rinse mine 2 or 3 times).
 
In a large/deep pan, mix 3 cups sugar, 2 cups water, 2 cups apple cider vinegar, 2 teaspoons ground turmeric, 2 teaspoons mustard seed and 1/2 teaspoon celery seed. Bring this mixture to a boil.
 
Reduce heat to LOW and put the cucumber slices in. Stir gently and let the cucumber sit in the hot liquid until they are all hot (but not cooked). Don't let the cucumbers boil.
 
Remove the slices from the hot liquid (with tongs) and pack directly into sterilized PINT size mason jars (pack as many as you can get into the jars...pack tightly).
 
When the jars are all packed with cucumber slices, bring the pot of vinegar liquid back to a boil. Remove from the heat and pour into the jars of cucumber slices, to within 1/4" of the top. Run a CLEAN knife around the sides of the jars to remove any air bubbles.
 
Wipe off the rims of the jars with a clean moist towel and screw on the two piece lids.
 
If you are going to use these pickles within 2-3 months, you can just keep them in the fridge at this stage.  If you want to keep them for a lot longer or if you want to store them in the pantry, you'll have to process the PINTS immediately in a hot water bath for 10 minutes.
 
Whether you keep them in the fridge, or put them through a hot water bath, you will have to let the cucumbers "pickle" for 2 or 3 weeks before you eat them, gently "shaking" the jars once a day.


ENJOY !!


Tuesday, September 16, 2014

Nina St. Tropez


Almost every review of Nina Parker's Nina St. Tropez says, "It's the next best thing to being there."  First, let me just clarify -- there is no "next best thing."  There is being there and NOT being there.  We are NOT there and we are not that happy about it, either.

That being said, while we are not in the South of France, that is simply no excuse not to cook like we are.  So grab a copy of this book and go native.  Now it may seem from the cover and very glam shots of the photogenic Ms. Parker, that this is a cookbook for the high end diner.  But it is actually a very comprehensive look at the food of the Mediterranean.  Food served in homes and bistros off the tourist map.  Parker writes:

"I want to show you the classic, often forgotten side of town -- far away from the mega yachts and spray of champagne....This is not the new St. Tropez, it's the real St. Tropez; much of it has remained intact since its heyday in the 1950's, holding on to that old-world charm and glamor all the while."

Don't worry, there are lovely photos of water and boats and beach and markets.  And there is food, food, food.  It is food one immediately wants to eat.  Beautiful and simple.  It is a page turner.  Rarely does one find a cookbook that has something to offer up on every page.  (Frankly, I hate bananas and even the banana split looked like I might even take a bite -- or two!)

The seafood it a stand out.  Alas, as stated before -- we are not there, so finding the gorgeous seafood can be a bit of a problem, but we often find scallops and we do love them.  Here is a great combination.

Brochettes de Saint-Jaques et Chorizo au Thym


350g fresh scallops, roe removed
100g soft cooking chorizo
bunch fresh thyme, leaves roughly chopped
5 tbsp olive oil
150g cherry tomatoes
2 lemons
20g unsalted butter
sea salt and black pepper

Carefully rinse the scallops under cold running water and pat them dry with kitchen paper. Slice the chorizo into chunks roughly the same size as the scallops. Put the scallops, chorizo and half the thyme in a bowl with some of the olive oil, season with salt and pepper and gently tumble together with your hands, making sure everything is coated.

Thread the scallops, chorizo and tomatoes on to the skewers and scatter over the remaining thyme. Heat the remaining oil in two large frying pans over a medium-high heat. When the oil is hot, add the skewers and cook for 4-5 minutes, turning every so often, until all sides are browned. One minute before they’re ready, squeeze half a lemon over each. Carefully stack them on a serving dish. Reduce the heat and squeeze another half a lemon into each pan. Use a wooden spoon to scrape up all the juices on the bottom of the pans and add half the butter to each pan. Cook for a moment, stirring, before drizzling the tasty pink sauce over the skewers.

You know you want to make these this weekend. I know I do! I can assure you, it will not be the next best thing to being there, but it may just be the best thing you do this weekend.  If you can't wait, grab a bottle of wine and make them on Wednesday.  It will be the best Wednesday ever!

Sunday, September 14, 2014

SOFT COCONUT DROP COOKIES

These cookies are WONDERFULLY SOFT, rich, flavorful and easy to make. The recipe makes about 3 dozen big 4" cookies and if you store them in an airtight container, they will stay soft and chewy (they are totally addicting!!)

 
Soft Coconut Drop Cookies are PERFECT lunch box cookies, bake sale cookies, potluck cookies or "anytime cookies". They are delicious.

1 cup butter flavored shortening
1 cup sugar
1 cup brown sugar
2 eggs
1 teaspoon vanilla extract
2 cups flour
2 cups old fashioned oats
1 teaspoon baking powder
1 teaspoon baking soda
1/2 teaspoon salt
2 cups sweetened flaked coconut (lightly packed)
1 cup finely chopped pecans (optional)

Cream the shortening, sugars and vanilla until light and fluffy. Add eggs one at a time, beating in between each egg.

Add the flour, oats, baking powder, baking soda, coconut and nuts (if you are using nuts) and beat until well mixed (batter will be thick).

Take a well rounded tablespoon of cookie dough batter and roll it into a ball. Place on a greased cookie sheet spaced 3" apart (I use parchment paper instead of greasing the pan). Bake at 350° for 11-14 minutes (my electric oven takes a full 14 minutes). Leave the cookies on the cookie sheet a minute or two before you remove them.

After they are cooled, store the cookies in an airtight container.

 
ENJOY !!
 
Note: Recipe calls for butter flavored shortening (I use butter flavored Crisco). I'm sure they could be made with butter instead, but they will bake differently and probably spread out a lot more. I also don't think they would stay soft and chewy.


Friday, September 12, 2014

A Good Heart and A Light Hand

This is a wonderful African American cookbook from 1968.   It was compiled as a fundraiser for the Fund for Alexandria, Virginia.  The recipes are from the Ruth Gaskins' Collection of Negro Recipes.  Like so many women, Gaskins learned to cook from the women in her family, her mother and grandmothers and the other women of the community.

Gaskins writes:

There is something special that every negro knows that I can only call "the Negro Welcome."  In Alexandria, Virginia, where I have always lived, I can go into any Negro home at any time and know that I am wanted. I don't have to phone first and I don't have to wait for a special invitation.  If I feel like seeing a friend, I'll go, and it it's meal time, I'll draw up a chair and eat. There'll be enough food, because we always cook for the friend who might drop by.

While the language might seem old, the sentiment is one we should all try to live by, the ability to welcome people into our homes and to always have food on the table.

The recipes in this book reflect many old Southern recipes, including a favorite of the Duchess of Windsor, Pork Cake. In addition to the cake, there is a nose to tail approach for the pig. There are vegetables and pickles and a potato wine.

A favorite accompaniment to pork or chicken is the sweet potato.  Baked is good, but fired is better!  According to Gaskins, these are served at special occasions.

Spiced Sweet Potato Balls
3 large sweet potatoes
2 tablespoons butter
1/2 teaspoon salt
1/8 teaspoon each: nutmeg, allspice, cinnamon
1 cup chopped nuts
flour
fat for deep frying

Scrub potatoes to remove all dirt.  boil them with the skin on until tender.  Peel and mash.  Beat in butter, salt and spices until fluffy. fold in the nuts. Shape into balls. Roll in flour. Fry in deep fat until browned.

These sweet potatoes would welcome anyone.