Recipes from an Edwardian Country House

Recipes from an Edwardian Country House is a book that was repackaged from an earlier book. Frankly, I hate it when publishers do this sort of thing, as I often have the first book and then end up with another copy of the same book .

Seasonal Recipes From The Garden

For a long time my cable provider didn't provide a PBS station. It seemed weird, no PBS, but I learned to live it. After changing providers, I suddenly had PBS again.

Favorite Recipes of Famous Men

We are suckers for collections of recipes by "famous" folk. So naturally, Favorite Recipes of Famous Men a 1949 cookbook collection by Roy Ald is a great one.

Spoonbread and Strawberry Wine

There is not a single member of Norma Jean and Carole Darden's family that you want to hang out with. While most of them are gone now, they live on in this delightful cookbook and memoir.

Recipes from an Edwardian Country House

Recipes from an Edwardian Country House is a book that was repackaged from an earlier book. Frankly, I hate it when publishers do this sort of thing, as I often have

Wednesday, July 31, 2013

HARD CHOCOLATE SHELL FOR ICE CREAM

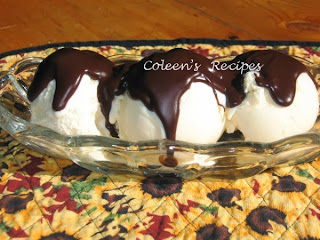
 This fudge-y treat is rich, delicious, quick to make and fun to serve, AND....when you pour it over something COLD, it turns hard, just like commercial "Magic Shell" ice cream topping (except it is a lot more budget friendly).

I've only ever made chocolate (duh!!) but I don't see why peanut butter chips or white chocolate chips or even mint chocolate chips wouldn't work just as well!!


1 cup semi-sweet chocolate chips
1/4 cup butter
1/4 cup canola oil
1/4 teaspoon vanilla extract

Heat the chocolate, butter and oil until the chocolate melts. I do this in the microwave, starting at 30 seconds on high, then stir, then 15 more seconds and stir and a final 15 seconds and stir.


At first, it will seem like the ingredients don't want to blend, but whisk it for 10-15 seconds and it will go together beautifully. Once it is smooth, whisk in the vanilla extract.

Cool to room temperature, (you can use it right away, but if you use it before it cools down, it will take a few more seconds to harden on the ice cream).


NOTE: If you use your microwave to melt the chocolate, watch it carefully, since your microwave might cook faster or slower than mine and chocolate scorches easily.

NOTE: With the addition of butter and oil, I thought this might have a greasy taste, but it does NOT. While it is still hot (which is my favorite) this has a velvety texture, almost like the best hot fudge sundae taste.

Tuesday, July 30, 2013

The Animal Farm Buttermilk Cookbook


When I was a kid in Alabama, my great-aunt, Ruth, kept a jug of clabber in the larder.  As a kid, I was totally disgusted.   As an adult, not a week goes by that I don't bemoan the fact that I never learned how to make Ruth's clabber.  It started with a mother that sat there for years, never once going in the refrigerator.  She seemed to use milk made from a powdered milk.  I always thought that was false until I read up on cheese making and found that the ultra-pasteurized milk found in every store will not make cheese but powdered milk will.  Odd, I know.  Still, I have no clabber recipe, so I am relegated to that stuff in the supermarket called buttermilk which is not really "butter" milk at all, but just milk with a bit of culture and thickener thrown into the mix.  Well, I digress...

Today's cookbook is The Animal Farm Buttermilk Cookbook by Diane St. Clair.  St. Clair has a dairy in Orwell, Vermont.  As you know from reading this blog, we do love Orwell -- George Orwell and rarely does one find a cookbook and an Orwell reference all in one!  In the culinary world, Diane St. Clair is famous for being the personal butter maker for Thomas Keller.   After a hard day of making butter for Per Se, there is buttermilk to be had.  If anyone knows how to use all that buttermilk, it is Diane St. Clair. 

We will not be holding against St. Clair that she is in Vermont by way of New York.   We will try to get our readers to refrain from making her cornbread.  While she calls it "tender" we call it "Yankee" as it has enough sugar to make sweet tea!  But there are other sweet things in the book we are fond of, like the raspberry buttermilk tart.   Raspberries are probably our favorite fruit of summer and this is a delightful way to show them off.

Raspberry Buttermilk Tart

1 Buttermilk Piecrust, arranged in a 10-inch fluted tart pan
2 cups fresh raspberries
1/2 cup sugar
2 tablespoons unbleached all-purpose flour
3 egg yolks
Juice and zest of 1 lemon
4 tablespoons unsalted butter, melted
1 cup buttermilk
1 teaspoon vanilla extract

1.Preheat the oven to 350 F.  Set the tart pan on a baking sheet.  Bake the piecrust for 15 to 20 minutes, until lightly browned.  Let the crust cool slightly, and then Spread the raspberries in the crust.

2. In a medium bowl, whisk the sugar with the flour.  Mix in the egg yolks and lemon juice  and , zest, and then beat in the butter.  Whisk in the buttermilk and vanilla until smooth. Pour the mixture over the raspberries.

3. Set the baking sheet in the oven and bake for 25 to 30 minutes, until the filling is just set in the center. Let cool before serving.

Rumor has it, this is actually better if you let it sit for a day, but I can't really see that happening.  What you need to do is make two -- you're heating the oven anyway.  Then you can have one for dinner and hide one in the back of the fridge for later.


Monday, July 22, 2013

Tasia's Table

I am totally convinced that I have written about this book.   I waited months and months for it to be published.  It was on my waiting list forever.  How did I not post about it?   I am here to rectify that over site.   Largely, because Tasia Malakasis was featured in the new issue of Country Living.  I said to myself, Self, you love that book and you did a great post.  But I looked and couldn't find it.  I am going crazy!!

Anyway...

Malakasis has a great story.  In this great migration back to the farm era, she was a forerunner.  Here is the the Cliff Notes version.

Small town Alabama girl makes it big in NYC.
She goes into her local cheese shop and finds a chèvre from Alabama.  
Becomes obsessed.  
Visits the cheesemaker.  
Harasses the cheesemaker till they let her intern at the dairy.  
Buys the dairy and moves back to Alabama.   
Makes a fine cheese.
Then writes a cookbook.
But not, "The End."

Malakasis is Greek but also Southern and with lots of goat cheese around, she has managed to write a cookbook that encompasses all the parts of her life.  There is a recipe for moussaka right along side a recipe for grits and goat cheese.  While the recipes rely on a lot of Belle Chèvre, there is a definite Southern breeze flowing through them.  If you have ever complained that all Southern cookbooks are basically alike, this is one that will change your view.

Take the sideboard staple, potato salad.  Here it becomes a warm and unctuous side.  It looks like potato salad but with a classy twist.


Warm Potato and Belle Chèvre Salad
2 lbs Fingerling Or Yukon Gold Potatoes, cut in 1” dice 
1 teaspoon Dijon mustard
1/4 cup dry white wine 
Clove garlic, minced
Salt and pepper to taste 
1/4 cup sour cream
1 medium red onion,  diced 
1/4 cup fromage blanc
1/2 cup fresh parsley 
2 tablespoons olive oil
1/2 cup Belle Chèvre Confetti 
4 tablespoons red wine vinegar
2 tablespoons fresh tarragon
Steam potatoes until tender. Drain and toss with with wine, salt and pepper. Add cheese, onion, and parsley. Stir together remaining ingredients. Toss with potatoes and serve immediately.

To read more about the Country Living article, head over to Lucindaville.

Monday, July 15, 2013

MINI MAPLE CHEESECAKES

We love the world of mini desserts these days; with an "empty nest", mini desserts are an easy better way to battle the mega-calories that a big ole' cheesecake in the fridge tempts us with.

Picky-picky husband LOVES all things maple, so I've been on a search for a maple cheesecake for a long time. This recipe is a combination of several other recipes combined with my own personal tweaks. WE
are very pleased with the results; they are sweet, smooth to the tongue, maple-y and super easy to make.

CRUMB CRUST
3/4 cup graham cracker crumbs
2 tablespoons sugar
2 tablespoons melted butter

Mix until well combined; I do this in a plastic food bag (saves on clean up). 

Preheat your oven to 275° and put paper cupcake liners in a cupcake pan.

Put a slightly rounded tablespoon of crumb mixture into each paper liner and press down.

CHEESECAKE FILLING
8 ounces cream cheese (room temperature)
1/3 cup REAL maple syrup (I've never tried pancake syrup)
1 tablespoon sugar
1 teaspoon vanilla extract
1/4 teaspoon maple extract
1 egg
2 tablespoons flour

Beat the cream cheese until it is fluffy and well mixed. While the mixer is running, drizzle in the maple syrup (scrape the sides of the bowl down if necessary).

Beat in the egg, extracts and flour until smooth.

Pour over the crumb crusts, filling almost to the top.

Bake at 275° for 30 to 35 minutes or until set. 

NOTE: My electric oven took 35 minutes to bake these because my maple syrup and egg were cold (right out of the fridge). If you bring the syrup and egg to room temperature before making these, it would probably only take 30 minutes to bake.

NOTE: I've never used artificial pancake syrup in these little cheesecakes, so I can't tell you if that will work or not, although I'm guessing it would (it just wouldn't taste as good).

NOTE: This recipe made 10 little cheesecakes.

Wednesday, July 10, 2013

CAKE DECORATING 101

I don't profess to be a great cake decorator but I do "OK"; lets just say if I can do it, certainly YOU can do it; it isn't rocket science.

This post has a very good basic butter cream frosting recipe and a few tricks of the trade that I've learned over the years. Don't be nervous, just jump in and "give it a go". Practice makes perfect and your friends and family will love eating those "practice cakes" (our kids grew up on them).


BUTTER CREAM FROSTING

1 cup white Crisco vegetable shortening
1 cup butter (room temperature)
8 cups powdered sugar
1/4 teaspoon salt
3 teaspoons vanilla extract
1 teaspoon almond extract
2/3 cup heavy cream

With an electric mixer (stand mixer works best) beat the vegetable shortening and (room temperature) butter until it is well mixed together.

Add half of the powdered sugar, salt, extracts and half of the cream. Beat until very well mixed.

Add the last half of the powdered sugar and the last half of the cream.  Beat on high for 2 or 3 minutes until very fluffy (makes a lot of frosting).
 
 
NOTE: Some people freak out about shortening in the frosting and I understand that, but, remember.....when you buy a cake from a chain type bakery, the frosting is made with ALL shortening, trust me!!

If you are dead-set against using vegetable shortening, you CAN use all butter, but the taste is very heavy; it is your choice.

NOTE: This frosting is great for the entire cake including borders and piping words, etc., but it IS a soft frosting and it WILL melt if you have it out in the sun or in a very hot room.  I like to frost  my cakes and then chill them until about an hour before serving.

If you don't have time to freeze the cake, just make sure it is completely cooled before frosting it (not even just a LITTLE bit warm).

DECORATING TIPS

Cupcakes are very popular right now and they are super easy to do. Using the above frosting recipe and a Wilton M1 decorating tip, you can have cupcakes that look like they came from a bakery in no time; that big M1 tip is the secret.


The following mini-lesson, is for a simple "every day" one layer 9x13 cake.

1. Brush all the crumbs off of the cake (you will thank me later)because it is easy to get the crumbs mixed in with your frosting and that isn't pretty.

2. I like to wrap or cover my HOT cake with saran wrap (right on the surface of the cake) and then let it cool down and put the wrapped cake in the freezer overnight.  The day you want to serve the cake, take it out of the freezer and frost it while it's still frozen. A frozen cake is sturdy and the frosting stays right where you put it.
Don't put it back in the freezer!!  The frozen/frosted cake will thaw out in about 60-90 minutes and be perfect for serving.

3. Put a thick layer of frosting all over your cake; don't worry about it looking smooth at this point, just try to cover it evenly.


4. Now here is a little trick that I learned a million years ago. Get a small fine mist spray bottle (that isn't used for anything else) and fill it with cold water. Give the frosting a light mist (from the distance of about a foot(just a super quick fine spritz) then smooth the frosting with a smooth bladed knife(wiping off your knife in between each stroke).  I always use an off-set spatula for this (see photo below) but any non-serrated knife will work in a pinch.

If you don't have a spray bottle, you can almost get the same effect by dipping your spatula into very hot water (then shaking off all excess water) before smoothing your frosting. This next picture shows what just ONE SWIPE around the sides of this cake (using the warm wet knife method) will do; you can imagine if you went over it a couple more times.


 If you are a perfectionist  (which I am not) and want NO frosting lines, just keep smoothing.

IMPORTANT NOTE: Only use the spritz technique on white frosting. If you use it on colored frosting, it will run and make your frosting look uneven....especially blue or green.

5. You can go crazy and buy all sorts of decorating tips and doo-dads, but you certainly don't need them.  Get just get a few of the basics and you will be amazed at what you can do.

You will need:
Disposable plastic frosting bags (a true MUST)
2-3 couplers (2 piece couplers let you change tips)
Decorating tips  (a large star and a round writing tip)
Off-set spatula  (not an absolute must, but very handy)
Food color paste (not the watery stuff) Check Walmart
Water bottle for misting


After you "flat frost" the whole cake, it is time to put on the borders/trim and any writing or drawing  you want on the cake. Now is the time you will use the frosting bags and metal tips.


6. The disposable frosting bags are probably the handiest part of this process. You can use non-disposable ones, but once you try to wash one, you will quickly see the "beauty" in the disposable kind.

7. The couplers, are not absolutely necessary either. You can just slide the metal decorator tips down inside the frosting bag and snip off the end. However, if you want to use a variety of decorating tips, the coupler is the way to go. Each one has two pieces; the larger part slides down inside the frosting bag and then the metal tip fits onto it from the outside, then the coupler band is screwed on (does that make sense?)


Once you have the decorating tip on, nestle the decorator bag inside of a large mug or measuring cup and fold the top raw edge down over the container, sort of like folding down a collar. Now put a cup or two of frosting in the bag (the "container" is just to hold the bag steady while you fill it).

Twist the top of the frosting filled bag closed and apply pressure with your fingers. As the frosting comes out the end, you will have to re-twist it tighter before continuing. When you are done using the frosting bag, just use scissors to cut the bag off just above the coupler, then throw the coupler and tip into the dishwasher!!

The base of your cake should have the larger frosting border than the top edge of your cake. Practice making a shell pattern on some wax paper before you try it on the cake.


8. I like to use a Wilton M1 tip on my cake base; it is a huge star tip and it takes an over sized coupler as well.


NOTE: When you first start to decorate, you will be fairly slow. Keep in mind that the heat of your hands can soften the frosting in the frosting bag and that can be a problem. If you find it getting too soft to hold its shape, put it in the fridge for about 20 minutes.

NOTE: Don't use regular (watery) food coloring in this frosting recipe; not only will it effect the consistency of your frosting, but the colors will  never get any stronger than a pastel color. 

Get some food coloring paste (it is very concentrated and gives you very deep colors, so go easy with it at first); one drop of blue will color an entire bowl of frosting. 

Walmart sells the food color paste in their cake decorating section.

NOTE: A fun thing to try is edible glitter. It is basically a transparent food starch that has been dried and flaked, but you can sprinkle it on ANY color frosting and it will look shiny and sparkly; it is GREAT for cupcakes or little girl princess cakes.

Another fun decorating tip is called a grass tip.

Grass Tip
 
Using a grass tip is super easy, you just apply lots of pressure, then immediately release the pressure and lift up at the same time which will make "blades" of grass.
 
 
GIVE IT A TRY !! BUT MOST OF ALL ...


HAVE FUN !!!

Thursday, July 4, 2013

S'MORE CUPS

This has to be the cutest idea that I've seen in a while. It (and the photo) is from  At Home With Amy.   They are delicious and so much fun.


7 whole graham crackers finely crushed
1/4 cup powdered sugar
6 tablespoons melted butter
4 milk chocolate candy bars (see note)
12 large marshmallows

Mix the graham cracker crumbs, powdered sugar and melted butter together until crumbly and evenly mixed. Put a small scoop of these crumbs in each cup of a mini-muffin tin and press down and up the sides to form a little "cup".  Bake at 350° for 4 or 5 minutes or until the edges are bubbling.

WhiLe the cups are baking, break apart the candy bar into sections (Hershey's are already scored into sections) and cut the marshmallows in half (scissors dipped in cold water works well for this).

Remove the cups from the oven and put a square of chocolate in each crumb cup, then top with a marshmallow half. Return to the oven for 1 or 2 minutes or until the marshmallow is just slightly puffed.

Cool in the pan for 15 minutes before removing them, then cool them completely. 

Melt the remaining chocolate (microwave works well) and dip the top of the completely cooled S'more Cups into the melted chocolate. Let them sit for about an hour to "set" the chocolate.

Store in an airtight container for up to a week. "Reheating" these in the microwave for a FEW seconds, is beyond delicious.

NOTE: Any (ALL chocolate) candy bar will work, whatever is your favorite....dark? white? milk chocolate?