Recipes from an Edwardian Country House

Recipes from an Edwardian Country House is a book that was repackaged from an earlier book. Frankly, I hate it when publishers do this sort of thing, as I often have the first book and then end up with another copy of the same book .

Seasonal Recipes From The Garden

For a long time my cable provider didn't provide a PBS station. It seemed weird, no PBS, but I learned to live it. After changing providers, I suddenly had PBS again.

Favorite Recipes of Famous Men

We are suckers for collections of recipes by "famous" folk. So naturally, Favorite Recipes of Famous Men a 1949 cookbook collection by Roy Ald is a great one.

Spoonbread and Strawberry Wine

There is not a single member of Norma Jean and Carole Darden's family that you want to hang out with. While most of them are gone now, they live on in this delightful cookbook and memoir.

Recipes from an Edwardian Country House

Recipes from an Edwardian Country House is a book that was repackaged from an earlier book. Frankly, I hate it when publishers do this sort of thing, as I often have

Wednesday, March 31, 2010

April Food Day


At Cookbook Of The Day, we spend all our time writing about FOOD. Food for us is abundant and exotic and just plain fun. We have never gone to bed hungry. We have never faced an empty shelf. We have never listened to children whose stomach growl because they did not have dinner.

If you read this blog, you probably love your cookbooks so here is the...

Cookbook Of The Day Challenge:

1. Go to your shelf and pull out your favorite cookbook.

2. Check the purchase price.

3. Donate that amount to Feeding America.


Here are a few of their statistics…


* Feeding America is annually providing food to 37 million Americans, including 14 million children. This is an increase of 46 percent over 2006, when we were feeding 25 million Americans, including 9 million children, each year.
* That means one in eight Americans now rely on Feeding America for food and groceries.
* Feeding America's nationwide network of food banks is feeding 1 million more Americans each week than we did in 2006.
* Thirty-six percent of the households served have at least one person working.
* More than one-third of client households report having to choose between food and other basic necessities, such as rent, utilities and medical care.
* The number of children the Feeding America network serves has increased by 50 percent since 2006.
* Feeding America food banks provide food and groceries to 33,500 food pantries, 4,500 soup kitchens and 3,600 emergency shelters.
* 68 percent of pantries, 42 percent of soup kitchens, and 15 percent of emergency shelters rely solely on volunteers and have no paid staff.
* 55 percent, are faith-based agencies affiliated with churches, mosques, synagogues and other religious organizations; 33 percent are other types of non-profit organizations.


For more info, check out the April Food Day blog.

Monday, March 29, 2010

BACON & CHEESE DEVILED EGGS FOR EASTER BRUNCH

If you are looking for a deviled egg recipe that is just a little different, this is a good one. The filling has crisp bacon and cheddar cheese in it and it is a great change. The filling is done in the food processor which produces a very creamy texture. I forgot to take a better photo of these before they went on the party table, but I quick snapped this one to give you an idea of how I decorated them.
12 hard boiled eggs
½ cup favorite salad dressing (I use mayonnaise)
4 strips of crisp fried bacon
¼ cup shredded cheddar cheese (I used medium)
1 level tablespoon prepared yellow mustard
2 tablespoons pickle juice (favorite flavor)
extra bacon for decoration (optional)
Cut the boiled eggs in half and put the yolks, salad dressing, bacon, cheese and mustard into a food processor. Process until it starts to get smooth, then...while running, pour in the pickle juice and process for another 20 seconds. This extra processing time will chop the bacon and cheese small enough AND it gives the filling a wonderful feel on the tongue.
Fill the egg white halves and top with a small piece of crisp bacon.

Friday, March 26, 2010

Famous Food Friday -- Len Deighton


As you know, I love the incredible, edible egg. I was flipping through an omelette book the other day and this clipping from London's The Observer fell out. I love finding things in old books. Well, Len Deighton, the famous mystery writer was also a bit of a cooking expert and a mighty fine illustrator. So, long before there were "graphic novels" Deighton did a graphic cookbook. Well, two actually, based on his cook strips for The Observer.


That's it.


Wait, actually, his most famous of these "cook strip" collection, Action Cook Book, has been reprinted in England. Perhaps it will soon be available in the U.S.

LIGHT AS AIR DONUT HOLES FOR THIS WEEKEND

This recipe comes from the April edition of Cooking Light...go figure. Why a fried donut recipe is in a magazine called Cooking Light, I'm not sure, but it is...I tried it, and they were delicious...light as air.
.
6 tablespoons warm water (see note)
¼ cup granulated sugar
1+ 1/8 teaspoons dry active yeast (I used 1¼)
6.75 ounces flour (about 1½ cups) divided (see note)
1/8 teaspoon salt
3 tablespoons sour cream
1 large egg, lightly beaten
6 cups peanut oil (I used vegetable oil)
.
Combine first 3 ingredients in a large bowl, let stand for 5 minutes or until bubbly. Weigh, or lightly spoon 5.63 ounces (about 1¼ cups) flour into dry measuring cups and level with a knife, add salt.
.
Add sour cream and lightly beaten egg to yeast mixture and mix until smooth. Add the flour mixture and mix until a moist dough forms. Turn dough out onto a lightly floured surface. Knead until smooth and elastic (about 3 minutes); add enough of the remaining flour (1 tablespoon at a time) to prevent dough from sticking to your hands. (dough will feel slightly sticky). See note.
.
Place dough in a bowl coated with cooking spray. Cover with plastic wrap and let it rise in a warm place (85 degrees) for 1 hour or until almost double in size. (see note)
.
Punch down dough. Divide into 36 equal portions; roll each portion into a ball. Cover dough with plastic wrap coated with cooking spray; let sit 30 minutes.
.
Fry in 375F oil, for 2 minutes or until golden and done. Drain donuts on paper towels. Glaze or roll in sugar.
.
OK, now that was their instructions...here's mine: I ended up using two cups of flour because their recommendation was simply not enough. I shaped the donut holes and placed them on a square of parchment paper that I had sprayed with cooking spray and then wiped off with a paper towel. This allows you to pick up each donut hole without deflating it.
Yeast dough's only cooperate with you if they are kept warm, so, either bring the egg and sour cream to room temperature before you use them, or sit your bowl of dough (and later your pan of shaped donut holes) over a large bowl of very warm water (the hottest water coming from your kitchen sink).

This dough was supposed to take only an hour to raise the first time. However, I didn't use room temperature ingredients, so it took almost 2 hours. Once I sat it over the bowl of warm water, the dough became beautifully light and fluffy.

.
I find that an electric skillet works well for frying donuts because you can set the temperature and it doesn't take all that much oil. Just make sure you flip them over every 30 seconds for a total fry time of 2 minutes.
Drain them, initially, on several layers of paper towels. Once drained, dip the hot donuts in a glaze or roll them in sugar.
Glaze
1½ cups powdered sugar
2 tablespoons maple syrup
2 tablespoons warm water
(I added a half teaspoon vanilla)
.
NOTE: Recipe starts with 6 tablespoons warm water. You can actually use fairly hot water in this step because the granulated sugar will cool down the water before you mix in the yeast.
.
NOTE: This recipe needs a lot more flour than is called for. I used two cups of flour (lightly spooned into a measuring cup and leveled off with a knife), and I didn't put it in 1 tablespoon at a time, like directions suggest, I just dumped it in.

Wednesday, March 24, 2010

INSTANT ITALIAN FLAT BREAD


I can't tell you how many times I've been asked for this recipe. They are quick to fix (out of ingredients that are always on hand) and they reheat well.
 
This super-simple recipe starts with a refrigerator biscuit that is rolled out flat and topped with a cheesy-herb mixture and baked. It's a great "go with" for any dinner..
.
10 ounce tube of refrigerator (flaky) biscuits
1/2 cup mayonnaise
2/3 cup grated Parmesan cheese (packed fairly tight)
1/4 teaspoon of dry basil leaves
1/4 teaspoon of dry oregano leaves
3 tablespoons of thinly slivered green onion tops1 clove of garlic (minced)
1/4 teaspoon black pepper
.
Mix everything together well (except the biscuits) and set aside. Separate refrigerator biscuits and roll each one out into a circle approximately 4” across.
.
Using your fingers, press on the center of the biscuit’s a little more, leaving the outer edge just a little bit thicker than the center (like a pizza). Divide cheese mixture evenly between the biscuits and spread it around (staying back from the edge).
.
Bake on lightly sprayed cookie sheet, at 350° for about 15 minutes or until golden around the edges.
..
NOTE: Change the kind of herbs if there is something you like better.
.
NOTE: I usually cook them for about 14½ minutes then turn the broiler on for about 30 seconds to give them just a little extra color (but watch them carefully). ..
NOTE: Don’t flour your counter before rolling out these biscuits.
.
NOTE: I've always used mayonnaise, I'm sure how Miracle Whip would taste.
.
NOTE: Any style of refrigerator biscuit will work.

Monday, March 22, 2010

SHORTBREAD MELTAWAY COOKIES

My Hubby has started a new hobby...wood turning and I couldn't be happier. I am quickly accumulating beauties like the piece below which is made out of birch (he harvests wind-fallen birch and spruce trees from the forest behind the house). He used to teach college level hand thrown pottery, so I'm guessing some of those skills have carried over to his new wood turning attempts. In any case, I am very happy with the results.

Today's Shortbread Meltaway Cookies are quick, easy and they literally do, melt in your mouth.
.
1 cup all purpose flour
½ cup cornstarch
½ cup powdered sugar
¾ cup butter (room temperature)
1 teaspoons vanilla
.
Cream the butter, in a stand mixer, until smooth. Add the rest of the ingredients and beat until the dough is well mixed and comes away from the sides of the bowl.
.
Roll dough into one inch balls and roll them in sugar. Place on ungreased cookie sheet and lightly press down with a fork. Bake at 350F for 10 to 12 minutes or until the outside edges of the cookie start to turn golden. Makes about 3 dozen cookies.


Sylvia's Family Soul Food Cookbook

I am having company from the great unwashed North tomorrow. Actually, from from the snowbound state of Vermont. My job is to provide a gigantic feast as they head west to Colorado. I am cooking up some seafood and as I told them... If I knew you were comin' I'd a baked a cake... since I did know they were comin' I asked for cake suggestions and Southern won out. so I am baking a red velvet cake. There are numerous recipes all basically the same, but I knew one of the best was in Sylvia's Family Soul Food Cookbook.

Sylvia Woods grew up in Hemingway, South Carolina. In the early sixties, she and her husband opened a small diner in Harlem. Not to be cliché but the rest is history. Reading Syvia's cookbook is like being in big friendly kitchen. There's Bedelia's Oven-Fried Chicken, Bert's Catfish Stew, Kenneth's Honey Lemon Tilefish and of course Sylvia's Red Velvet Cake.

Red Velvet Cake

Cake

2 1/2 cups sifted cake flour
2 teaspoons cocoa powder
1 teaspoon baking soda
1 teaspoon baking powder
1 teaspoon salt
1 1/2 cup sugar
1/2 cup unsalted butter, softened
2 large eggs
1 cup buttermilk
2 ounces red food coloring
1 teaspoon distilled white vinegar
1 teaspoon vanilla

Frosting

1 (8-ounce) package cream cheese, softened
1/2 cup unsalted butter or margarine, softened
1 pound box confectioners sugar
1 teaspoon vanilla extract
1 cup chopped pecans


For the cake:

Preheat the oven to 350 degrees F. Grease and flour 2 (9-inch) cake pans. In a medium bowl or on a piece of waxed paper, sift together flour, cocoa, baking soda, baking powder, and salt; set aside. In a large bowl, cream together sugar and butter. Beat in eggs one at a time.

Alternately add flour mixture and buttermilk. Beat in food coloring and vinegar, then add vanilla. Spread the batter evenly in the pans. Bake for 20 to 30 minutes or until a wooden toothpick inserted into the center comes out clean. Turn out onto a rack to cool.

For the frosting:

In a large bowl, cream the cream cheese and butter. Beat in confectioners sugar until fluffy. Beat in vanilla. Stir in pecans. Use frosting to fill and ice cake. Slice and serve on individual plates.

OK, here's the deal. I don;t like nuts so I don't use them. I know it makes the cake pretty. The other alternative is to take a the crumbs of the cake you get when you slice off a bit of the tops to make the cake sit evenly and crumble those up to place on the sides. Of course my other alternative so that NO cake shows through -- make extra frosting. Works for me.

Friday, March 19, 2010

Grace at Charleston

For more than fifty years, Grace Higgens worked at Charleston. She began as a housemaid for Vanessa Bell in 1920 and soon became angelica Bell's nursemaid. By 1935 she was housekeeper and cook. While she finally had enough money to purchase her parents house in 1959, she remained at Charleston with Vanessa Bell and then Duncan Grant. A collection of her recipes form a small booklet entitled Grace at Charleston.


Interior with Housemaid by Vanessa Bell, 1939

Higgens traveled frequently to France with the Bell's and it was there that she began to shine as a cook. Even Virginia Woolf once tried to steal her away from Vanessa. Alison Light wrote a wonderful book about domestic life in Bloomsbury entitled, Mrs. Woolf and the Servants. Check out the post over at Lucindaville.

Grace Higgens' recipes are simple and straightforward. steamed fish, chops and sausages and a sweet here and there. Here are just a couple.

Eggs Chasseur

Fry two or three chicken livers in butter with a dozen sliced mushrooms and a small piece of chopped shallot, salt and pepper. When the mixture has been well fried, set it round four eggs which have been well cooked, on an egg dish and serve it in the same dish.


Sausages in Sweet and Sour Sauce

1lb Pork sausages fried well. Add celery, onions, apples and carrots cut into pieces. cook slowly until soft, add 2 teaspoons cornflour, 2 teaspoons Worcester sauce and 1/2 pint stock.


Grace at Charleston, though small, is the closest thing to a Bloomsbury cookbook there is, an I find it to be a treasure.

PINEAPPLE SQUARES - THE PERFECT POTLUCK DESSERT

The great cooks over at Mennonite Girls Can Cook posted this recipe a few days ago. Their original recipe was for a 9" x 13" pan (I made a pie). It was a little soft for a pie, so next time I'm definitely making the 9"x13", but man-o-man is it delicious!!! It is super simple to throw together and it keeps beautifully in the fridge for 3 or 4 days. If you have a potluck, family gathering, or company coming this weekend, I hope you give this recipe a try; it will be a big hit with everyone from the little guys to Grandpa!! CRUST
2½ cups graham cracker crumbs (see note)
½ cup melted butter
(I added ¼ cup of white sugar)
Mix and press into a 9" x 13" baking dish and bake at 350F for 12 minutes then cool.
.
PUDDING LAYER
1 box vanilla pudding
2 cups milk
Cook per box directions and spread over cooled crust
NOTE: I used a 3.4 ounce of instant pudding
.
PINEAPPLE CREAM LAYER
1 large can of crushed pineapple drained well
2 cups whipping cream
1 teaspoon vanilla
2 tablespoons white sugar
Whip the cream, vanilla and sugar together until you get stiff peaks. Fold in the pineapple (I squeezed it dry with my hands) then spread the pineapple-cream over the pudding layer. Chill in the fridge for several hours before serving.
NOTE: The original recipe on the MGCC site, said to reserve ¼ cup of the graham cracker crumbs to sprinkle over the top of the pineapple cream layer (for decoration).

Wednesday, March 17, 2010

A Taste of Ireland


Kiss me! I'm not the least bit Irish. But I am Southern and we will celebrate ANYTHING! So here's to all you Irish folk out there. Rumor has it you saved civilization, so grab a pint of Guinness for your trouble.

A Taste of Ireland is one of those small, specific books we love. A few recipes a lot of pictures and the author has a great name, Biddy White Lennon. Who wouldn't just love someone named Biddy White Lennon.

According to Biddy White Lennon, this is a favorite dish of Jonathan Swift, who was Dean of St. Patrick's Cathedral (the one in Dublin) and a writer... what was that book?? Gulliver's Travels.


Jonathan Swift by Charles Jervas

So here's a little something for St. Patty's Day...


Dublin Coddle

450 g/1 lb bacon bits*, or a streaky bacon joint, cubed
450 g/1 lb good quality (meaty) Irish breakfast sausages
3 large onions, peeled, and chopped
1¼ kg/3 lb floury potatoes, peeled
6 tablespoons fresh parsley, chopped
freshly ground black pepper to taste
500 ml/16 fl oz/2 cups water

*Bacon ‘bits’ are off-cuts from various types of bacon (both smoked and pale) and are sold cheaply in Dublin pork butchers’ shops specially for coddle. Normally they contain a fairly even mixture of fat and lean. Streaky bacon also works well; keep the skin on for more flavour.

Cut the potatoes into fairly large pieces (leave them whole if small). Chop the fresh parsley. Choose a heavy pot with a really tight-fitting lid. Put a generous layer of chopped onions on the bottom and then layer the other ingredients, giving each layer a generous twist of pepper. Bring to the boil, then reduce the heat to a bare simmer. Cover very tightly. Cook for 2–5 hours! The longer and slower the cooking, the better this dish will be. It cannot come to any harm providing the lid is really tight. A very low oven is best, set at 120°C/250°F/Gas ½.

This dish is a famous Irish "funeral food" as you can stick it in an oven and basically cook it for hours without much harm.

Now get out there and start drinking! Éirinn go brách!

KATY'S CHICKEN

Katy is one of the sweetest souls I've met in the blogging world. Her web page is called Food for a Hungry Soul; do yourself a favor and check out her recipes. I especially enjoy her chicken recipes because her "Ole Sweetie-Pi" and my "Picky-picky Hubby" have very similar taste when it comes to anything more elaborate than red meat and potatoes.

Katy's original title for today's post was Oven Fried Chicken with Honey Butter Sauce...however at our house, we just called Katy's chicken and it is delicious!! Thanks for sharing the recipe Katy.


1 tender frying chicken, cut up for frying
1 cup flour
2 teaspoons salt
1/4 teaspoon pepper
2 teaspoons paprika
1/2 cup butter

SAUCE
1/4 cup melted butter
1/4 cup honey
1/4 cup lemon juice (I used pineapple)
(I added a pinch of dry red pepper flakes)


Dip chicken pieces into mixture of flour, salt, pepper, and paprika. Melt one stick butter in a shallow baking pan in a hot oven (400 degrees). Remove pan from oven. Arrange chicken in single layer in pan, turning to coat with butter. Bake skin side down at(400F) 30 minutes. Turn chicken.

For the sauce, melt 1/4 cup butter and add the honey and lemon juice. Pour the sauce over chicken and bake another 30 minutes or until fork-tender. Baste often, with the sauce, during last 15 minutes of baking,

I decided to use 4 boneless skinless chicken breasts instead of a whole chicken. Assuming I wouldn't need as much flour mixture, I followed Katy’s directions (well almost) and made only half of the flour mixture. I also substituted pineapple juice for the lemon juice. I baked the floured chicken breasts 25 minutes at 400F and then covered them with the sauce and baked them for another 20 minutes (basting them with the sauce every 5 minutes or so).

This recipe is so simple yet produces an extremely tender and juicy chicken breast. I made a few extra and we are looking forward to making some great chicken sammie’s tomorrow.


Sunday, March 14, 2010

(TWIX COPYCAT) CHOCOLATE-CARAMEL-SHORTBREAD COOKIES

A few days ago, I spotted an intriguing recipe on someones web page, however, in my haste I didn't take note of who's page it was (thank you to everyone who helped with page suggestions). Instead I found a similar recipe and gave it a try (with a couple minor changes). My first "taste testers" were a group of old grizzled snowmachine groupies in Hubby's shop and the treats disappeared instantly.


Next, I made some to take to our granddaughters 14th birthday party; they were a hit there as well. It is unfortunate that these cookies are called Twix cookies, because they are vastly better than ANY Twix candy bar I've ever eaten. There is a sweet crispy shortbread cookie base, topped with a nice thick layer of caramel made from sweetened condensed milk, and then they are topped with your favorite flavor of melted chocolate. These cookies are totally addicting and the recipe is going straight into my FIVE STAR recipe folder.

COOKIE BASE
1 cup cold butter
2 generous cups all purpose flour
heaping ½ cup brown sugar (I used dark)


Put all the of cookie ingredients into the food processor and pulse until it just starts to bind together. It won't go completely together, but if you watch it while you pulse, you will see the consistency change and small "clumps" appear.


Press this mixture into a parchment paper lined 9x13 baking dish (I left the ends of the parchment paper long, so I could grab them and lift the final product out of the pan for easier cutting). Bake in preheated 350F oven for 20-25 minutes or until edges are light golden. (see note below)

While the crust is baking, make the caramel filling:
.
¾ cup butter
generous ½ cup brown sugar (I used dark)
3 tablespoons Karo corn syrup
14 ounce can sweetened condensed milk (not evaporated)
.
In a heavy bottomed saucepan, mix all of the caramel ingredients. Heat (and stir constantly) on medium high heat until it comes to a boil. At first, the melted butter will sort of float on top, but as it cooks (and you stir) it will incorporate. See note below for burner temperature suggestions. Reduce heat and simmer for 6-8 minutes, stirring constantly. Pour over pre-baked cookie base. Refrigerate until caramel layer is cold and firm to the touch.
.
Melt 12 ounces of your favorite flavor chocolate (I used milk chocolate) + a teaspoon of butter. Stir until smooth and pourable (I just melted mine in the microwave for 60 seconds). Spread over cooled caramel and return to the fridge to let the chocolate set (I actually speed set mine in the freezer).
.
Cut into small squares and serve. These are really rich, so I cut them into squares just a little bigger than 1" x 1".
.
NOTE: The recipe calls for "2 generous cups of flour"...whats up with that? I measured my flour and sugar in the standard way then added a tablespoon extra per cup. I'm not sure if that is what the original recipe meant, but it worked well for me.
.
NOTE: The ingredient amounts for the cookie crust are way off track in the original recipe. I only used about 2/3 of the crumbs for the cookie base and it was perfect. If you like a thick cookie base, use all of the crumbs.
.
NOTE: My burner settings go from 1 to 10. I brought the caramel ingredients up to a boil at setting 8 (medium high), then quickly turned it down to setting 5 (medium) for a couple of minutes, and finally ended up on setting 3 (low); cooking for a total of 6 minutes. The caramel will be pretty thick, so keep reducing the heat until the caramel. The caramel traps and holds the heat for a long time, so start turning down your burner before it gets to that wild-boil stage.
.
NOTE: I found this recipe (dated 2008) on a web page called The Domestic Side of Life.

Friday, March 12, 2010

In an Eighteenth Century Kitchen


In our ongoing desire to do as little work as possible, we are offering up Famous Food Friday from Lucindaville. But you know that by now! Today's Famous Food Friday has a good bit of gardening involved as we are featuring Beverley Nichols. This is also a bit of a departure as Beverley Nichols didn't actually write his cookbook, he merely found it. Still we are giving him a pass because we like him. (Also we have been working on a gigantic "Brideshead" post and Beverly Nichols knew Evelyn Waugh whom he often refered to as "The Waugh of the Poses" because he believed Waugh to be a bigger poseur than he was!. Seriously, how can you not like someone that funny, but I digress...)


Beverly Nichols is often thought of as a “garden writer” but he was so much more. Nichols was a prolific writer, a novelist, a composer and yes, a gardener. Osbert Sitwell described Beverley Nichols as the original "bright young thing." He “ghosted’ the famous diva Nellie Melba’s memoirs. He wrote a series of detective novels, several books about cats, and even some children’s books. Still, he is best know for his book Down The Garden Path which has been in print for over 75 years.

Beverly Nichols believed he had found a dream garden at a Tudor cottage in Glatton, Cambridgeshire. He knew of his reputation as an urbane and witty aesthete and he calculated that writing a book on gardening would appeal to the masses. Ironically, this calculation would begin his reign as a “garden” writer.


Nichol's "dream" garden before...


Nichols dream garden was a nightmare, but his vision remained in tact and as he wrote about his adventures, which he found as easy to write as years of readers have found it easy to read.


...and after


Down the Garden Path would be followed by A Thatched Roof and finally A Village in a Valley.


The Thatched Cottage


He changed the name of Glatton to Allways, a play on the popular Irving Berlin song, Always. In A Thatched Roof, Nichols writes of finding a cookbook tucked in a cupboard:

“Eagerly we leant over that book in the fading light – a golden October sunset that flooded onto the yellowing paper – yellow to yellow, with the grave black letters dancing before our eyes, as thought they were overjoyed to be read again. As we tuned the pages it seemed that there was a scent in the old room of ghastly sweetmeats; there drifted back to us the perfume of curious country wines, the aroma of forgotten preserves, the bitter-sweet flavor of kitchens which have long crumbled to dust.”


Nichols kept the book for thirty years before turning it over to Dr. Dennis Rhodes who meticulously researched the cookbook. The manuscript was printed on paper watermarked with a coat of arms and sometimes the word “Company”. That would suggest the paper itself came fro the Company of White Paper Makers whose main activity was between 1686 and 1698. In 1968, Cecil and Amelia Woolf published the manuscript. In an Eighteenth Century Kitchen featured illustrations by Duncan Grant.

To Preserve Damsons

Take a pound of sugar & Clarifie it & boy it to a full syrup & put a pound of yo Damsons into it & lett them boyl very leasurely till they are very tender yn set them to coole & 3 day after pour ye sirrup from them and put half a pint of Apple water into it & boyl it’s self till it is boyled to a quacking jelly & take ye scum off from it yn put it to yor Dansoms again boyling hot & so keep them for your use.


Spring is in the air and it is a great time to drag out your Beverley Nichol's books and give them a second look. Not to mention that there have recently been several nice reprints of his works.

CHOCOLATE - BANANA BREAD

Yep, you read it correctly, chocolate banana bread, and it is really good!! The chocolate (cocoa and chocolate chips) lend the predominate flavor, but you can still taste the banana AND the fruit keeps the bread extremely moist.


1  1/4  cups of mashed bananas
1/3 cup vegetable oil
1 teaspoon vanilla
1 cup white sugar
2 eggs
1  1/2 cups all purpose flour
1/2 cup baking cocoa
1 teaspoon baking soda
1/2 teaspoon  salt
1 cup chopped pecans
1 cup semi-sweet mini chocolate chips (a must)
..
Beat all of the wet ingredients and sugar together until well combined and smooth. Beat in the dry ingredients just until combined then stir in the nuts and chocolate chips.
.
Bake the bread in a greased 8" x 4" loaf pan, in a pre-heated 350F oven for 60 to 70 minutes or until toothpick tests clean (see note below). Cool bread in pan, on rack, for 15 minutes, then remove from pan . Immediately, wrap hot bread with plastic wrap and cool, this will seal in all of the moisture......important step.


If you click on the (above) photo, you can see the melted chocolate chips...a slice of this bread, heated in the microwave for 10 seconds or so, will satisfy any serious choco-holic.


 NOTE: I'm not a big fan of baking all that batter in a single 8" x 4" loaf pan for over an hour. That always seems to produce a lot of hard crusty corners. I much prefer to make two smaller loaves which bake in about 45 minutes. Whatever pan size you use, try the toothpick test for doneness. When you remove the toothpick, you will see some melted chocolate chips on the toothpick, but no gooey batter.
.
NOTE: Yes, that is snow (higher than my kitchen window) in that last photo. Snow also accounts for the ultra-bright window-light in the first photo. We live at the base of a mountain pass and we get a lot of snow...but, hey, it's nearly mid-March, so this is even a lot of snow for us. Tonight it's zero again. I heard on the radio today that the Iditarod dog team racers are experiencing 35 below zero this week!!

Wednesday, March 10, 2010

The Organic Dog Biscuit Cookbook


Last year we did a post featuring a cookbook for you lovely cats. My friend Ann read it and being a big “dog” person decided I needed a dog cookbook and she finally found one she liked.

It seems these two rational humans, Jessica Disbrow Talley and her husband Eric decided to start a dog bakery. Hey, this is America, if you want to start a dog bakery, you go right ahead. So they did and the Bubba Rose Biscuit Company was born. Judging from their successes, there are lots and lots of people who desperately wanted to take their dogs to a bakery and buy them treats. That was 2006 and 2 years later they published a cookbook. The Organic Dog Biscuit Cookbook came equipped with its own bone-shaped biscuit cutter.

So I began to find a recipe to cook for Ann’s dogs, Penny and Boomer. They were banned from Doe Run Farm several years back due to an unfortunate chicken killing incident. Well, they were bread to be bird dogs, so I don’t fully blame Boomer. He was kind of like Lennie in Of Mice and Men. He just wanted to make friends with a chicken and play with her. Alas, Boomer weighs in at 80 pounds and the chicken weighed in at 3 pounds so it wasn’t a fair play date.

Penny under the watchful eye of Djuna

Anyway, I decided to make some organic dog biscuits since Ann sent me the cookbook and the nifty bone-cutter. First, let me say, these recipes are long and dogs evidently have delicate little constitution and they can’t eat wheat and they can’t eat chocolate and they can’t eat macadamia nuts and they can’t eat raisins and they are allergic to soy and corn and wheat. Seriously, get a cat!! But I digress…

Actually, dogs CAN eat all those things, but they MAY not because they will get all sick and if they don’t die they will incur copious vet bills. My cats have a $300 limit on vet bills and they are way too smart to eat chocolate covered raisin/macadamia nut clusters.

Here is a recipe for some plain cheese biscuits.

Cheese, Please

1 1/2 c. oat flour
1 1/2 c. brown rice flour
1 c. shredded cheese
1/2 cup grated Parmesan
1 egg
1 c. water

Preheat oven to 350F. Combine all ingredients and mix thoroughly until dough forms. Roll the dough out on a lightly floured surface to 1/4” thickness. Use a cookie cutter to cut out shapes. Place on an ungreased cookie sheet (they can be close together as they don’t spread much while cooking).

Bake 20-25 minutes or until golden brown. Remove from the oven and let cool completely on a wire rack. Store in an airtight container in the refrigerator.


The good news is, if your dog won’t eat them, you can. Go ahead, eat up, you will need your strength when you go out to adopt your cat.


P.S. I know YOUR dog is god’s gift to canineness, so don’t be offended by my clear feline bias.

Tuesday, March 9, 2010

The White House Family Cookbook

My fried Anne got an e-mail from a friend way across the pond asking about an old White House cookbook they used to cook from. Alas, they had no title,no author, no real remembrance of the cover, but they did remember that it had menus and was early 20th century.

Anne asked me if I had any such White house cookbook, and though I didn't it got me thinking about the ones I did have. I read recently that Henry Haller has updated his White House Family Cookbook to include more current presidential families. I don't mind the old White House families.

Here is a classic from the past. It's not hard to think of poor Pat Nixon being stuck in tricky Dick's kitchen making him a meatloaf.

Pat Nixon's Meat Loaf

2 tablespoons butter
1 cup finely chopped onions
2 garlic cloves, minced
3 slices white bead
1 cup milk
2 pounds lean ground beef
2 eggs, lightly beaten
1 tablespoon salt
4 twists freshly ground black pepper
1 tablespoon chopped fresh parsley
1/2 teaspoon dried thyme
1/2 teaspoon dried marjoram
2 tablespoons tomato puree
2 tablespoons bread crumbs


1. Grease a 13-by-9-inch baking pan.

2. Melt butter in a saute pan, add onions and garlic and saute until just golden. (Do not brown.) Let cool.

3. Dice bread and soak it in milk.

4. In a large mixing bowl, mix ground beef by hand with sauteed vegetables and bread pieces. Add eggs, salt, pepper, parsley, thyme and marjoram and mix by hand in a circular motion.

5. Turn into the prepared baking pan and pat into a loaf shape, leaving at least one inch of space around the edges to allow fat to run off.

6. Brush the top with the tomato puree and sprinkle with bread crumbs. Refrigerate for 1 hour to allow the flavors to penetrate and to firm up the loaf.

7. Preheat the oven to 375 F.

8. Bake on lower shelf of preheated oven for 1 hour, or until meat is cooked through. Pour off accumulated fat several times while baking and after meat is fully cooked. Let stand on wire rack for five minutes before slicing.


I don't know about you, but this meatloaf is about the best thing from the Nixon administration!

Monday, March 8, 2010

ORANGE JELLY - A LITTLE BIT OF SUNSHINE FOR A WINTERS DAY

We woke up to 9 inches of fresh snow this morning and my hopes for an early spring flew out the window. This is the time of year that I get into a real cooking rut, so much so, that even my stock of homemade jam seems boring.
.
To combat that, every year about this time, I make a quick batch of this orange jelly for our morning toast. All it takes is 4 oranges, 2 lemons and some sugar, to make this delicious taste of summer...it is not a marmalade.

I still remember the first time I bought marmalade for my family...they hated it. Well, they hated the "chunks" (and so did I), although the jam in between the chunks was tasty (does that make sense?). That is when I decided to create an orange jam that had no chunks...this is it.

4 medium oranges
2 medium lemons
1/8 teaspoon baking soda
1½ cups water
5 cups granulated sugar
1 pouch Sure Jell liquid fruit pectin

Wash and dry the oranges and lemons. Using a very fine zester, remove the colored part of the fruit. Make sure you don't go deep into the fruit or you will get the white pith, which can be bitter. Set the zest aside.
Peel and cut up the oranges and lemons, then pulse them in the food processor until they look like this, then set them aside.

Put the orange and lemon zest into a heavy bottomed sauce pan and add 1½ cups of water and the baking soda. Bring to a boil over high heat, then turn it down to a simmer, cover and simmer (stirring occasionally) for 20 minutes.
.
After 20 minutes, add the chopped oranges and lemons and simmer for another 10 minutes.
.
Put the cooked fruit-zest mixture through a fine mesh strainer and measure off 3 cups of juice.
.
Place exactly 3 cups of strained juice into a large heavy bottomed saucepan and add the sugar. Bring mixture to a full rolling boil over high heat, stirring constantly. Stir in liquid pectin and return to a full rolling boil for exactly one minute, stirring constantly. Remove from heat and skim off any foam with a metal spoon.
..
Immediately pour into prepared jars, filling to within 1/8" of the top. Wipe jar rims and threads. Cover with 2-piece lids and screw bands on tightly. Process jars in a hot water bath for 10 minutes.

This jam is not only great for your morning toast, but it works excellently for glazing chicken.

NOTE: Because this is a citrus jam, it can take up to a week to full set, but it is SO worth the wait.

Friday, March 5, 2010

Alfred Lunt's Cookbook

"Every time I was visiting with the Lunts in
Genesee Depot I was in a sort of daze of
wonder...the dining room, the table, the
china, the silver, the food,the
extraordinary care and beauty and taste...
a sort of dream, a vision."

Katherine Hepburn


Today's cookbook is stolen from Lucindaville's Famous Food Friday post. This cookbook is written by none other than that famous Broadway star, Alfred Lunt. When Alfred Lunt and Lynn Fontanne retired from the stage they moved to an estate in Wisconsin to become gentlepeople farmers.


Lunt and Fontanne were married for 55 years. Alfred died in 1977 at age 84 and six years later Lynn died at age 95. Their estate Ten Chimneys was dangerously close to being bulldozed and developed when a group of civic leaders gathered together and saved Ten Chimneys and set up a foundation to restore the property. (Bless their hearts!)

In the process of restoration they found Alfred Lunt's hand-typed cookbook pages tucked in a closet. After writing several Famous Food Fridays, I can assure you that Famous Foodies fall into basically three categories:

The Famous who produce a cookbook with recipes they EATS, but the cook cooks

The Famous who are talented amateur cooks

and

The Famous who are famous and also trained cooks

Alfred Lunt falls into the last category. At age 65 and needing a new career path, Lunt enrolled at Le Cordon Bleu and graduated as Lynn Fontanne would say, "with flying saucepans." Lunt seriously considered writing a cookbook but it never saw the light of day until the recipes were discovered and the Ten Chimneys Foundation published them. This edition is artfully titled the "tester's" edition as the recipes were published as found. The Foundation encourages anyone who gives the recipes a try to sent them feedback. In the meantime, it is worth checking out their site and if you are in the Wisconsin area, tours of the property are available. You can also purchase a copy of the cookbook on the website to add to your collection.


Recently, my friend Harry Lowe and I were talking about eating salmon croquettes when we were little. Harry Lowe decided he was going to try and recreate his mother's recipe. I was thinking of those salmon croquettes when I saw this recipe. It is for a salmon mousse. I still have my mother's goofy fish mold that saw more than its share of fishy mousses. I always remember them as being graciously complicated and fussy. Alfred Lunt seems to have eliminated such fuss.

Alfred's Canned Salmon Mousse

1 pound tin salmon, drained, skinned, and boned
juice of 1/2 lemon
3 heaping Tbsp. mayonnaise
3 heaping Tbsp, heavy cream
1 packet plain gelatin, dissolved in 1/2 cup water
fresh dill, minced, to taste

Put all ingredients in blender. Mix well, pour into serving dish, refrigerate at least four hours. It is better made the day before. This recipe, doubled, feeds six.

If my mother had used this recipe, she could have spent more time indulging in cocktails!

I am definitely dragging out the fish tin.

Thursday, March 4, 2010

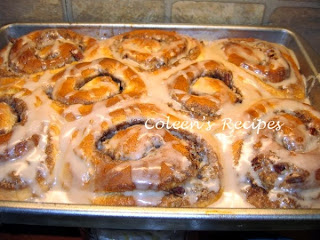
BEST EVER (NO KNEAD) CINNAMON ROLLS

I thought I had the best cinnamon roll recipe, but oh my goodness..."Katy bar the door" --- drop everything and try this recipe. Here's why:
.
1. The dough is light and fluffy, not "bready"
2. There is no kneading, but it sure tastes like there is
3. The flavor is outstanding!!
4. They have the texture of a good donut
5. Covered, they stay fresh and delicious for 2-3 days
6. They freeze beautifully

Do I have your attention yet? Click on this photo so you can see the light and airy texture of the baked rolls.


2 cups buttermilk
1/2  cup vegetable oil
1/2 cup sugar

1 packet dry active yeast (I use 1 tablespoon)
4  1/2 cup all purpose flour (DIVIDED)
1/2  teaspoon baking powder
1/2 teaspoon baking soda

FILLING
3/4  brown sugar
2 teaspoons cinnamon
pinch of salt

1 cup chopped pecans
2 tablespoons butter (soft)

Mix the buttermilk, vegetable oil and sugar in a saucepan and warm this mixture to just before the boiling point… (see note) then remove from heat let it cool down then stir in dry yeast. Let this mixture sit for a few minutes to let the yeast bloom.

Add 4 (of the 4½ cups) of flour to the buttermilk mixture and stir well (no need to knead, just mix well). Dough at this stage will be extremely sticky and more like a thick batter. Cover dough with plastic wrap and let it sit in a warm place for an hour.

In a small, separate bowl, mix the final ½ cup of flour, baking powder, baking soda and salt. After the sticky dough has rested/raised for an hour, stir it down and add this final half cup flour mixture. Mix until well incorporated (by hand or electric mixer)...just takes a minute.
 

Turn batter (which will still be quite soft and sticky) out onto WELL-floured counter and roll the dough around a few times, coating the surface with flour so it is not so sticky. Roll (or pat) dough out into a rectangle that is about ½” thick. Spread dough surface with 2 tablespoons butter then evenly spread on the filling ingredients and top with nuts (pat the nuts into the sugar a little). Roll up, jellyroll style, keeping it as tight as you can. Pinch the seam shut tightly. Cut 1½” slices and lay them, cut side down, in a greased 9x13 baking dish. Cover with plastic wrap and let rise for 30 minutes. Bake in pre-heated 375F oven for about 20 minutes or until golden and they sound hollow when you tap on them. Drizzle with glaze while the rolls are still hot.

MAPLE GLAZE

1 + 1/3 cups powdered sugar
1 teaspoon vanilla extract
½ teaspoon maple extract
2 OR 3 tablespoons milk


 NOTE: For the first step, I warm the buttermilk-vegetable oil mixture up in the microwave. I don't find it necessary to bring the buttermilk to "near boiling" like the instructions tell you to. I just microwave it until it feels good and warm (not hot) when I put my finger in it.

Tuesday, March 2, 2010

The Omelette Book

Narcissa Chamberlain and her husband, Samuel, wrote many classic cookbooks. As you know of our love for "egg" books, it is no wonder the The Omelette Book is one of our favorites.

In doing some research, I found this article from none other than Sports Illustrated from 23 March 1959 with a dashing Aly Khan on the cover. Sports Illustrated is probably the last place I would have looked for great omelette recipes!


How To Make A Perfect Omelet

Mary Frost Mabon

Because a lot of people don't seem to know how to beat an egg, I decided to write a book on omelets," said Narcissa Chamberlain. We were sitting, on a winter's day in Marblehead, Mass., before one of the six fireplaces that issue into a central chimney in the enchanting 17th century house which is called home by the much-traveled Chamberlains. The walls of every room, or so it seemed, were lined right up to the low ceilings with books—innumerable books, many of them cookbooks, ancient and modern. For the writings of erudite, gifted Samuel Chamberlain combine history and travel with lore about food and restaurants in many countries of the world.

His wife Narcissa and daughter Narcisse make their contribution in the kitchen, testing his discoveries and adapting exotic recipes for American use. The mother-daughter team also is responsible for the charming Chamberlain Calendar of French Cooking, published every year by Hastings House. But The Omelette Book, first published in 1955 by Alfred A. Knopf, Inc. and reprinted last year, is the creation of Narcissa Chamberlain alone. An English edition has appeared, and Das Omelett Buch is making her famous in West Germany. The book contains nearly 300 recipes for omelets, with a choice of Spanish, Italian, Russian and Chinese versions, besides many variations of the classic French dish.

But where does one begin? I asked Mrs. Chamberlain to describe the essential steps in preparing the basic French omelette. The first requirement, she specified, is the selection of impeccably fresh eggs and the best butter. From that point on, here are the important things to know and do:

The pan should be the shape of a frying pan, but rounded inside, with "sloping shoulders"; it can be of heavyweight aluminum or of heavyweight French steel. It should be reserved for omelets only, and kept oiled, so as always to be "slidy"; wiped out with oil and soft paper before and after use, but never washed. (Adhering particles of egg may be removed with coarse salt and oil.) A new pan must be seasoned by heating oil in it very slowly. Use a pan about 10 inches in top diameter for a 5- or 6-egg omelet for 4 people; for a larger number of people, cook several omelets successively.

Beating the eggs: The eggs, broken in a bowl, with salt and pepper and half a teaspoon of water per egg (milk makes an omelet tough), should never be beaten with an egg beater as this thins them—"takes all the joy out of them," Mrs. Chamberlain said, "unless they are beaten for a very long time." She continued: "I use only a fork, and beat towards me. I beat the eggs for just 30 seconds or a few seconds more, but I beat very, very vigorously; 45 seconds is probably about right for most people."

Cooking the omelet: "The place where many cooks go wrong is in heating the pan too fast. Warm it slowly over medium heat; it is at the right temperature when a tiny bit of butter sizzles but does not turn brown. Now add a few drops of oil to keep the pan 'slidy,' together with the amount of butter required (a generous tablespoon for a 6-egg omelet). Tilt and turn the pan to coat its surface; cook on moderate heat till the frothing bubbles of butter have subsided. Now, in go the seasoned eggs. Stir around with the flat of a fork a couple of times, tilt the pan, and shake back and forth as the eggs set, to keep the omelet slipping and free. Lift edges here and there to let the liquid part run under."

To fold and turn out: "While the surface of the eggs is still soft, grasp the handle of the pan with your left hand from underneath (see picture opposite), and with a rubber spatula or scraper held in the right hand fold the omelet over from left side to center. Tilt the pan so that the omelet slips to the edge of the pan. Now, discarding the spatula, hold a platter with your right hand close up to the omelet pan, and with your left hand turn the pan completely over on it. The omelet, neatly folded, should then be in position on the platter."

Once these instructions for the plain omelet have been mastered, there are many exciting changes to be tried—the addition of fresh herbs or grated cheese in the omelet itself, or of delicate vegetables such as okra or fresh asparagus tips in a slit made lengthwise in the top surface, or the swathing of the omelet in a rich sauce. Here, from Narcissa Chamberlain, is one example of the possibilities:

SHRIMP OMELET MIREPOIX

(A savory sauce for an omelet serving 4)


4 teaspoons butter
2 tablespoons grated raw carrot
2 tablespoons minced onion
1/2 teaspoon fine-chopped parsley
small piece celery with leaves, chopped fine
half a bay leaf
small pinch marjoram
small pinch thyme
salt and pepper
2 tablespoons plus 1 teaspoon tomato paste
1/4 cup dry white wine
1/4 cup clear chicken broth
1 teaspoon brandy
1/2 cup diced cooked shrimp

Melt butter in a small, heavy pan. Add minced vegetables, herbs and seasoning, and sauté 6 to 8 minutes. Add tomato paste, white wine, chicken broth and brandy. Cover and simmer for 15 minutes or until reduced by one third. Add diced shrimp and continue over fire until these are well heated. Spoon half the sauce over center of a 6-egg omelet before folding; pour rest of sauce over folded omelet on platter.


Here's a really great veggie omelette. I would have never thought of a corn omelette. This post has just been full of surprises.

Creamed Corn Omelette

Scrape the kernels from 2 ears of cold, boiled sweet corn and combine with about 1/4 cup rich cream sauce, or just enough to give a nice consistency. Reheat, season well, and fold into the center of a 6-egg omelette.

Honestly, I am thinking about going out and getting a subscription to SI. Well, probably not.