Recipes from an Edwardian Country House

Recipes from an Edwardian Country House is a book that was repackaged from an earlier book. Frankly, I hate it when publishers do this sort of thing, as I often have the first book and then end up with another copy of the same book .

Seasonal Recipes From The Garden

For a long time my cable provider didn't provide a PBS station. It seemed weird, no PBS, but I learned to live it. After changing providers, I suddenly had PBS again.

Favorite Recipes of Famous Men

We are suckers for collections of recipes by "famous" folk. So naturally, Favorite Recipes of Famous Men a 1949 cookbook collection by Roy Ald is a great one.

Spoonbread and Strawberry Wine

There is not a single member of Norma Jean and Carole Darden's family that you want to hang out with. While most of them are gone now, they live on in this delightful cookbook and memoir.

Recipes from an Edwardian Country House

Recipes from an Edwardian Country House is a book that was repackaged from an earlier book. Frankly, I hate it when publishers do this sort of thing, as I often have

Showing posts with label CHRISTMAS. Show all posts

Tuesday, January 6, 2015

Happy, happy...

Christmas, Holidays, Hanukkah, Kwanzaa, New Year, Birthday whatever else there is out there...

(Sorry in advance as no one cares about others illnesses but... )Woke up Christmas Eve morning with a bit of a cough.  Escalated from there.  Still a bit puny.  How puny one might ask?  Well pictured above is my Christmas haul of new cookbooks. (Thanks Ann, for checking the Wish List and to Catherine for a surprise.) I finally got around to looking at them today!  Yes, today.

Needless to say, there will be much to write about in the coming year...

Friday, December 12, 2014

The Pastry Queen Christmas


Christmas is upon us and we have yet to feature a Christmas cookbook, so allow us to rectify that oversight.  Many years ago, we featured the Rebecca Rather's first cookbook, The Pastry Queen.  She returned in 2007 with The Pastry Queen Christmas.  


Rather owns the Rather Sweet Bakery and Cafe in the land of Texas.  Like much of Texas, everything is big. Her first cookbook, features on its cover, meringue tarts with meringue that towers over the actual tart.  Because frankly, meringue should run about three or four times as high as the pie it is sitting on.

The book does try to skews toward Christmas, with recipes including peppermint, cranberries, pumpkin, spiced claret and the like, it is really a fine cold weather cookbook.  Yes, Texas stays pretty warm, but go with us on this. It also leans toward the spirit of place, featuring such Tex/Mex faves as Frito pie, quesadillas, sopaipillas, and cowboy coffee.  Combining two traditions offers up some fun ideas for holiday entertaining.

Every holiday season has its signature cake.  That cake that gets baked only once a year.  that cake that disappears in one sitting.  That cake you crave all year long.  For Rather it is a coconut cake.  It is a long and somewhat involved recipe, but one that have heads turning.  Like most of these cakes, Rather's comes from a recipe by her Great-Aunt Molly.  Various cousins have changed the recipe a bit, but this is the one Rather is sticking with.

Christmas Coconut Cake

1 cup (2 sticks) unsalted butter at room temperature
2 cups sugar
3 cups all-purpose flour
4 teaspoons baking powder
1/2 teaspoon kosher salt
1/4 cup whole milk
1/2 cup unsweetened coconut milk (available canned in the Asian section of most grocery stores, or see Tip)
1/4 cup coconut cream (Coco Lopez)
1 teaspoon vanilla extract
8 large egg whites at room temperature

Whipped Cream Filling

1 cup cold heavy whipping cream
2 tablespoons coconut cream (Coco Lopez)
1/2 cup grated fresh coconut (optional, see Tip)

Frosting

2 large egg whites
1 1/2 cups sugar
1/3 cup cold water
1/4 teaspoon cream of tartar
1/4 teaspoon kosher salt
1/2 cup mini marshmallows
1 teaspoon vanilla extract
3 to 4 cups unsweetened flaked coconut for decorating

Preparation

Place an oven rack in the bottom third of the oven and another in the top third of the oven. Preheat the oven to 350°F. Butter three 9-inch cake pans, then line each with a parchment paper round. Butter the paper and dust the pans with flour; knock out the excess.

Using an electric mixer fitted with the paddle attachment, cream the butter and sugar on medium-high speed until light and fluffy, about 3 minutes. Use a rubber spatula to scrape down the sides of the bowl. In a medium bowl, stir together the flour, baking powder, and salt to blend. In a small bowl, stir together the milk, coconut milk, and coconut cream until smooth. Add the flour mixture in 3 increments, alternating with the milk mixture in 2 increments, starting and ending with the flour mixture. After each addition, mix at low speed just to combine the ingredients. Stir in the vanilla. 

Using an electric mixer fitted with the whisk attachment, beat the egg whites on high speed until stiff peaks form. Gently fold the egg whites into the batter until evenly blended. Divide the cake batter evenly among the prepared cake pans.  Set two layers on the top rack and the third on the lower rack. Stagger the cake layers on the oven racks so no layer is directly under another. Bake for 35 minutes, or until a toothpick inserted in the middle of the cakes comes out clean.  Monitor the layers carefully for doneness; each one may be done at different times.  Remove from the oven and let cool in the pans for 10 minutes, then unmold onto wire racks to cool completely. 

To make the whipped cream filling:

Using an electric mixer fitted with the whisk attachment, beat the cream on high speed until soft peaks form. Beat in the coconut cream and the fresh coconut, if using. 

To make the frosting:

Whisk the egg whites, sugar, water, cream of tartar, and salt in a large stainless-steel bowl until thoroughly combined. Place the bowl over a saucepan filled with 2 inches of barely simmering water. Using a hand beater or handheld electric mixer, continue beating the egg white mixture for 4 minutes. Add the mini marshmallows in 2 increments while continuing to beat. Wait until the first batch of marshmallows has melted before adding the second. Continue beating for 2 to 3 minutes more, until stiff peaks form. Remove from the heat, stir in the vanilla, and continue beating until the frosting is thick enough to spread.
To assemble the cake:
Stack one cake layer on a serving plate and spread the top with half of the whipped cream filling. Repeat with a second layer. Stack the final cake layer on top of the first two and cover the cake’s top and sides with the frosting. Sprinkle the coconut on the top and sides of the cake. 

Cover the cake loosely with plastic wrap and store for 1 day at room temperature or up to 3 days in the refrigerator. Bring to room temperature before serving.

Tip:

It's challenging to press coconut into the sides of the cake. When pressing the coconut in, the icing invariably sticks to my fingers and mars the frosting's finish. I've discovered that throwing small handfuls of coconut toward the side of the cake makes it adhere quite well—a messy but effective technique for creating a gorgeous-looking cake.


Tip:

For those who want to follow Aunt Molly's original recipe, here are her directions for extracting coconut meat and liquid from a fresh coconut: "First buy a fresh coconut. To select the best one, shake it to listen for a lot of milk inside. Prepare the coconut by first making a hole or two in one end with a hammer and ice pick. Stand the coconut up over a small bowl or glass measuring cup to catch the milk as it drains out. Next, crack the hard outer shell with a hammer, then pry off the pieces. The inner white coconut meat can then be grated [with a handheld microplane grater]. Refrigerate both the milk and grated coconut until ready to use." 

If you are looking for s showstopping Christmas recipe, this one will do it!

Tuesday, December 24, 2013

Merry Christmas


Friday, December 20, 2013

FIVE STAR CARAMEL CORN

If you are looking for a last minute gift idea that is super easy to make and even more easy to "consume mass quantities" (as the Coneheads would say); you have to try this caramel corn recipe from the cooks over at Table for Seven. I've tried a lot of caramel corn recipes over the years, and this is BY FAR the best one EVER!!  As a matter of fact, picky-picky husband and I ate the entire batch in one evening, we just couldn't leave it alone!!


1 bag of microwave popcorn (see note)
1 cup brown sugar (I used dark brown)
1/4 cup Karo corn syrup (the clear kind)
2 teaspoons molasses
1/2 cup butter cut into cubes
1/4 teaspoon baking soda
1/2 teaspoon salt
1/2 teaspoon vanilla

Preheat your oven to 250° and lightly spray a large baking sheet (with sides) with vegetable spray, set aside.

In a sauce pan, bring the brown sugar, corn syrup, molasses, butter and salt to a simmer. Cook and stir until this mixture reaches 250° on a candy thermometer (it takes about 5 minutes).

While the mixture is simmering, pop the bag of popcorn in the microwave then spread it out on the prepared baking sheet and let it sit in the preheated oven to stay warm.

When the caramel mixture reaches 250°, remove it from the heat and stir in the baking soda and vanilla.  Stir until very well mixed (it will get just a little foamy).

Pour over the popped corn and stir to coat. Bake coated popcorn in the 250° oven for one hour, stirring every 15 minutes or so.

After it has baked one hour, turn it out onto some waxed paper and let it cool (doesn't take long). Once it is completely cool, break apart any larger pieces and store in an airtight container (or Ziploc bag).

NOTE: I used one bag of lightly salted microwave popcorn. Personally, I don't think I would use the heavy butter flavored variety, although I'm sure it would work.

NOTE: Let the candy coated spoons/utensils sit in a cup of hot water for a little while and the candy will dissolve and wash off easily.

NOTE: Make sure the baking sheet that you use has sides. I used my roaster pan and it worked well.  You just want the sides to be tall enough that, when you stir the caramel corn you won't lose any over the edge.

NOTE: Be careful while you are stirring this caramel sauce so you don't get it on your skin (it is dangerously hot).

Once you turn the finished caramel corn out onto waxed paper, it cools down very quickly.

NOTE: The final caramel corn is lightly crunchy and not at all sticky as long as you keep it in an airtight container.

Wednesday, December 4, 2013

BRANDY SNAPS

If you want to impress your guests, make some of these Brandy Snaps for them. They look so elegant and they are definitely not something you see on every dessert tray.

A hard candy shell filled with sweetened whipped cream...do I have your attention yet?  Pretty fool proof if you follow my extra tips below printed in RED, AND you can make them days in advance and fill them just before your guests arrive. 


BRANDY SNAPS


Brandy Snaps are basically a crisp, sweet, lacy, candy shell that you can fill with sweetened whipped cream or your favorite mousse.

They look very hard to make, but it is an illusion; they are pretty easy if you pay attention to the tips below in RED.

2 tablespoons sugar
2 tablespoons white corn syrup
1/4 cup butter  (I used only 3 tablespoons)
2 teaspoons brandy (or) 1 teaspoon vanilla (I used rum extract)
1/4 cup all purpose flour

Since this whole process goes VERY fast, it is best to have everything ready before you start cooking the above ingredients.

Preheat your oven to 350° and line a cookie sheet with parchment paper (important). These candy shells REALLY spread as they cook, so only plan on making six of them on each cookie sheet.

Mix the sugar, corn syrup and butter in a small saucepan. STIR over medium heat until the mixture is good and bubbling, then remove from heat and stir in the flour and flavoring.

Drop one measuring teaspoon (per candy shell) of the cooked mixture onto the parchment paper. This will spread out into a circle about 4" in diameter as it bakes for about 6 to 7 minutes, but watch them very carefully after six minutes, as they can go from caramel colored to DARK very fast. It sounds tricky, but it isn't.

My candy circles were fairly pale in color until they hit the 6 minute mark in my electric oven, but they were a beautiful light caramel color at 6 1/2 minutes.

When they have turned a nice light caramel color, remove from the oven and let them sit on the cookie sheet for about 30 seconds. If they look a little oily, LIGHTLY dab them with a paper towel.

Use a pointed knife and lift the edge of the candy circle up a little so that you can grab it with your fingers (be careful, this is VERY  hot). One at a time, quickly roll the candy circle around the handle of a wooden spoon (they will cool almost immediately and hold their shape).

Once you form it around the spoon handle, it will instantly be cool enough to slide the candy tube off of the handle, and it's done!! 

If the other candies get too "hard" to roll, put them back in the oven for 30 seconds or so (but that shouldn't be a problem, as they stay fairly pliable as long as they are on the hot cookie sheet), they only become rigid once they cool off.


I didn't use a spoon handle, I used some metal cannoli tubes I have and they worked perfectly (no need to grease the spoon handle).

Keep the cooled candy tubes in an air tight container until you are ready to serve them. Fill them with sweetened whipped cream (the candy tubes can be filled up to about an hour before serving).

Don't be scared off by any of my "warnings' about this recipe, it may sound complicated, but it really is pretty easy and I hope you try it.

NOTE: I substituted rum extract for the vanilla, the candy tasted like butterscotch. I think ANY extract would work.

NOTE: You don't have to fill these with whipped cream. Almost any mousse like whipped filling would work wonderfully.


Thursday, December 20, 2012

CHRISTMAS FUDGE

Christmas is almost here and everyone I know is running around looking for that last minute mini-gift for the mailman, a teacher, the newspaper boy or even the UPS man!!

This fudge recipe is the perfect answer!! Not only is it quick and easy to make, but it tastes great and I love that it can be made way ahead of schedule.


4 cups white sugar
1 twelve ounce can of evaporated milk
8 ounces of real butter (no margarine or spreads)

2 cups milk chocolate chips
1 cup semi-sweet chocolate chips
1 cup white chocolate chips
1 TABLESPOON vanilla
chopped nuts if desired (we like honey roasted peanuts)

In a heavy bottomed sauce pan, mix the white sugar and evaporated milk; bring it to a boil over medium high heat.  Once it is at a full rolling boil (one that you can not stir down), turn the heat down to medium and boil for 6½ minutes (stirring CONSTANTLY). I stir with a wooden spatula that has a square end and I stir in a figure 8 (the flat blade of the spoon really scrapes the  bottom of the pan well).

After 6½ minutes at a full rolling boil, remove the pan from the heat and add the butter, a TABLESPOON of vanilla and all of the chocolate.

At first the butter will sort of stay separate from everything, but if you use a whisk, it will incorporate quickly. When it's all smooth, add the nuts if you are using them (as many as you like).

Pour into a FOIL LINED 9" x 13" pan and cool overnight in the fridge. If you are using these cute little tin foil stars (instead of the 9" x 13" pan), you can just wrap them in clear cellophane bag (after they are chilled) and tie it up with a bright Christmas bow!!

 MERRY   CHRISTMAS   FRIENDS!!!

NOTE: You can make this with any flavor chocolate chips you like.
I've tried them all and the only one I DON'T recommend is using ALL semi-sweet. The three chocolate blend listed above results in a wonderful flavor (you won't taste the white chocolate, but it adds a lot to the final taste).

Note: Make sure you use a good quality butter, not a soft spread butter or a diet butter and definitely no margarine.

Monday, December 17, 2012

Christmas Memories With Recipes


Her is an oldie but goodie in the Christmas recipe genre.   Christmas Memories with Recipes was published in 1988.  It includes most of the big name food faces of the 70' and 80's.  This is very interesting as you look at all the foodie faces of today and wonder who will we still be talking about in 2050!

This is a wonderful collection featuring a young Martha Kostyra Stewart and Jaques Pepin to the august Maida Heatter and Craig Claiborne.  The stoically British Jane Grigson to the wildly Italian Edward Giobbi with a bit of Lee Bailey's Southern charm thrown in.

Basically, each person tells stories of their favorite Christmas memories and includes in the recipes that made it great.  For Edna Lewis, Christmas began in September when she was sent out to collect nuts for fruitcake.  IT was the children's job to gather the nuts, crack them and extract the meats from the shells.  Every sunny day in September, her mother set out to make the fruitcakes.  Through October and November they were doctored with spirits until they saturated for giving.    Here is her recipe.

Edna Lewis' Fruitcake 
1 cup diced glazed candied orange peel
1 cup diced glazed candied lemon peel
2 cups diced citron
1 cup currants
2 cups seedless raisins, chopped
1/2 cup dry red wine
1/2 cup brandy
3-1/2 cups all-purpose flour
1 teaspoon ground cinnamon
2 teaspoons freshly grated nutmeg
1/2 teaspoon ground cloves
1 teaspoon ground allspice
1/2 teaspoon ground mace
1 teaspoon baking powder
1/2 teaspoon salt
1 cup plus 6 tablespoons butter, room temperature
2 cups brown sugar
5 eggs, separated
1/2 cup sorghum molasses
Mix all the fruit in a large bowl and pour in the wine and brandy. Stir gently and set aside to marinate for a few hours.
Butter a 10-inch tube pan or two 9 x 5 x 3-inch loaf pans and line it (or them) with clean parchment paper. Butter the paper.
Sift the flour with the spices twice. Add the baking powder and salt and sift again.
Put the butter into a large mixing bowl and cream until satiny. Add sugar and, using an electric mixer, cream until light and fluffy. Beat the egg yolks slightly and then add them to the bowl. Mix the batter well before you start to add the flour-spice mixture. Stir the batter as you add the flour, a little at a time, stirring well after each addition. When the flour is thoroughly incorporated, add the molasses and stir. Finally, stir in the fruit and any soaking liquid in the bowl.
Put the egg whites in a grease-free bowl and beat with a clean beater until they hold stiff peaks. Fold them into the batter thoroughly and then spoon the batter into the prepared pan ( or pans ). Cover loosely with a clean cloth and let the batter sit overnight in a cool place to mellow.
On the next day, heat the oven to 250 degrees. Place the fruitcake on the middle rack of the oven and bake for 3-1/2 to 4 hours. After 1-1/2 hours, cover the pan with a piece of brown paper (do not use foil) or set the pan in a paper bag and return it to the oven.
When the cake has baked for 3-1/2 hours, remove it from the oven and listen closely for any quiet, bubbling noises. If you "hear" the cake, it needs more baking. Or test the cake with a toothpick or cake tester. If the toothpick or tester comes out of the center of the cake clean, the cake is ready to take from the oven. Put it on a wire rack to cool, still in the pan.
When the cake is completely cool, turn it out of the pan (pans), leaving the brown-paper lining on the cake. Wrap the cake with parchment, then aluminum foil, and pack the cake in a tin. Homemade fruitcakes need air, so punch a few holes in the lid of the tin or set the cover loosely on the tin.
Set the tin in a cool, undisturbed place, and every two or three weeks before Christmas, open the foil and sprinkle the cake with a liqueur glassful of brandy, wine, or whiskey. The liquor will keep the cake most and flavorful and help preserve it as well.

On Christmas morning her father would wake the children and set off Roman candles.  I am sure that today there are local ordinances that would prevent fireworks on Christmas, but fruitcake is still acceptable.

Saturday, December 15, 2012

GINGERBREAD HOUSE

Gingerbread houses make wonderful gifts. Not only are they easy (you really can't goof them up because frosting fixes everything) but they are an impressive GIFT FROM THE KITCHEN!!

You can make them out of gingerbread dough, like this one (it is delicious and smells fantastic), or you can make them out of graham crackers (glued together with royal frosting). You can make them simple or elegant. You can use any candy, cereal, cookies, crackers or pretzels you have on hand... let your imagination be your guide.
CLICK TO ENLARGE

Upside down (and frosted) ice cream sugar cones (decorated with sprinkles) make wonderful Christmas trees next to your gingerbread house. Pretzels make perfect fences, marshmallows make cute snowmen and if you really want to get fancy, you can use tufts of cotton candy coming out of a chimney for smoke and marshmallow cream frosted around the bottom of the gingerbread house makes wonderful snow ....the sky is the limit. Decorated gingerbread houses have a LONG shelf life if you use royal frosting (recipe below). It dries rock hard and is very strong.

5 cups all purpose flour
2 teaspoons ground cinnamon
2 teaspoons ground ginger
1/2 teaspoon ground cloves
1/2 teaspoon baking soda
1/2 teaspoon salt
1 cup vegetable shortening
1 cup sugar
1/2 cup molasses
2 eggs

Beat the shortening and sugar together until well mixed and creamy. Add the molasses and eggs and beat until well combined.

Combine the flour, spices, baking soda and salt and slowly add it to the shortening-sugar mixture; beat until everything is smooth. 

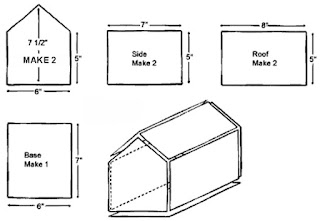
You will be rolling out the gingerbread house pieces on the BACK of ungreased cookie sheets. The reason for this is so that after you cut out the pieces, they don't have to be moved before baking and they won't get mis-shapen.


CLICK ON THIS PICTURE TO ENLARGE

Use the above measurements to make a pattern on paper or a manila folder, even waxed paper will work. Roll out some of the dough right on the back of a big cookie sheet, using a lightly floured rolling pin, to about 1/8" thick.

Lay the paper pattern pieces right on the rolled out dough and cut the dough out with a sharp knife. Remove any excess scraps so that just the gingerbread piece is left on the back of the cookie sheet. Using the BACK of the cookie sheet also makes it a lot easier to slide the baked cookie onto a cooling rack (no cookie sheet "edge" to deal with.

Bake the pieces in a pre-heated 350° oven for 10-12 minutes or until lightly golden around the edges. Let the baked pieces cool on the pan a little before you try to remove them. Cool them completely on a wire rack.

Now the fun starts!!

ROYAL FROSTING 
This is what you glue the pieces together with

3 1/2 cups powdered sugar
3 egg whites (if you are going to eat this use egg white powder)

In a large bowl, beat the sugar and egg whites until smooth. Place in a pastry bag with a star tip (or place in a resealable plastic bag and cut the corner off).

Use a large serving tray or a foil lined piece of heavy cardboard to hold the finished gingerbread house. Put a few dots of this royal frosting on the underside of the "floor" piece and stick it to the serving tray. This will keep it from sliding around if its moved.

Lay an end and one side of the gingerbread house down flat(where they are supposed to go) around the edges of the "floor". Pipe a generous line of the royal frosting around the edges of each piece.

Carefully lift and press the edges of one end of the house to the side of the house.Repeat for the other side.

Now, I've made these for years, and there is a trick I'll share with you.  Get the ends and sides up and use a little extra royal frosting on the seams but DON'T put on the roof until the next day.  If you wait until the next day, the walls will be VERY strong and there is no chance that the roof will be too heavy.

Day two, put the roof on and let the royal frosting harden until day three......now you are good to go, you can almost drive a truck over it after this point, and it won't break on you.

White tree's with sprinkles, green trees with sprinkles, pretzel fences, gum drop topped candy cane's, Necco shingles (frosted shredded wheat also makes great shingles).

This older photo is a "house" I made using chocolate graham crackers. I hope you try it. It might seem complicated, but once you make ONE......you'll be hooked.

NOTE: If your making this to eat (some people eat them, some people just display them), make the royal frosting using powdered egg whites (sold in the baking isle). If you are going to let little guys eat the gingerbread house..... use royal frosting to glue the structural pieces together, but use a softer frosting to embed the shingles or frost the trees. It makes it easier for the kids to "pick off" the candy goodies.
NOTE:  Royal frosting dries out almost instantly if it isn't covered with plastic wrap (that is why it makes such a great frosting "glue". Keep a wet dish towl over your frosting bowl while you work.

Monday, December 10, 2012

A Savannah Christmas

We have been rather enamoured of picture books lately.  A Savannah Christmas by Kimberly Ergul & Holley Jaakkola is a vision of Savannah at Christmas time.  OK, we admit it not so much a cookbook as a Savannah Wonderland with a handful of recipes.  Yes, you have to wade though page after page of gorgeous homes, lovely tables settings and wonderful rooms to find the recipes, but what better way to spend Christmas.

Let's face it.  You overdo everything at Christmas.  This book has everything you need:  pickled shrimp, warm pimento cheese, a red velvet cake and a big old vat of Chatham Artillery Punch.   Really you will be the talk of Christmas.  Throw in this classic from Martha Nesbit and you are good to go.

Crab Stew

6 tablespoons (3/4 stick) butter
1 cup green onions roughly cut
1/2 cup celery, roughly chopped
1 (2-inch) piece of carrot
6 tablespoons flour
2 1/2 cups milk
2 1/2 cups chicken broth, preferably homemade
1/4 teaspoon nutmeg
1/4 teaspoon white pepper
ı⁄8 teaspoon cayenne pepper
1 cup cream
1/4 cup sherry
1 pound claw crab meat, picked through for shells

Melt the butter over low heat in a saucepan. Mince the green onions, celery, and carrot in a food processor, or by hand. Add the vegetables to the butter, over the saucepan, and sauté over low heat for 5 minutes.

Whisk in the flour and cook for 2 minutes more to remove the starchy taste. Whisk in the milk and broth. Bring to a boil, whisking occasionally. Add seasonings, cream, sherry, and crab and mix. If you’re not serving immediately, refrigerate in an airtight container.

Reheat over very low heat until very hot.


It helps if you serve it on trays just like this.

Tuesday, November 27, 2012

Giving Tuesday


It's Giving Tuesday.  I'm not sure that Giving Tuesday should be stuck behind Thanksgiving Dinner, Black Friday, Small Business Saturday and Cyber Monday!  Who would have any leftover MONEY.   But it is a great idea.  

Harry, like many people who have ever given a dollar, gets tons of requests for charity.  So many we never know which one to give to.  When you give once, it seems they send a notice every other week.   (And I think that makes money for the company that is SENDING the requests and not the actual charity...but I digress.)  To combat this excess, we set aside Harry's birthday as the one day of the year to make ALL his charitable contributions. That way, we know who we have given to and we can throw away all those repetitious mailers. 

As for Giving Tuesday, you are probably broke, but here is my favorite charity:  Heifer International


In a survey 79% of Americans would rather have a charitable donation made in their name than to receive a gift they wouldn't use.   Make someone you love or like or whose name you got in the Secret Santa drawing HAPPY by donating to a good cause like Heifer International.


Sunday, December 25, 2011

Happy Christmas Cooking

Happy Cooking

Our newest little elf, Treat, wishes you and yours happy cooking during this holiday season.

Tuesday, September 20, 2011

A Recipe Request...


...from Amy.

Amy sent us this:
Thanks for featuring this cookbook Lucindaville. I remember it being a fantastic read and a great snapshot of some of the more popular recipes of the past. In there is a very special Christmas Plum pudding recipe. My ex's mum used to make this every Christmas and extra for me to last until July! In the break-up I unfortunately lost my pudding privileges and access to the recipe. There are no words to describe how amazing this pudding is! I think many women in my mum's generation might have experienced the same feeling I get from the first bite of the pudding, when they saw Richard Chamberlain take his clothes off in The Thornbirds way back then. So could I ask *pretty pretty please* for you to share the Plum Pudding recipe from the book? If anyone gets past the astounding number of ingredients required it really is worth all the effort!

We do so hate to lose recipes in a break-up. So here is Colleen's Christmas Pudding recipe.

Christmas Pudding

4 cups raisins
6 cups sultanas
1/2 cup chopped almonds
4 tablespoons chopped orange peel
4 tablespoons chopped lemon peel
1 cup glace cherries, chopped
2 cups brandy
450 g (1 lb) butter
1 cup dark brown sugar
8 large eggs
1 cup apple puree (or apple sauce)
1/2 cup orange juice
6 cups fresh soft bread crumbs
2 cups plain flour
2 tablespoons ground ginger
2 tablespoons ground cinnamon
2 tablespoons ground nutmeg
2 tablespoons ground allspice
1 tablespoon curry powder
1 teaspoon salt
1 teaspoon baking powder

Chop the fruit and almonds and orange and lemon peel, dust lightly with a little flour, and put in a basin overnight with the brandy poured over them.

Cream the butter and sugar, then beat in the eggs one by one, getting each one well absorbed before breaking in another. The mixture will look very curdled by the time the last egg is added, but this is quite normal for rich dark cakes and puddings, and as the flour is added the curdling disappears.

To the creamed butte/sugar with the eggs beaten in, add the apple puree and beat well, the orange juice and beat well.

To the liquid mixture, add the breadcrumbs a cup at a time, mixing well.

Sift the flour together with the spices, salt and baking powder, then stand the mixture aside in a basin.

To the liquid and breadcrumbs, add 2 cups of the soaked fruit, stirring well.

Add 1/2 cup of the flour, stirring well.

Add 2 more cups of the fruit, then 1/2 cup of the flour, and continue in this way until all the fruit and flour have been incorporated.You may find that this is impossible toward the end to mix with any other implement than your hands, so use your hands.

Make sure that you put into the pudding all the liquid that might have run out of the fruit soaked overnight. You don't want to lose any of the brandy!

Spread the pudding cloth, sprinkle it with flour except for the outer margins, then pile the pudding mixture in its center. Tie it up tightly and well with string.

Place the mixture tied in its cloth in a very large pot of boiling water, put the lid on the pot, and boil the pudding for 8 hours. As the water evaporates, replenish it with more boiling water - never add water which isn't boiling, and never let the pudding go off the boil.

It is best to make the pudding at least two weeks before Christmas, to permit it to mature.

You can add small silver coins to the mixture which is traditional for Christmas, but make certain they are silver coins, and do not use any of the modern Australian five and ten cent pieces which are amalgams of metals other than silver.

The pudding is served with brandy butter and hot custard.


When you make this, Amy, do send us photos. Merry Christmas!

Friday, December 24, 2010

Merry Christmas


Merry Christmas

from all the reicpes at

Cookbook Of The Day


Tuesday, December 14, 2010

EASY FRUIT LADDER

I've made this fruit ladder a million times. It is super simple, fast, looks impressive on any dinner table and is delicious. The dough works beautifully, is very forgiving and never fails!! You can make this ladder with any pre-cooked fruit filling (home made or commercial).


I have had people tell me this looks hard to make, but trust me, it is not. There is just one little trick: roll the dough out into a rectangle and then move it to your baking sheet BEFORE you try to make the ladder. You can't move the ladder (and keep it's shape) after it is filled. This dough is the real secret to this recipe.

Preheat oven to 350°

1 cup butter softened
1 cup sour cream
2 cups flour

Mix ingredients with an electric mixer (the dough will be a little sticky before it is chilled). Divide dough in half (this recipe makes TWO ladders). Put each ball of dough in some plastic wrap and rough it into a large disk shape…cover well and refrigerate 1 hour (extremely important).


After an hour, remove from fridge and flour your counter top and rolling pin. Roll one of the disks into a rectangle about 15” x 10”. Pick up the crust rectangle (it will not break) and lay it on a lightly greased baking sheet.

Now I could describe, at length how to do this next step, but a picture will describe it much quicker:


Find the center of your crust rectangle, and spread your fruit filling in a 3” wide strip, long-wise, right down the center of the rectangle (keep the fruit about an inch away from each end of the ladder). Each ladder will take ½ can of commercial fruit filling.
.

Cut the dough, on both sides of the fruit, into equal strips, but be sure you stay about an inch away from the fruit filling. Pull the strips back over the fruit (one at a time) in a criss-cross fashion (the strips just lay on top of each other, don't crimp). The only part that is crimped is the very first strip (on each end of the ladder), it should be pinched together.
 
Bake the fruit ladder for 30-40 minutes (in a preheated 350 degree oven) or until lightly golden. Run a spatula under the ladder to make sure it is loose, and then slide it off onto a serving plate. Drizzle it with a simple powdered sugar glaze and decorate with nuts (I like candied nuts), sprinkles, or any decoration you like.

 
I have tried lots of different fruits, cherry, lemon, raspberry, blueberry, apple strawberry, blackberry, etc. Commercial pie filling works as well as home made.

Saturday, December 11, 2010

EASY MICROWAVE CANDY

This is the easiest candy I have ever made and better yet, my picky Hubby gives it two thumbs up!! It is fast to make in the microwave and is pretty enough for Christmas gift giving.

NOTE: Don't be tempted to use all one kind of chocolate. For some (unknown to me) reason, the blend of white chocolate, semi-sweet and milk chocolate produces the BEST chocolate taste EVER!!
12 ounce bag of good quality white chocolate chips
12 ounce bag of good quality semi-sweet chocolate chips
12 ounce bag of good quality milk chocolate chips
3 cups of your favorite whole nuts (see note)
 
Put the chocolate chips in a large, microwave safe glass bowl and microwave for two minutes at 60% power (imperative that you stir every 30 seconds). My microwave took about 2 minutes and 10 seconds.
 
Stir until all of the chocolate is smooth, then stir in 3 cups of your favorite whole nuts. I ended up adding five cups of whole mixed nuts and I'm fairly certain I could have added one more cup. This makes a LOT of candy!!
 
The recipe calls for spooning candies onto waxed paper, but I spooned mine into mini-cupcake size paper liners. Put them in the fridge to "set" for about 15 minutes and they are ready to serve.
 
NOTE: The candy will only be as good as the chocolate you use. I used Ghirardelli chocolate chips. (Note: You do not taste the white chocolate when they are all melted together (I don't like white chocolate), but the blend of the 3 chocolates is delicious.
 
NOTE: I used a mixture of whole roasted nuts (cashews, almonds, peanuts, pecans, Brazil nuts and hazelnuts...delicious.

Monday, October 25, 2010

PUMPKIN - CRANBERRY BREAD (the best)

If the rating system for this recipe was 1 to 5 stars; I would rate this a 10. It is absolutely delicious and will be perfect for your holiday table!! It is very easy to make (doesn't even take an electric mixer) and yet it is unique enough for gift giving. I hope you try it, it is SO GOOD... extremely moist, total comfort food!!!


 Preheat your oven to 350, and grease and flour two 9" x 5" loaf pans. Set out two large bowls. In the first one mix:

3 cups flour
3 1/4 teaspoons cinnamon
3/4 teaspoon nutmeg
3/4 teaspoon ground ginger
1/4 teaspoon ground cloves
2 teaspoons baking soda
1 1/2 teaspoons salt

In the 2nd bowl, mix:
3 cups sugar
(1) 15 ounce can pumpkin (without spice)
4 eggs
1 cup vegetable oil
1/2 cup orange juice
2 cups fresh or frozen cranberries
.
Whisk the first bowl (with the flour in it)until the dry ingredients are well mixed. Whisk the 2nd bowl (with the pumpkin in it) until WELL mixed and oil is completely incorporated. Pour the wet into the dry and mix with spoon just until moistened. Stir in cranberries gently.
.
Pour batter into prepared loaf pans. Bake 60 to 65 minutes (my oven took 70 minutes). Cool (in the pans) for about 10 minutes, then turn them out. Wrap the hot bread IMMEDIATELY in plastic wrap, covering tightly. Let the breads cool completely in the wrap.


NOTE: Make sure you use a 15 ounce can of plain packed pumpkin and NOT pumpkin pie filling (big difference).

NOTE: Recipe calls for ½ cup of orange juice, which I didn't have, so I used pineapple juice instead.

NOTE: Wash and sort your cranberries. Try to use the darkest berries. Make sure they are thawed out before mixing into batter.

NOTE: It is OK to put the plastic wrap on the hot bread as soon as it comes out of the pan. This forces the moisture back into the bread as it cools.

NOTE: My oven took 70 minutes to cook these loaves. Use the toothpick test to determine doneness.

Saturday, December 26, 2009

Aperitif


Christmas is over.

The problem with Christmas on Friday is guests feel they should just spend the whole weekend. If they insist, have them take down decorations, or shovel snow, seriously, put them to work!

It they decide to head on home and you have a moment to breath, take this opportunity to sit quietly and rehash the holiday festivities with a simple aperitif and an olive or two. Georgeanne Brennan has a lovely book called Aperitif. Like all of her books, they are simple and gorgeous. It really doesn’t matter if you ever make a recipe from her books; you simply want to look and them and crawl inside.


It is a little late to have you make your own aperitif, so grab one you like from the bar; a nice sherry, Dubonnet, Campari, or my favorite, Lillet.

Now try one of these simple snacks.

In the Mediterranean they have a tiny clam called tellines, which are about the size of your thumbnail. They are a favorite accompaniment to an aperitif. Look for the smallest clams or mussels you can find.

Garlic Sautéed Clams

1 pound small clams or mussels
1/4 cup olive oil
4cloves garlic, minced
1/4 minced fresh parsley

Wash the clams thoroughly under running water to remove and grit, sand or dirt. Discard any that do not close when touched. Clean the mussels in the same way, plus, using scissors, clip any beards that are evident. Rough dry the shellfish with a towel.
In a skillet large enough to hold all the clams or mussels at one time in a near-single layer, warm the olive oil over medium heat. Add the garlic and sauté for a minute or two, stirring, but do not let the garlic brown. Add the clams or mussels to the pan and turn them with a wooden spoon, coating them with the olive oil. Sprinkle on the parsley and cook, shaking the pan and stirring, just until the shells open, 2 to 3 minutes. Serve immediately.

Or try this one.

Dried Figs with Bacon and Fresh Goat Cheese

12 dried figs as Mission
1/4 pound fresh goat cheese, divided into 12 equal portions
2 or 3 slices bacon, cut into 2-inch-long pieces, to total 12

Preheat the broiler. Make a lengthwise slit in each fig. Tuck a portion of cheese into each slit, then wrap with a piece of bacon and secure closed with a toothpick.

Arrange on a broiler pan and slip into the broiler. Broil, turning once, just until bacon is browned and barley crisped.

Sit quietly, and enjoy the silence. Only 364 days till Christmas!

Friday, December 25, 2009

Merry Christmas


from all creatures great and small here at Doe Run Farm,

we wish you a very

Happy Holiday.

Thursday, December 24, 2009

Ruth & Skitch Henderson’s Christmas in the Country


I like to buy cookbooks. I know, you are shocked to find that I like to buy cookbooks. There are a few “antique” cookbooks I covet, but they are usually out of my price range. So I am always on the lookout for books in my price range. On any given day, I generally have about $5 in my pocket and that is the magical cookbook range. Show me a cookbook in good shape, with a reasonable jacket that is priced under $5 and I will generally add it to my collection. Sometimes these books simply make a pass through and some of them are cherished possessions.

Last summer I picked up a lovely copy of Ruth & Skitch Henderson’s Christmas in the Country. I thought it would make a nice "Famous Food Friday" segment at Lucindaville, as Henderson was the conductor of the New York Pops. The book came complete with its own CD accompaniment, and next to cookbooks I love tunes, so this was a two-fer. Later I found that this particular copy was also a “Presentation” copy, inscribed by Ruth and Skitch to a couple who obviously were unimpressed because they never played the CD and dumped the book at a used bookstore. Lucky for me.

Ruth and Skitch Henderson on their wedding day

It being summer and all, I didn’t spend a lot of time with the book. With Christmas approaching, I pulled it out. Ruth & Skitch Henderson’s Christmas in the Country is one of the best Christmas cookbooks out there; in fact it is a really great cookbook on its own. Grant it, there are a lot of family stories, and some crafts, but there are really great recipes and tons of photo’s of lovely table settings. And there is a CD. Who knew!

Well, now you do!

Ruth Henderson describes fond memories of Saint Nicholas Day. On December 6, children made their Christmas list, rolled it up and placed it in one of their shoes. The shoe was placed at the foot of the bed or outside the bedroom door. They left Santa a snack and in the morning, if the list was gone and replaced with candy, you might have your list fulfilled, but if you found coal or a switch well, Christmas could be bleak.

The tradition was continued at the Henderson household, featuring a party for neighbors. Ruth always served a German drink called Glühwein.

Glow Wine

1 750 ml bottle red wine
5 whole cloves
2 cinnamon sticks
1/4 cup sugar
Juice of 1/2 lemon
Zest 1/2 lemon
1/4 cup dark rum (optional)
6 cinnamon sticks for garnish

Combine all ingredients in a medium saucepan. Heat to simmering; do not boil. Strain if you want to (we don’t) and keep warm. To serve, ladle into mugs and add cinnamon stick to each mug.

Give it a try.

Here's Skitch with Carol of the Bells.

Happy Christmas Eve

Wednesday, December 23, 2009

Southern Living Christmas Cookbook


Every year or two, Southern Living puts out another Christmas Cookbook. In 2008 they published Southern Living Christmas Cookbook: All-New Ultimate Holiday Entertaining Guide. It is filled with a lot of recipes that feature canned soup, like the one below and they have a certain inconsistency in recipes. On Amazon, several people complained that the recipes didn't work and the timing was off. That may be the case in one or two recipes, but if you cook several recipes and they seem to all be off, then I would suggest that it is far more likely that your oven is calibrated wrong. Instead of buying a cookbook you might want to buy an oven thermometer.

Still, if you want an easy, general Christmas book, Southern Living keeps churning them out.

I make a variation of this recipe in a large pan and love it. My recipe features NO mushroom soup, just milk. I am certain you can eliminate the canned soup by just adding a bit more milk. Though in individual coffee mugs this should be a sow-stopper.

Mini Sausage-and-Egg Casseroles

1 1/2-oz. sourdough bread slices, cut into 1/2-inch cubes
Vegetable cooking spray
1 (12-oz.) package pork sausage
2 1/2 cups 2% reduced-fat milk
4 large eggs
1 tablespoon Dijon mustard
1/2 cup buttermilk
1 (10 3/4-oz.) can cream of mushroom soup
1 cup (4 oz.) shredded sharp Cheddar cheese

1. Divide bread cubes evenly among 10 (8- to 10-oz.) ovenproof coffee mugs coated with cooking spray, placing in bottom of mugs.Top evenly with sausage which has been cooked in a nonstick skillet until browned and then, crumbled. Whisk together 2 1/2 cups milk, eggs, and Dijon mustard. Pour evenly over bread mixture in mugs.

2. Whisk together buttermilk and cream of mushroom soup. Spoon over bread mixture in mugs; sprinkle with Cheddar cheese. Place coffee mugs on a baking sheet.

3. Bake at 350° for 25 to 30 minutes or until casseroles are set and puffed. Serve immediately.

Note: Unbaked mugs of casserole can be covered with plastic wrap, then foil, and frozen up to 1 month. Thaw overnight in the refrigerator. Bake as directed.


This is such a "Southern" suggestion, to wrap them and freeze them for a month! Seriously, it takes longer to thaw them than to make the recipe from scratch. Southerner women are notorious for keeping a casserole in the freezer "just in case someone dies."

Don't freeze them, (unless you are anticipating someones demise in the near future)bake them today.