Recipes from an Edwardian Country House

Recipes from an Edwardian Country House is a book that was repackaged from an earlier book. Frankly, I hate it when publishers do this sort of thing, as I often have the first book and then end up with another copy of the same book .

Seasonal Recipes From The Garden

For a long time my cable provider didn't provide a PBS station. It seemed weird, no PBS, but I learned to live it. After changing providers, I suddenly had PBS again.

Favorite Recipes of Famous Men

We are suckers for collections of recipes by "famous" folk. So naturally, Favorite Recipes of Famous Men a 1949 cookbook collection by Roy Ald is a great one.

Spoonbread and Strawberry Wine

There is not a single member of Norma Jean and Carole Darden's family that you want to hang out with. While most of them are gone now, they live on in this delightful cookbook and memoir.

Recipes from an Edwardian Country House

Recipes from an Edwardian Country House is a book that was repackaged from an earlier book. Frankly, I hate it when publishers do this sort of thing, as I often have

Showing posts with label HOLIDAY RECIPES. Show all posts

Thursday, November 6, 2014

BEST TURKEY GRAVY EVER !!

There are three reasons we LOVE this turkey gravy. First of all, it is rich, savory and has a delicious concentrated turkey flavor (the kind that you CAN NOT get from a package or a jar). Secondly, you can make this gravy a day ahead of time and escape those "last second" holiday scheduling conflicts or the dreaded "I need just one more stove burner" issues. Thirdly, the recipe makes enough for a big turkey dinner AND enough for those scrumptious "day two" hot turkey sandwiches!!


It may sound like this recipe makes a ton of gravy, but don't forget that the liquid "cooks down" for an hour, so actually you'll end up with about 5 cups of good rich gravy, which is just perfect.

6 turkey wings (or 4 turkey drumsticks)
2 small onions (or 1 large) peeled and quartered
1 cup water
2 quarts turkey broth (divided) (chicken broth will work in a pinch)
1 cup chopped carrot
1 cup large chop celery
1/2 teaspoon dried thyme leaves
1/2 to 3/4 cup all purpose flour (see note below)
2 tablespoons butter
1/4 teaspoon black pepper
*(note don't add salt until the end)

Put the turkey wings (or drumsticks), quartered onions and 1 cup of water in a large pan. Make sure the pan is big enough so that the wings are not on top of each other.

Bake in preheated 400°F oven for 1 1/2 hours or until wings are nice and golden.
 
Put the turkey and onion into a large soup pot. Add 1 cup of water to the original baking pan and stir/scrape up all of the baking bits stuck to the bottom of the pan. Pour it all over the meat in the soup pot.

Add 6 cups of turkey broth to the soup pot, along with the carrot, celery and dried thyme leaves. Make sure the "browned" side of the wings are down in the broth. Bring it all to a boil, then reduce the heat to a SLOW SIMMER and cook UNCOVERED for 1 1/2 hours.

NOTE: Turkey broth is the best for this recipe if you can find it. Locally, I've found it at Walmart, Carrs and Three Bears. If you can't find it, just use chicken stock.

Recipe uses two of these boxes

After the broth has simmered for 1 1/2 hours, remove the meat from the broth (it can be saved for a different use if you want to, but you won't need it for the gravy).

Strain the broth (throwing away the veggies) and return broth to soup pot. Bring  the broth to a gentle boil.

Whisk the flour into the remaining 2 cups of chicken broth until smooth and gradually whisk it into the simmering turkey broth. Cook and stir until thick.  Stir in butter and pepper.

IMPORTANT: Taste the final gravy for salt. I usually end up adding about 3/4 teaspoon of salt before serving.

NOTE: How much flour you use to make your gravy depends on how much liquid broth you have after it's boiled. I usually end up using 1/2 cup of flour.


NOTHING says Thanksgiving like a great gravy!!
 
ENJOY!!


Monday, October 1, 2012

NO ROLL JELLY ROLL

Last year, I posted a recipe for an old fashioned jelly roll cake.  I heard from several people who said they had fond memories of their mom or grandma making jelly rolls, but they were afraid to make one themselves because they were nervous about rolling the cake.

Rolling the cake isn't hard, as long as you follow a few strict rules, but it IS messy with all of the "sprinkle towel with powdered sugar" stuff. That is why I came up with this "NO ROLL JELLY ROLL".  I think it is every bit as pretty as the classic jelly roll Grandma used to make but it is MUCH EASIER !!


This is definitely going on my holiday table this year

Basically, I baked the same 10 x 15 sponge cake that I use in the jelly roll, but I cut it into thirds and stacked them with jam in between each layer and on the top, then drizzled vanilla glaze over. I'm very happy with how it turned out. It is so simple, I know I will be making it a lot more often.

3 large eggs
1 cup granulated sugar
1 teaspoon butter extract (see note)
1 teaspoon vanilla extract
1/3 cup water (see note)
1 cup CAKE FLOUR
1 teaspoon baking powder
1/4 teaspoon salt
1 cup jelly or jam  (see note)

Preheat oven to 375 then line a 10" x 15" pan with parchment paper and spray the paper with cooking spray, set aside.

Beat the eggs, on high, until very thick and lemon colored (takes about 5 minutes).  After five minutes, and while the mixer is still running on high, slowly add the sugar.

Put the butter extract into a 1/3 measuring cup and then fill the cup with water (extract + water should = 1/3 cup). Add the extract-water and vanilla extract to the egg mixture and mix well.

Sift the cake flour, baking powder and salt into the egg mixture and beat just until the batter is smooth (I do this step with a whisk).

Pour batter into prepared pan and bake in preheated 375 oven for 12-15 minutes (my electric oven takes 15 minutes) or until toothpick in center comes out clean.

Remove from oven and slide a sharp knife around the edges of the cake to loosen them.  Let the cake cool in the pan for 10 minutes before removing.


Place waxed paper or saran wrap on a cookie sheet (spray the paper/plastic wrap with cooking spray) and turn the cake out onto the cookie sheet.  This will help you transport the cake while its still hot.  The cake is much easier to cut and handle if its chilled, so I put the cake in the freezer for about half an hour before I tried to cut it.

When you are ready to assemble the cake, slice a VERY THIN edge off of each side of the cake (not necessary, but looks prettier).  Cut the cake in thirds.

Place the bottom layer on a serving plate and spread with jam (stir the jam to loosen it up before spreading). Repeat with next two layers.

Spread jam on the top of the cake and then drizzle with vanilla glaze. 


VANILLA GLAZE
1/3 cup melted butter
2 cups powdered sugar
1½ teaspoons vanilla extract
¼ teaspoon almond extract
2 tablespoons milk

Mix all together with a whisk.

NOTE: This recipe works best with a jam that doesn't have big pieces of fruit in it. Personally, I like Smuckers Simply Fruit; it not only tastes great but its PERFECT for this cake. Just make sure you stir or whisk the jam before spreading it, it will soften up and get smooth.

NOTE: If you do not have butter extract, just double the vanilla extract.

NOTE: This cake gets more moist after it sits for a few hours because the jam sinks into the cake a little.

Wednesday, December 28, 2011

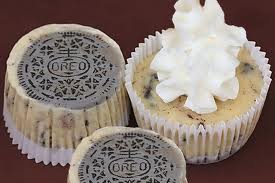
MINI OREO CHEESECAKES

I've made these little gems many, many times, and I've never had a single crack in any of them and they go together in a snap. They are absolutely delicious and totally addicting. 

The only "extra" step, is that they really need to sit in the fridge overnight after baking (to soften the cookie crust), but this step is WELL WORTH IT. You can eat them as soon as they are chilled, but the cookie will still be crunchy.  If you let them sit in the fridge overnight, the cookie almost becomes part of the cheesecake...scrumptious.


24 Oreo cookies (divided)
1 pound of cream cheese (room temperature)
1/2  cup granulated sugar
1/2  cup sour cream
2  large eggs (lightly beaten)
1 teaspoon vanilla extract

Place 6 (original) Oreo cookies in the food processor and process into fine crumbs (set aside). Preheat your oven to 275 F and put 18 cupcake papers in your cupcake pan. Place a whole Oreo cookie in the base of each cupcake paper and set aside.

With your electric mixer (I used my stand mixer with a paddle attachment), mix the cream cheese on medium speed for three minutes.  Add the sugar and vanilla and mix for another 2 minutes on medium speed, or until very smooth. Add the lightly beaten eggs and mix on LOW until well combined. Fold in the sour cream and cookie crumbs with a spatula.

Fill the cupcake papers almost to the top (I used an ice cream scoop and it seemed to be the perfect measurement). Bake in preheated 275° oven for 30 minutes.

Once they are baked, leave them in the cupcake pan and immediately put them in the fridge. Chill overnight.  Delicious !!!


Thursday, November 3, 2011

PECAN PIE BARS

Picky-picky Hubby says these pecan pie bars are totally addictive. They have a buttery shortbread crust and a nutty (and slightly gooey) baked topping with a great pecan pie taste.

I have to admit that my budget doesn't allow pecans right now (they are almost $10 for a 2 cup bag!!), so I use walnuts, but they are ever so tasty just the same!! I am planning on adding these to my Christmas cookie trays (I'll splurge on pecans for Christmas though).

CRUST
2 cups all purpose flour
1/3 cup sugar
¼ teaspoon salt
2/3 cup butter (room temperature)

Mix the above crust ingredients and press into a 9" x 13" baking dish (see note below about greasing pan). This mixture will seem crumbly, but don't worry about that. Just pat it evenly into the pan.  Bake in preheated 350 oven for 20 minutes. While the crust is baking, mix up the topping:

TOPPING
3 eggs well beaten
1 cup light corn syrup (like Karo syrup)
½ cup granulated sugar
½ cup brown sugar
2 tablespoons melted butter
1 teaspoon vanilla
1 + 2/3 cup chopped pecans (toasted a little)

Mix well and pour over partially baked crust, making sure the nuts are evenly spread. Return to the 350 degree oven and bake for 25 more minutes.
Cool completely in pan before cutting.

NOTE:  The pecan pie bar crust does not stick to the pan, but around the edges of the topping, it does tend to stick. To combat that, I lined my 9" x 13" glass dish with foil. I didn't grease the bottom, but I greased the sides of the foil a little (the new Reynolds Easy Release foil would be good for this). 

Also, let the foil ends hand over the edges of the baking dish a little bit so you can grab the foil "tails" and lift the baked (and cooled) bars out of the pan for easier cutting.

When the bars are completely cool, just lift the whole thing out of the pan and onto a cutting board.They are rich, so cut the bars small.