Recipes from an Edwardian Country House

Recipes from an Edwardian Country House is a book that was repackaged from an earlier book. Frankly, I hate it when publishers do this sort of thing, as I often have the first book and then end up with another copy of the same book .

Seasonal Recipes From The Garden

For a long time my cable provider didn't provide a PBS station. It seemed weird, no PBS, but I learned to live it. After changing providers, I suddenly had PBS again.

Favorite Recipes of Famous Men

We are suckers for collections of recipes by "famous" folk. So naturally, Favorite Recipes of Famous Men a 1949 cookbook collection by Roy Ald is a great one.

Spoonbread and Strawberry Wine

There is not a single member of Norma Jean and Carole Darden's family that you want to hang out with. While most of them are gone now, they live on in this delightful cookbook and memoir.

Recipes from an Edwardian Country House

Recipes from an Edwardian Country House is a book that was repackaged from an earlier book. Frankly, I hate it when publishers do this sort of thing, as I often have

Tuesday, February 26, 2013

CREAMY SHRIMP RICE BAKE

We REALLY enjoy this comfort food casserole. It is packed with tons of shrimp, rice and veggies, surrounded with a cheesy cream sauce. There are three (easy) steps to this recipe, but all can be done ahead of time and popped into the oven at dinner time. This recipe makes a LOT (serves 8)and it reheats very well!!


1½ cups UNcooked long grain rice
3 cups chicken broth (see note)
1 tablespoon butter.

In a large and deep sauce pan, melt the butter and put the RAW rice in with the butter. Stir and let the rice kernels toast in the butter until they just start to turn bright white, then add 3 cups chicken broth, stir, COVER and turn heat down super low and cook the rice for 20 minutes. After 20 minutes, remove from heat and fluff with a fork. Set aside.

Saute the following together:
1/2 cup butter (see note below)
3 celery stalks chopped
2 cloves of garlic minced
2 green onions sliced thinly
1 red bell pepper (optional)
2 cups frozen mixed veggies (or your favorite fresh veggies)

Saute, gently for about 10 minutes. The last 2-3 minutes, add 1½ pounds of raw, peeled, de-veined and washed shrimp and cook only until they start to turn pink. Don't over cook, at this stage because they will cook the rest of the way in the oven.  I often skip this step and use pre-cooked shrimp (see note below).

In a bowl, gently mix the following:
Cooked shrimp
Cooked rice
Sauteed veggies
(2)10¾ oz. cans cream of shrimp soup (Undiluted)
1/4 teaspoon black pepper
1 cup milk
2 cups Colby-Jack Cheese shredded (see note below)

Place mixture in greased 10 x 15 baking dish and sprinkle with bread crumbs that have been sauteed in a little butter. Bake at 350 for 40-50 minutes or until hot and bubbly.
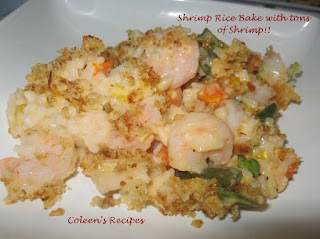
NOTE: The original recipe said to put all of this food into a 9x13 pan, but it didn't all fit, so I've had better luck baking it in a 10x15 pan (or TWO smaller baking dishes).

NOTE: It might sound like 1/2 cup butter is a lot, but remember that is for 8 servings (1 tablespoon per serving) and ½ cup of butter is necessary for the right sauce consistency.

NOTE: Make sure you use Colby-Jack cheese.  Cheddar (only) is not a good choice here, and the Monterrey Jack cheese (in the Colby-Jack blend) is super creamy.  You could always use American Cheese, that would work well too. Just make sure your choice of cheese is creamy when melted.

NOTE: I don't have a problem finding cream of shrimp soup, but if you do, cream of celery soup would work well too.

NOTE: For the bread crumb topping, Just put a couple of tablespoons of butter in a fry pan along with 2 cups of bread crumbs (plus a pinch of kosher salt and a pinch of black pepper and a pinch of cayenne pepper) and stir them until they get toasty brown, then sprinkle on the casserole before you bake it.

NOTE: If you are using fresh shrimp, ignore the following note, but if you are using frozen shrimp, it is extremely important that you thaw the shrimp in a colander overnight in the fridge (do not speed thaw in running water). It is unbelievable how  much water will drain out of the frozen shrimp (both raw AND cooked), and that water will make your casserole SOUPY and SOGGY. Let the shrimp thaw overnight, then the next day, rinse them and pat them dry. I usually use medium size shrimp for this recipe (40-50 shrimp per pound).

NOTE: This casserole can also be done with chicken instead of shrimp, just change the cream of shrimp soup to cream of chicken soup, and change the shrimp to cooked chicken.

Sunday, February 24, 2013

Microwave Chocolate-Marshmallow Pudding

Super quick, super easy, rich and chocolate-y, and very inexpensive to make; this fun dessert will satisfy your chocolate craving for sure!! Equally delicious warm or cold, you can have this treat on the dinner table in no time.


1/2 cup brown sugar
1/3 cup unsweetened baking cocoa
pinch salt
3 level tablespoons corn starch
2 cups milk (see note below)
1 tablespoon butter
1 teaspoon vanilla
2 cups mini-marshmallows (optional)

In a large glass bowl, mix the brown sugar, cocoa, salt and corn starch. Slowly add the milk and mix well. At first the cocoa will sort of sit on top of the milk, but if you mix well with a whisk, it will mix together in a minute or so.

Microwave on HIGH for 3 minutes. Carefully remove from microwave, and stir well (again with whisk).  Put it back in the microwave (one minute at a time...stirring well after each minute) until the pudding is shiny and thick.  My microwave took the initial 3 minutes, then 2 more (1 minute) intervals), but everyones microwave is different, so just mix it well after each interval and when it is shiny and thick, it's done.

After pudding is thick, stir in butter and vanilla and mini-marshmallows. The heat from the pudding will melt the marshmallows, so don't stir them too much (you want them to stay whole if possible).  Chill the pudding in dessert dishes.


NOTE: I like to use whole milk in this recipe, but I make it with 2% milk a lot too.

NOTE: Marshmallows totally optional.

NOTE: Don't microwave this pudding in a plastic bowl because the plastic gets hotter than the pudding for some reason; glass is the best.

Saturday, February 23, 2013

YUMMY BARS

This basic recipe has been around for several decades because it is not only delicious, but it is super quick and easy and very versatile. It is basically a graham cracker bottom with a sweetened condensed milk center laced with coconut, nuts and chocolate chips; easy as one-two-three!!

Prefer dark chocolate? No problem, prefer peanut butter chips, no problem, prefer cinnamon or chocolate graham crackers? No problem.  Change this recipe to your hearts desire!!
1½ cups graham cracker crumbs
2 tablespoons granulated sugar
1/2 cup melted butter
14 ounce can sweetened condensed milk (not evaporated)
1 cup sweetened flaked coconut
1 cup chopped nuts (optional)
2 cups favorite flavor chocolate chips

Line a 9" x 13" baking dish with parchment paper, leaving the ends long enough to hold on to when you lift the finished bars out of pan. If you don't have parchment paper, you can spray the pan with vegetable spray but parchment works the best.

Melt the butter and toss with graham cracker crumbs and sugar. Press firmly into prepared baking dish.

Pour the sweetened condensed milk evenly over the bottom layer.
Sprinkle the coconut on top of the milk layer; next add the nuts if you are going to use them (I don't).

Finally, layer the chocolate chips (or your favorite flavor of chips). Use a fork and really press hard on the layers, mashing them all together.

Bake at 350° (in metal pan) or 325° in glass dish for 25 minutes or until lightly golden around edges.

Don't cut the bars until the chocolate is cooled AND set. You can speed set the chocolate by putting the baked bars in the fridge for a while, but bring it to room temperature again before cutting them.

Store covered, at room temperature. These are super fast to make and are great for any time you need a quick "take along".

Saturday, February 16, 2013

FLOUR TORTILLAS

I've been on a "learning how to make flour tortillas" kick all week; I don't know how many different recipes I've tried, but it has been a lot of fun and even the "least attractive" tortillas were delicious and (very much) worth the effort (they are worlds better than the ones at the store!!)

Most tortilla recipes require the same basic ingredients: flour, baking powder, salt, lard or shortening and hot water. Where the recipes differ is in technique and that is something that just takes practice;I found some GREAT tortilla making tutorials on "You Tube", those people have it down to an art!!!

3½ cups all purpose flour
1 teaspoon salt
2 teaspoons baking powder
1 teaspoon kosher salt
6 tablespoons Crisco or lard (see note)
1+ cup very hot water (see note)

Mix the dry ingredients and cut the Crisco or lard into the flour with a pastry cutter until you get what looks like corn meal (same technique as you would for pie crust).

Make a depression in the middle of the dry ingredients and slowly add the HOT water a little at a time, mixing in the dry ingredients as you go. Stir until everything comes together then knead it by hand (or stand mixer) for 2 minutes.

Cover and let the dough rest for an hour. Shape the dough into ping pong ball size balls, cover again and let rest for 15 minutes. This will make them easier to roll out.


Roll the tortillas out on unfloured counter. It's hard to get them perfectly round at first, so don't worry about that; they taste great no matter what their shape is.

What IS frustrating is how thin you need to roll them; roll them as thin as possible. The tortillas in the photo above were rolled thin enough that I could see the color of my counter through the dough, and yet, when you cook them, they don't stay that thin; keep that in mind.

To cook them, heat a cast iron pan (I like to use my electric skillet) to about 375° to 400° DO NOT USE OIL at this stage. Put the tortilla on the hot surface. As soon as you see little bubbles appearing in the tortilla (it will depend on how thick you rolled them), turn it over. You want the little bubbles to turn light brown, so watch your heat and raise/lower it if necessary; if the tortillas super-puff up, just gently press on them with the flat of your spatula. Don't over-cook them or they will get brittle.

Place cooked tortillas in a clean warm towel. You can use them right away or wrap them well and keep them in the fridge for up to a week; you can also freeze them.
I hope I haven't scared you off because home made tortillas are seriously delicious. Your first batch won't be beautiful, but don't let that discourage you. It really is fun (get the kids to help!!) and each  batch comes out prettier than the last.

NOTE: The recipes I found called for lard or shortening (Crisco). I don't have lard in my pantry, but I had great results with butter flavored Crisco. I even made some with real BUTTER and they were great too. Some recipes call for vegetable oil, but I haven't tried that yet.

NOTE: Don't be afraid to add a little extra hot water to get a nice smooth dough. I live in a very dry climate and I had to add almost an extra 1/4 cup of hot water. You want your final dough to feel soft and pliable but not sticky.

NOTE: Recipe makes 8 burrito size tortillas or 12 regular/small size tortillas.

NOTE: I like the idea of making little tortillas for our youngest grandchildren!!

Thursday, February 14, 2013

CROCK POT SPICY PORK AND PINTO's

This recipe is a real crowd pleaser. Fork-tender pork tenderloin with pinto beans, spicy gravy and it all cooks together in the crock pot!! The first night, I like to serve this over rice, but it is equally as tasty stuffed into warm flour tortillas, or over a bed of tortilla chips and smothered with cheese; it also has ENDLESS leftover possibilities (which is a very good thing)!!

I like to use a 2 pound pork tenderloin, because it is nice and lean, but any 2-3 pound pork roast will work.  My crock pot is a big one and it tends to run a little hot, so this pork is fall apart tender (for me) in 6 hours ON THE LOW SETTING. Depending on your crock pot, it could take as many as 8 hours on low, but that is unlikely, just start checking for tenderness at 6 hours.


2 pounds (roughly) pork tenderloin
1 1/2 cups DRY PINTO beans (rinse, but DO NOT soak)

(1) 4 ounce can of mild green chilies (I use Ortega)
3 teaspoons chili powder (see note)
2 teaspoons ground cumin

2 teaspoons salt
1 teaspoon dry oregano
1 clove garlic minced
1 cup chopped sweet onion
healthy pinch of dry red pepper flakes (optional see note)


Brown the pork well and put it in the crock pot. Saute the onions and garlic in the same pan and then mix them with the DRY beans, spices, canned chilies then pour over the meat. Add just enough water to mostly cover the beans and meat, it should look like this:


Make sure the liquid gets under the meat as well. After cooking on low for a few hours, check the liquid level in the crock pot and add a little more water if necessary, but not TOO much. THIS BROTH MAKES THE BEST-BEST-BEST RED GRAVY!!
 
Take the meat out of the crock pot after 5-6 hours or when it gets fork tender  (remove any fatty pieces and bones) and pull it apart. Thicken the liquid in the crock pot with a cornstarch and water slurry, then put meat back in with the beans and gravy. 


VARIATION: The beans in this recipe make OVER THE TOP delicious re-fried beans. Just fish out the beans and put them in the food processor with a little bit of the liquid. You'll never buy canned refried beans again!!

NOTE: A word about the heat or spice in this recipe. My hubby doesn't like very much (hates) "heat" in his food. He likes strong flavors, he just doesn't like "fire" as he calls it. I use a very small pinch of dry red pepper flakes when I make this for him. If you like a little more "fire", just up the dry red pepper flake ingredient.

NOTE: If I'm making this for children, I back off the chili powder to 2 teaspoons and omit the chili flakes.


Thursday, February 7, 2013

CLASSIC YELLOW CAKE

Everyone needs a great classic yellow cake recipe, so I would like to share mine. It is very moist, has a wonderful "scratch cake" flavor and texture and even though there are several steps in the recipe, they are all quick and easy.


1 cup butter (room temperature) no substitutions
1½ cups granulated sugar
8 egg YOLKS   (yes, EIGHT!!)
3/4 cup milk
2 teaspoons vanilla
2 cups cake flour  (see note below)
2 teaspoons baking powder
1/2 teaspoon salt

Preheat your oven to 350° and grease and flour two 9" cake pans that are at least 2" deep (this cake rises a lot!!)

Sift the cake flour, baking powder and salt together and set aside (I sift it twice).

Beat the butter and sugar together, on high, for two or three minutes, scraping down the sides of the bowl about once a minute.

Add the egg YOLKS, one at a time (important), beating well in between each yolk. Add the vanilla.

Now you will need to add the flour alternately with the milk; start with flour and ending with flour. Make sure you scrape the sides of the bowl once in a while. I add the flour about 1/2 cup at a time, then add a little milk, then another half cup of flour. Batter will be very thick, like this:

Divide batter into two prepared pans evenly; I like to use this recipe for cupcakes. If you make cupcakes, only fill the papers about 1/3 full.

Bake 9" layers in preheated 350° oven for 25-30 minutes. If you are making cupcakes, bake them for about 20 minutes or until golden on top. With either pan, the cake will spring back a little when lightly touched when it's fully cooked.

Cool the layer cakes about 10 minutes before you remove them from the pans. If you make cupcakes, just cool them for 2 or 3 minutes before you remove them from the pans.

NOTE: This recipe calls for two cups of cake flour. If you don't have any, you can substitute the following: put 1 tablespoon of cornstarch in a 1 cup measuring cup and then fill the cup with all purpose flour. This is a great substitution for cake flour. You will need to do this twice...once for each cup.

Tuesday, February 5, 2013

EASY BUTTERSCOTCH PUDDING

It seems that I have been on a never-ending search for good pudding recipes...we like pudding!! Picky-picky husbands favorite is butterscotch and I found one, last year, that had a fantastic flavor, but it was a little thick and paste-y for our tastes.

Because it had such a rich butterscotch taste, I've been tinkering with the thickening agents and the final results have produced a real keeper of a recipe.It is light, creamy, very butterscotch-y and super quick and easy to make... no tempering of eggs or anything complicated, just mix, bring to a boil then add butter and extracts...it is done in a snap!!


1 cup brown sugar
3 level tablespoons corn starch
3 egg YOLKS
2 cups half and half
 2 tablespoons butter
1 teaspoon vanilla extract
1/2 teaspoon rum extract

In a saucepan that has a heavy bottom, mix the brown sugar and cornstarch. Once mixed well, stir in the half and half and the egg yolks; whisk until well mixed (run a spatula over the bottom of the pan to make sure you have everything out of the corners).

Cook on medium high until it just starts to boil (stirring the whole time).  When it starts to bubble, the pudding should already be nice and thick; remove from heat.

Whisk in the butter and extracts; mix well. Pour into dessert dishes and put some plastic wrap or wax paper directly onto the surface of the hot pudding. This will stop any pudding skin from forming.  


 Put in the fridge until well chilled.

NOTE: You get the best flavor if you use a combination of vanilla and rum extracts. If you don't have rum extracts, just use all vanilla.

Friday, February 1, 2013

At Home with May and Axel Vervoordt


I have two words for you -- food porn.   At Home with May and Axel Vervoordt is a big old book of food porn. I am not saying it is wrong.  I am just saying it is!   Frankly, no one loves food porn more than me.  Clearly, if you were hanging out in Belgium and May Vervoordt says come on over for quick bite, you would go.   The food would be great.  The food in this cookbook is nice and tasty.  There are a lot of ingredients that sit squarely on the spice rack.  There is not a lot of meat.  The food is surrounded by dreamy castle shots and rich place settings. A reasonably accomplished home cook could pull off anyone of these recipes and be the toast of the kitchen.  I don't mean to complain, but lets review.

If you lived here:


If your husband was a noted antiques dealer and decorator whose clients list included Bill Gates and Sting:


If you has access to a vast array of dishes and china and whatnot's: 


 If you oversee a staff nearing 100 including your chef:


My best guest is that you could set a nice table with nifty grub for family and friends.  It is not a criticism, it is just a fact.  You might pick a nice dessert like this one.
Pears With Citrus Fruits and Cinnamon
 
4 small pears
1 orange
I lemon
2 cups water
1 cinnamon stick
1 tablespoon chopped fresh gingerroot
1 pinch of saffron powder
½ cup agave syrup

Peel the pears and cut them in half lengthwise. Cut the orange and lemon into ¼ inch strips, retaining the skin.

To make the syrup, boil 2 cups water. Add the cinnamon stick, ginger, saffron, lemon and orange strips, and let infuse for 10 minutes. Poach the pears in this liquid, heated to 175-195 degrees, for 10 minutes. Remove the pan from the heat and leave the pears to cool in the pan.

Remove the pears from the pan. Strain the juice. Pour the juice over the pears and serve.


May likes them with a nice chocolate dessert or with one's morning muesli.  Yes it is basically poached pears.  But it is poached pears with lemon and ginger and saffron and agave syrup.  Poached pears fit for the finest trailer park or 50 room castle.  Enjoy.

Sunday, January 27, 2013

BUTTER COOKIES

These big 4" cookies are crispy, light as a feather and full of butter-y goodness. They are too fragile to ship through the mail, but straight out of the cookie jar, they are melt in your mouth perfection.

1 1/4 cups butter (room temperature)
1 1/2 cups granulated sugar
3 egg YOLKS
2 cups all purpose flour
1 teaspoon baking soda
1 teaspoon cream of tartar
1 TABLESPOON of vanilla extract

Cream the room temperature butter and granulated sugar with your stand mixer. Once smooth, add the egg yolks, one at a time, and beat well in between each addition; beat in the vanilla.

Mix the flour, baking soda and cream of tartar, and add this mixture to the butter mixture, one cup at a time. Mix well.

Cover and chill the dough for about 30  minutes.

Roll the dough into 1" balls and roll them in granulated sugar.  Place on an UNgreased cookie sheet (3" apart)and flatten slightly.

Bake in 350° preheated oven for 10-12 minutes or until the edges of the cookies are golden.  Recipe makes 3½ dozen cookies.

Rolling dough into 1" balls, will give you 4" cookies, so leave lots of room between each cookie ball on the cookie sheet.


Saturday, January 26, 2013

Cooking Out Of Doors


 It is a cold day here in Lucindaville.  And we are not alone, it is a cold day pretty much everywhere.  (Please do not email us and tell us that YOU are in Hawaii and it is 84 and balmy.  We are happy for you but really, keep it to yourself.)   The cold has prompted us to think about picnics!   So we pulled out a vintage charmer:  Cooking Out Of Doors by Molly Graham.  This 1960 British cookbook offers up a cavalcade of al fresco dining options.

But remember, it is the sixties, in fact the first sixty, so some of the ideas are a bit...  like these sandwich suggestions

Cream Cheese and Gherkin

Spread cream cheese on thickly and top with thinly sliced gherkins.


or

Ham and Crushed Pineapple

Chop up some ham or gammon and spread on bread with butter.  Add a layer of well-drained, tinned crushed pineapple.

Here's and idea for a caravan holiday:

Braised Tinned Tongues

large tin lamb tongues
vegetables
a little water
seasonings

Set the children to preparing any vegetables you have.  These should include a large onion and a large potato each for the family.  Open the tin of tongues and separate them.  Put the tongues into a casserole and put sliced vegetables on top.  Add a little water and salt and pepper.  Put into a moderate oven until the vegetables are cooked, about 1 hour.  

If very venturesome, make a sauce to go with dish.
 Correct me if I am wrong but if you are eating canned tongue you have probably crossed over into the "venturesome" category already!   Which led me to wonder -- Can one still buy canned lamb tongues?  The answer is yes, especially if one lives in New Zealand.

Fortunately there are several drink recipes.  One will be needing several drinks before the canned lamb tongue casserole.   Here is one beloved by the British Navy.

Pink Gin

Take a cocktail glass and into it a drop of Angostura Bitters.  Twist round so that this coats the glass then pour away and surplus.  Add a measure of gin.   the drink will be pale pink.

Well, I am heading home to hunker down by the fire...and picnic another day.

Thursday, January 24, 2013

Menus From History


With the Presidential Inauguration being fresh in our minds, we have been thinking a lot about historical menus.  A glance at the Obama menu juxtaposed against the menu served at Lincoln's second Inauguration say as much about the changes in our country as do shifting politics.  Lincoln had four types of beef, three of veal, four poultry dishes not counting the quail and pheasant served as game.  

Menus are a great way to view history.  Which brings us to Menus From History.  Janet Clarkson is a food historian of great breath.  Her blog, The Old Foodie, is a daily dissertation on all things culinary.  Menus From History is a two-volume work published by the very scholalrly Greenwood Press and has a bent toward libraries.  If you love food or culinary history it should find its way to your library.

Menus From History is an exhaustive compilation of menus and recipes for every day of the year.  September 23, 1387  is the Feast for King Richard II.  May 10,1806 is the dinner between Chief Nez Perce and Lewis and Clark.  There are Royal Dinners, Inaugurations, prison dinners, and Titanic dinners.  Bread is broken with the rich, the famous and the ordinary.  Pick a day -- any day and you will be transported.

Today, January 24 is the anniversary of the day the Gourmet Society "went Arctic."   In 1937 at Cavanagh's in New York, the Gourmet Society feasted on Eskimo Fare.   According to the New York Times, the members  "trifled" with Eskimo fare by eating reindeer loin,  noting that "blubber and vintage fish" appeared only in speeches.

The menu:


Lynnhaven Bay Oyster Cocktail
Hearts of Celery  Queen Olives
Bisque of Soft Clams
Broiled Loin of Alaska Reindeer
Current Jelly  Fresh Mushrooms
New String Beans, Julienne
Candied Sweet Potatoes
Green Vegetable Salad
Cavanagh Dressing
Apple Pudding
Hard and Brandy Sauce
Cafe, Demi-Tasse
(Two Wines)


If you have ever run across old menus, you will notice that while you might be given a listing of the food offered up, the menu does not include the recipes.  For every menu Janet Clarkson uncovered, recipes had to be matched up.  Clarkson goes to great lengths to keep the recipes as historically accurate as the menus.  For this menu, she chose an oyster cocktail from a collection of church recipes from 1900.


Oyster Cocktail

One dessertspoonful tomato sauce, one shake of tabasco, a sprinkle of horse radish, about half a dozen oysters, and the same on top.  Serve in small tumblers on a plate with pounded ice around them and with oyster biscuits.

The real problem with these two volumes is their totally addictive nature.  You can't just read one entry.  You just keep reading.   Each entry has history and bibliography.   The Gourmet Society's Candied Sweet Potatoes lead you to February 1, 1928 to the Broadway Association Dinner for the Dodge Brothers Electric Sign.  And the Dodge Brothers take us to the 1919 and the 50th Anniversary of the Heinz Company on December 20th where one finds a recipe for candied sweet potatoes.

If there is a single complaint about this work it is the prohibitive request for twice as much ephemera.  There are plenty of  black and white illustrations, but we are gluttons for more -- more photos, more menu card, more color!  (All of this would push Menus From History to three volumes and triple the price, but ...)  OK, maybe just one more thing...there are hundreds of texts referenced, but there is no full bibliography... so there are four volumes!

This is really a pitiful attempt to even encapsulate this work.  You will never look at a party the same way.   Tomorrow?  Burns Night.

Super Moist Chocolate Cupcakes

I found this quick, easy, delightful recipe on the For the Love of Cooking web site. It makes one dozen super moist, super chocolate-y, super yummy cupcakes. This recipe is going into my "5 star file", that is for sure.
 
 
1/2 cup white sugar
1/2 cup brown sugar
3/4 cup + 2 tablespoons flour
1/4 cup + 2 tablespoons unsweetened cocoa powder
3/4 teaspoons baking soda
3/4 teaspoons baking powder
1/4 teaspoon salt
1 egg
1/2 cup milk
1/4 cup canola oil (I used vegetable oil)
1 teaspoon vanilla extract
1/2 cup BOILING water

Preheat the oven to 350° and line a cupcake pan with 12 paper liners.

Sift together all of the dry ingredients into a large bowl. Add the egg, milk, oil and vanilla and beat together with an electric mixer until combined.

Scrape the sides of the bowl and add the boiling water, mix until just combined but smooth.

The batter will be very watery looking, so don't be alarmed.  Pour the batter evenly into the paper liners.

Bake in preheated oven for 20-22 minutes or until a toothpick tests clean. Remove from oven and cool before frosting.


Do you have a craving for chocolate?
Give this a try, they are great.

Wednesday, January 23, 2013

Ways With Food


If ever one was in Palm Beach from the 1950's on,  the person with the best "Ways With Food" was none other than Harriet Healy.  Healy taught the rich and famous a thing or two about food.  Her reputation as a cook with a flair for entertaining grew.  She was an American hostess who imparted a casual hand to entertaining that motivated generations of women.

Healy was the "go to" for fashionable feasts in Palm Beach.  Trained at the Cordon Bleu, her reputation grew out a series of cooking classes she offered at Au Bon Gout, her gourmet food and accessory shop.  Though Healy is a name that may not be familiar today, she was regularly mentioned with such culinary giants as Craig Claiborne, Pierre Franey, Julia Child, and James Beard.   According to Craig Claiborne her kitchen was one of the most stylish and well equipped in Palm Beach.  For more info on that kitchen check out this post from The Peak of Chic.

Healy published sever spiral bound cookbooks based on her classes at Au Bon Gout and in the early 1060's she edited the Palm Beach Garden Cookbook, a collection of recipes from the Palm Beach Garden Club.  In 1982 she published Ways With Food.   The cookbook is a product of its time.  There is much Campbell's soup and lots of mayonnaise.  In fact, Healy advises that a cook not bother to use homemade stock when using curry powder.  Here is her recipe for a cold lemon soup.  It is like a Greek soup, she says but with no cooking!

Cold Lemon Soup

1 can Campbell's cream of chicken soup
1 cup cream
1 cup chicken stock
3 tablespoons finely chopped mint leaves
Juice of 2 lemons

Strain soup, add the cream, chicken stock, finely chopped mint leaves and lemon juice.  Soup must be served ice-cold.

If you do not have chicken stock, the soup is still good thinned with cream and milk.  The soup must not be too thick.  Soup cups may be decorated with parsley -- this is more effective on glass cups.
I was very interested in recipe for Souffle Crackers, a recipe that called for soaking Uneeda Crackers in water for 8 minutes, then broiling them till brown.  Alas, Uneeda Crackers no longer exist!

While the recipes might seem a bit dated, one thin that is not is Healy's taste in kitchen ware. Au Bon Gout was the place to buy Dodie Thayer china with its unmistakable leafy patterns.  IT was a popular purchase for everyone from Jackie Kennedy to C.Z. Guest.  The late Brooke Astor had a collection of 218 pieces including  a tureen, cover and stand, a large salad bowl, a circular serving dish, a circular platter, four oval platters in three sizes, a trefoil condiment dish, forty-one dinner plates, thirty dessert plates, fourteen side plates, thirteen salad plates, eight shallow circular bowls, eight small bowls, a coffee pot and cover, a milk jug, a cream jug, nineteen coffee cups and saucers, four tall vases, six small bud vases, eight candlesticks, four salts and six small ladles, six pepper shakers and fifteen butter pads, impressed marks.   Estimated to sell between $ 9,000 and $15,000, the lot sold for a whopping $74,500.

C .Z. Guest's tables set with Dodie Thayer

Tuesday, January 22, 2013

Not A Cookbook -- Inaugural Luncheon

Niagara Falls by Ferdinand Richardt

 Menu with Recipes and Wine

Menu

Wine

  • Tierce Finger Lakes Dry Riesling (2010)
  • Korbel Natural, Special Inaugural Cuvée California Champagne
  • Bedell Cellars Merlot (2009)

Saturday, January 19, 2013

CINNAMON ROLL CAKE (5 STAR!!)

Oh my goodness, this cake is beyond perfect. It has that wonderful taste that you only find in the "center part" of a good cinnamon roll (does that make sense?). The first time I tried it, I was compelled to close my eyes and savor it in complete silence...it was THAT good.

The cake is quick and easy to make and it is one of those great recipes that tastes good (even better) on day two and three (if it lasts that long).It would be a big crowd-pleaser for ANY occasion.


2 1/3 cups all purpose flour
TABLESPOON baking powder
3/4 teaspoon salt
1 1/2 cups granulated sugar
1/2 cup butter flavored Crisco (see note)

Put the above ingredients in the food processor and process until the mixture looks sort of like wet-ish sand. Remove from food processor and place in mixing bowl.

To the above mixture, add:

3/4 cup vegetable oil
4 whole large eggs
1 cup sour cream
2 teaspoons vanilla extract

Mix everything just until smooth, do not over mix. I did this with an electric mixer on low.

In a different small bowl, combine 1 cup brown sugar and 1 tablespoon of ground cinnamon, set aside.

Grease and flour a 9" x 13" GLASS baking dish. Put half of the cake batter in the prepared pan. Sprinkle it with 2/3 of the brown sugar-cinnamon mixture, then top with the other half of the cake batter. Gently swirl a small knife through the batter, making sure that you don't scrape the bottom of the pan.

Sprinkle the top of the 2nd layer with the final 1/3 of the brown sugar-cinnamon.


Bake in a preheated 325° oven (yes, that is 325°) for 50 minutes or until a toothpick tests clean (don't over bake).

Remove from oven and let the cake sit for 15 minutes, then drizzle frosting glaze over the top of the hot cake (leave the cake in the pan).

GLAZE

2 cups confectioners sugar
4 tablespoons milk
1 tablespoon vanilla extract

Whisk till smooth and drizzle over hot cake.

Keep this cake in the baking dish, just make sure you cover it tightly with plastic wrap AFTER it is completely cooled.

This cake is beyond moist and delicious on day two and three.

NOTE: The recipe calls for butter flavored Crisco; I have no idea how the batter/cake would turn out if you used something else, (sorry).

Friday, January 18, 2013

TACO MEAT LOAF

This meat loaf is a lot of fun and it is a great way to perk up any week night. It has crushed corn chips, salsa and cheese in it and then its topped with refried beans and more cheese.

The "heat" of your salsa will determine how spicy this meatloaf is, so it is easy to adjust for younger kids (and us grandparents). I like to serve it with Spanish rice, refried beans and coleslaw. It is a great change of pace.


1 pound of LEAN ground beef (less than 10% fat)
½ cup of finely crushed corn chips
1 beaten egg
3 teaspoons chili powder
1 teaspoon cumin
½ cup of (your favorite) thick and chunky salsa
½ teaspoon black pepper
½ cup of Mexican blend shredded cheese


TOPPING
1 cup of refried beans
¼ cup of your favorite salsa
1 cup of Mexican blend shredded cheese


In a bowl, mix the ground beef, corn chips, egg, chili powder, cumin, salsa, black pepper and ½ cup of shredded cheese. Mix thoroughly and form into an oval on the baking sheet (not in a loaf pan).
 You should have an oval meat loaf like this

In a small bowl, mix the refried beans with ¼ cup of salsa and frost the top of the uncooked meatloaf with it. Bake at 375° for 45 minutes. The last few minutes of baking time, sprinkle the top of the meatloaf with one cup of shredded cheese and return to oven.

To serve, gently slide a thin spatula under the meatloaf to loosen it from the baking pan and lift it (all in one piece) to a nice serving dish.


NOTE: I do not add salt to this recipe because there is plenty of salt in the other ingredients.
NOTE: By baking this on a sheet pan (rather than a loaf pan) the grease will run out onto the pan and not "soak" your meatloaf.You shouldn't have much "grease" if you use 90% lean ground beef.