Recipes from an Edwardian Country House

Recipes from an Edwardian Country House is a book that was repackaged from an earlier book. Frankly, I hate it when publishers do this sort of thing, as I often have the first book and then end up with another copy of the same book .

Seasonal Recipes From The Garden

For a long time my cable provider didn't provide a PBS station. It seemed weird, no PBS, but I learned to live it. After changing providers, I suddenly had PBS again.

Favorite Recipes of Famous Men

We are suckers for collections of recipes by "famous" folk. So naturally, Favorite Recipes of Famous Men a 1949 cookbook collection by Roy Ald is a great one.

Spoonbread and Strawberry Wine

There is not a single member of Norma Jean and Carole Darden's family that you want to hang out with. While most of them are gone now, they live on in this delightful cookbook and memoir.

Recipes from an Edwardian Country House

Recipes from an Edwardian Country House is a book that was repackaged from an earlier book. Frankly, I hate it when publishers do this sort of thing, as I often have

Showing posts with label CHRISTMAS COOKIES. Show all posts

Wednesday, December 4, 2013

BRANDY SNAPS

If you want to impress your guests, make some of these Brandy Snaps for them. They look so elegant and they are definitely not something you see on every dessert tray.

A hard candy shell filled with sweetened whipped cream...do I have your attention yet?  Pretty fool proof if you follow my extra tips below printed in RED, AND you can make them days in advance and fill them just before your guests arrive. 


BRANDY SNAPS


Brandy Snaps are basically a crisp, sweet, lacy, candy shell that you can fill with sweetened whipped cream or your favorite mousse.

They look very hard to make, but it is an illusion; they are pretty easy if you pay attention to the tips below in RED.

2 tablespoons sugar
2 tablespoons white corn syrup
1/4 cup butter  (I used only 3 tablespoons)
2 teaspoons brandy (or) 1 teaspoon vanilla (I used rum extract)
1/4 cup all purpose flour

Since this whole process goes VERY fast, it is best to have everything ready before you start cooking the above ingredients.

Preheat your oven to 350° and line a cookie sheet with parchment paper (important). These candy shells REALLY spread as they cook, so only plan on making six of them on each cookie sheet.

Mix the sugar, corn syrup and butter in a small saucepan. STIR over medium heat until the mixture is good and bubbling, then remove from heat and stir in the flour and flavoring.

Drop one measuring teaspoon (per candy shell) of the cooked mixture onto the parchment paper. This will spread out into a circle about 4" in diameter as it bakes for about 6 to 7 minutes, but watch them very carefully after six minutes, as they can go from caramel colored to DARK very fast. It sounds tricky, but it isn't.

My candy circles were fairly pale in color until they hit the 6 minute mark in my electric oven, but they were a beautiful light caramel color at 6 1/2 minutes.

When they have turned a nice light caramel color, remove from the oven and let them sit on the cookie sheet for about 30 seconds. If they look a little oily, LIGHTLY dab them with a paper towel.

Use a pointed knife and lift the edge of the candy circle up a little so that you can grab it with your fingers (be careful, this is VERY  hot). One at a time, quickly roll the candy circle around the handle of a wooden spoon (they will cool almost immediately and hold their shape).

Once you form it around the spoon handle, it will instantly be cool enough to slide the candy tube off of the handle, and it's done!! 

If the other candies get too "hard" to roll, put them back in the oven for 30 seconds or so (but that shouldn't be a problem, as they stay fairly pliable as long as they are on the hot cookie sheet), they only become rigid once they cool off.
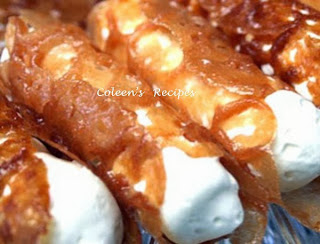


I didn't use a spoon handle, I used some metal cannoli tubes I have and they worked perfectly (no need to grease the spoon handle).

Keep the cooled candy tubes in an air tight container until you are ready to serve them. Fill them with sweetened whipped cream (the candy tubes can be filled up to about an hour before serving).

Don't be scared off by any of my "warnings' about this recipe, it may sound complicated, but it really is pretty easy and I hope you try it.

NOTE: I substituted rum extract for the vanilla, the candy tasted like butterscotch. I think ANY extract would work.

NOTE: You don't have to fill these with whipped cream. Almost any mousse like whipped filling would work wonderfully.


Wednesday, August 7, 2013

MAPLE PECAN TASSIES

When our kids were little, I made these Tassie's ONLY on special occasions, or during the Christmas holiday. I'm not sure why that was "the rule", but it was.

These days, at our house, Tassie's have evolved into a barbecue "staple" for several reasons: not only are they super easy (and mess-less) to serve a crowd (especially the little ones), but you can make them a day (or even two) ahead of time, which is always handy.

I just set a tray of these beauties out on the buffet table, and guests "re-visit" it again and again; I guess their mini-size isn't as intimidating as a big old piece of pecan pie.

Tassie's Aren't Just For Christmas Anymore!!


PASTRY CRUST
1 cup unsalted butter at room temperature (see note)
6 ounces cream cheese at room temperature
2 cups all purpose flour

Cream the butter and cream cheese (with electric mixer) until it is light and fluffy. Add the flour and beat until the dough comes cleanly away from the inside walls of your mixing bowl.

Roll pastry into 1 inch balls and place them into an un-greased mini-muffin pan. Using your fingers, press the balls of dough into the bottom of each cup and up the sides. (I use the floured round end of my rolling pin to press the dough into place). Place the pan of shaped shells into the freezer for a few minutes while you make the filling.

FILLING
3 large eggs
3 tablespoons melted butter
1 3/4 cups light brown sugar
1 teaspoon vanilla
1/2 teaspoon maple extract
3/4 cup coarsely chopped pecans (see note)

Beat the eggs until very well mixed and lemon colored. Stir in everything else (except nuts) and whisk until smooth; set aside.

Put a few chopped pecans in the bottom of each pastry shell and add enough filling to fill the shell about 2/3 full. (see note)

Bake in pre-heated 375F oven for 20 minutes or until the pastry is golden and the filling is set, yet still a little soft in the center. Remove from oven and sit the pan on a wire rack for about 10 minutes before you try to lift them out. Lift Tassie's out of pan and cool on a wire rack.


NOTE: Keep in mind that the filling puffs as it bakes, so don't overfill the unbaked shells. If you overfill them, they will be hard to get out of the pans. If your Tassie's resist coming out easily, use the tip of a knife to help you "lift them" out of the pan.

UPDATE: The recipe that I've used for 35+ years, used butter in the crust. However, recently, I decided to try butter flavored Crisco and I was thrilled with the crust difference. The butter produces a very white and non-flaky crust, but the butter flavored Crisco produces a super-flaky golden crust that picky-picky husband loved. If you click on the following photo, you can see how nice and flaky this ingredient substitution turned out.

NOTE: If you do not have maple extract, just leave it out.

NOTE: Picky-picky husband is not a big nut eater, so I put minimal nuts in these when I make them. Even with the extra filling, they bake in 20 minutes.
 

Wednesday, October 12, 2011

RASBERRY SHORTBREAD BARS

Everyone loves these raspberry bars, they have an ultra-buttery shortbread crust topped with cooked raspberries and a streusel topping.They are very sweet, buttery, tender AND they cut nicely...perfect for gift giving (these will definitely be in my cookie gift boxes this Christmas). Yes, you heard me correctly...it is never too early to start planning your holiday baking!!.

Raspberries grow well in Alaska, so if you are lucky enough to have some in the freezer, this is a wonderful recipe for them; I'm not so lucky, so I used a 12 ounce bag of frozen raspberries.

Put the berries (no need to thaw) in a heavy saucepan with ¼ cup of water and one cup of white sugar. Bring to a boil over high heat, then reduce the heat to medium high and simmer the berries until they thick (I turned mine down to a medium low heat and simmered them for about 15 minutes). Set aside to cool (they will thicken even more as they cool).
SHORTBREAD CRUST
21 tablespoons of butter, melted and cooled to room temp.
This seems like a lot of butter, but it makes an upper and lower crust
¾ cup of white sugar
2 large egg yolks
3 cups + 3 tablespoons all purpose flour
No need to use an electric mixer, I did it all with a wooden spoon. Mix the sugar into the melted butter and whisk in the egg yolks. Stir in the flour to make a very stiff dough. Remove two cups of this dough and pat evenly into a foil lined 9 x 13 pan. Prick the dough all over with a fork and refrigerate for 30 minutes (or put in freezer for 7 minutes). Set the rest of the dough aside.

Bake the 9 x 13 chilled pan of dough, on the middle rack of your oven, for 20 minutes at 325.
After 20 minutes, the dough will still be very pale in color and will not have any golden color on the edges. Remove it from the oven and spread the cooled raspberry filling evenly over it.

To the reserved shortbread dough that you set aside, add ¼ cup of granulated sugar and use a fork to break up the dough into crumbs (I use my pastry cutter).
Sprinkle the crumbs evenly over the raspberry layer. Bake on the TOP rack of a 350 oven for 25 minutes (mine took 32 minutes). Watch the crumbles towards the end of the baking time so they don't get dark. 

Cool baked bars on a wire rack for at least an hour or until completely firm. You can speed set them in the fridge. When the bottom of the pan is completely cool, lift the bars out of the pan by pulling on the flap ends of the foil. Cut into 2" bars. These will keep at room temperature for a week.

 NOTE: The butter measurement of 21 tablespoons is not a typing error
NOTE: Line  your 9" x 13" baking pan with foil and leave the ends of the foil a little long, so you can use them as handles to lift the cooled bars out of the pan. You don't have to grease the bottom of the pan because there's so much butter in the shortbread, but DO spray the sides of the pan/foil with cooking spray so the jam doesn't stick to the sides.

NOTE:
Pay attention to baking temperatures. The first crust pre-bake is on the middle rack at 325. The final bake is on the TOP rack at 350. The recipe says it is baked on the top rack so that the bottom of the crust doesn't get too dark.


NOTE: If you want to take a shortcut, I am fairly certain you can just use raspberry jam instead of cooking the berries. I have not tried it this way, but I don't know why it wouldn't work (although I'm fairly certain that the cooked berries taste "brighter".

Tuesday, December 21, 2010

OATMEAL CRANBERRY WALNUT COOKIES

If you are looking for one more easy cookie to round out your holiday baking, try these delicious cookies. They are light, crispy and buttery tasting (not the standard heavy oatmeal cookie).

1 cup butter (room temperature)
1 cup packed brown sugar
1 cup white sugar
2 eggs
1 teaspoon vanilla extract
1 teaspoon butter extract
1 teaspoon cinnamon
2 cups quick cooking oats
2 cups flour
1 teaspoon baking soda
1 teaspoon baking powder
1 teaspoon salt
2 cups Craisens (sweetened dried cranberries)
1 cup chopped walnuts
Beat butter, sugars, eggs and extracts for FIVE MINUTES (important to the light crispy nature of this cookie).
.
In another bowl, mix the flour, oatmeal, baking soda, baking powder, cinnamon and salt. Add this dry mixture to the butter mixture (1 cup at a time) beating well after each addition.
.
Stir in the dried cranberries and walnuts. Let this finished cookie dough sit for about 5 minutes.
.
Roll the dough into 1" balls (dough will be a little sticky). Place the dough balls on lightly greased cookie sheet, about 2" apart. Bake in 350 preheated oven for 12-14 minutes (my oven took 13 minutes).

NOTE: Before you put the cookie dough balls on the baking sheet, look for the side that shows the most cranberries and put that side up (the prettiest side).

.
NOTE: These freeze very well. I drizzled a vanilla glaze on my cookies (for the holidays) but that is not necessary. Makes about 4 dozen?

Sunday, March 14, 2010

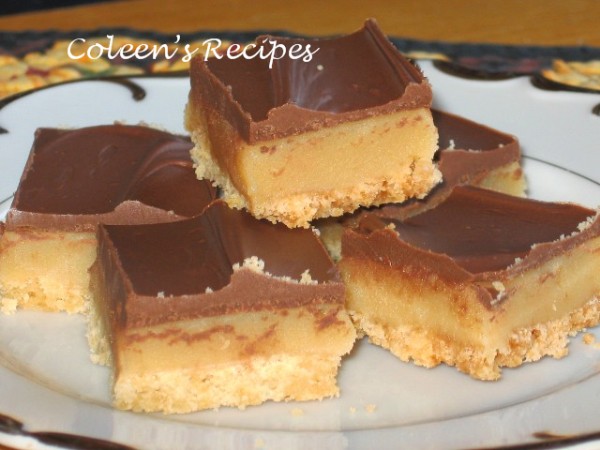
(TWIX COPYCAT) CHOCOLATE-CARAMEL-SHORTBREAD COOKIES

A few days ago, I spotted an intriguing recipe on someones web page, however, in my haste I didn't take note of who's page it was (thank you to everyone who helped with page suggestions). Instead I found a similar recipe and gave it a try (with a couple minor changes). My first "taste testers" were a group of old grizzled snowmachine groupies in Hubby's shop and the treats disappeared instantly.


Next, I made some to take to our granddaughters 14th birthday party; they were a hit there as well. It is unfortunate that these cookies are called Twix cookies, because they are vastly better than ANY Twix candy bar I've ever eaten. There is a sweet crispy shortbread cookie base, topped with a nice thick layer of caramel made from sweetened condensed milk, and then they are topped with your favorite flavor of melted chocolate. These cookies are totally addicting and the recipe is going straight into my FIVE STAR recipe folder.

COOKIE BASE
1 cup cold butter
2 generous cups all purpose flour
heaping ½ cup brown sugar (I used dark)


Put all the of cookie ingredients into the food processor and pulse until it just starts to bind together. It won't go completely together, but if you watch it while you pulse, you will see the consistency change and small "clumps" appear.


Press this mixture into a parchment paper lined 9x13 baking dish (I left the ends of the parchment paper long, so I could grab them and lift the final product out of the pan for easier cutting). Bake in preheated 350F oven for 20-25 minutes or until edges are light golden. (see note below)

While the crust is baking, make the caramel filling:
.
¾ cup butter
generous ½ cup brown sugar (I used dark)
3 tablespoons Karo corn syrup
14 ounce can sweetened condensed milk (not evaporated)
.
In a heavy bottomed saucepan, mix all of the caramel ingredients. Heat (and stir constantly) on medium high heat until it comes to a boil. At first, the melted butter will sort of float on top, but as it cooks (and you stir) it will incorporate. See note below for burner temperature suggestions. Reduce heat and simmer for 6-8 minutes, stirring constantly. Pour over pre-baked cookie base. Refrigerate until caramel layer is cold and firm to the touch.
.
Melt 12 ounces of your favorite flavor chocolate (I used milk chocolate) + a teaspoon of butter. Stir until smooth and pourable (I just melted mine in the microwave for 60 seconds). Spread over cooled caramel and return to the fridge to let the chocolate set (I actually speed set mine in the freezer).
.
Cut into small squares and serve. These are really rich, so I cut them into squares just a little bigger than 1" x 1".
.
NOTE: The recipe calls for "2 generous cups of flour"...whats up with that? I measured my flour and sugar in the standard way then added a tablespoon extra per cup. I'm not sure if that is what the original recipe meant, but it worked well for me.
.
NOTE: The ingredient amounts for the cookie crust are way off track in the original recipe. I only used about 2/3 of the crumbs for the cookie base and it was perfect. If you like a thick cookie base, use all of the crumbs.
.
NOTE: My burner settings go from 1 to 10. I brought the caramel ingredients up to a boil at setting 8 (medium high), then quickly turned it down to setting 5 (medium) for a couple of minutes, and finally ended up on setting 3 (low); cooking for a total of 6 minutes. The caramel will be pretty thick, so keep reducing the heat until the caramel. The caramel traps and holds the heat for a long time, so start turning down your burner before it gets to that wild-boil stage.
.
NOTE: I found this recipe (dated 2008) on a web page called The Domestic Side of Life.

Thursday, November 19, 2009

CLASSIC PECAN TASSIE

Almost everyone has their own favorite version of a pecan tassie, the classic Christmas treat. However, for those who don't, this is a great one. Pecan tassies are a bite size pecan pie in a cream cheese pastry crust. I used to make them only at Christmas, but they have become one of Hubby's favorites, so I make them throughout the year. This recipe makes 4 dozen and freezes well.


PASTRY CRUST
1 cup unsalted butter at room temperature
6 ounces cream cheese at room temperature
2 cups all purpose flour

Cream the butter and cream cheese (with electric mixer) until it is light and fluffy. Add the flour and beat until the dough comes cleanly away from the inside walls of your mixing bowl. Flatten dough into a disk, wrap in plastic and chill for one hour (I NEVER chill this dough, it is a dream to work with).

FILLING
3 large eggs
3 tablespoons melted unsalted butter
1 3/4 cups light brown sugar
1 teaspoon vanilla
1/4 teaspoon salt
1 cup coarsely chopped pecans

Beat the eggs until very well mixed and lemon colored. Stir in everything else.

ASSEMBLY
Roll pastry into 1 inch balls and place them into an ungreased mini-muffin pan. Using your fingers, press the balls of dough into the bottom of each cup and up the sides. (I use the floured end of my rolling pin to press the dough into place). Put a few chopped pecans in the bottom of each pastry shell and top with about a tablespoon of filling. (see note)


 Bake in pre-heated 375F oven for 15-20 minutes or until the pastry is golden and the filling is set, yet still a little soft in the center. Remove from oven and sit the pan on a wire rack for about 10 minutes before you try to lift them out. Lift tassies out of pan and cool on a wire rack.

NOTE: Keep in mind that the filling puffs as it bakes, so don't overfill the unbaked shells. If you overfill them, they will be hard to get out of the pans. For those stubborn tassies, use the tip of a knife to help you lift them out of the pan.


Monday, November 16, 2009

SWEET POTATO PECAN PIE TARTS

I'm posting this at midnight and it is FIFTEEN BELOW ZERO HERE!!
This last weekend was our 39th wedding anniversary; we were high school sweethearts. To celebrate, I made a big roast beef dinner and these heavenly little tarts that I found on Shelby's The Life and Loves of Grumpy's Honybunch. They are absolutely delicious tiny bites (about the size of a tassie) of cinnamon spiced sweet potato and pecans all baked in a pre-prepared mini-phyllo cup. They are impressive looking, great tasting, ultra-easy and (believe it or not) the recipe says they are only about 45 calories each!! It doesn't get much better than that!!!

1 cup cooked and mashed sweet potato
3 tablespoons white sugar
¼ teaspoon cinnamon
1/8 teaspoon salt
1/3 cup chopped toasted pecans
¼ cup brown sugar, packed
1 tablespoon dark corn syrup (I used light)
½ teaspoon vanilla extract
1 egg white

2 (2.1 ounce) packages mini-phyllo shells

Poke sweet potatoes a few times with a knife and place them in a pie plate with 2 tablespoons of water; cover loosely with waxed paper and microwave on high for five minutes (mine took 7 minutes) or until tender.

Mash and measure out 1 cup of sweet potato. Add sugar, cinnamon and salt and stir well (I used my electric mixer to really mash the potatoes). Set aside.

In a small bowl, combine toasted pecans, brown sugar, syrup, vanilla and egg white. Stir well and set aside.

Set mini phyllo shells on a baking sheet and put about 1 teaspoon of the sweet potato mixture into the bottom of each shell (gently push down-in a little). Spoon ½ teaspoon of pecan mixture over the sweet potato mixture. Bake at 350F for 20 minutes. Cool completely on a wire rack.

NOTE: Our super-store sells these little pre-made phyllo shells in the ATHENS brand.

Saturday, November 14, 2009

CHOCOLATE-PEANUT BUTTER FILLED COOKIES

There should be a warning attached to this recipe...do not eat these while they are still warm, because you won't be able to stop!! These chocolate spritz dough cookies with a mini-Reese's center, are heavenly right out of the oven. I "accidentally" knocked a few of them over, while they were still hot, and the melted chocolate sort of got drippy like in this photo (so I was FORCED to eat those imperfect ones...snicker).


The chocolate shell is a spritz cookie recipe

1¼ cup butter (room temperature)
1 cup white sugar
2/3 cup brown sugar packed
2 large eggs
1 teaspoon vanilla extract
2½ cups all purpose flour
2/3 cup bakers cocoa
½ teaspoon baking soda
¼ teaspoon salt
Frozen miniature Reese's cups

In a large mixing bowl, cream butter and sugars at medium high speed until light and fluffy. Add the eggs, one at a time, beating well after each egg. Add vanilla extract. Sift together the flour, cocoa, baking soda and salt. Add this gradually and beat well. Let dough sit for about 15 minutes.

Roll dough into 1½ inch balls and place in an ungreased mini-muffin pan. Bake at 375 for about 12 minutes, leave the cookies in the pan.


Immediately press a frozen miniature Reece's cup candy into the center of each baked cookie, pressing down as far as you can. Let cookies sit in pan for about 10 minutes, then carefully lift them out and place them on a cooling rack. The chocolate will be very liquid, so be careful not to spill it.


 Cookies will cool and set in an hour so. After the chocolate "sets" the cookies are no longer messy. Makes about 4 dozen.

NOTE: Christmas sprinkles or candy would make these a wonderful addition to your Christmas cookie trays.