Recipes from an Edwardian Country House

Recipes from an Edwardian Country House is a book that was repackaged from an earlier book. Frankly, I hate it when publishers do this sort of thing, as I often have the first book and then end up with another copy of the same book .

Seasonal Recipes From The Garden

For a long time my cable provider didn't provide a PBS station. It seemed weird, no PBS, but I learned to live it. After changing providers, I suddenly had PBS again.

Favorite Recipes of Famous Men

We are suckers for collections of recipes by "famous" folk. So naturally, Favorite Recipes of Famous Men a 1949 cookbook collection by Roy Ald is a great one.

Spoonbread and Strawberry Wine

There is not a single member of Norma Jean and Carole Darden's family that you want to hang out with. While most of them are gone now, they live on in this delightful cookbook and memoir.

Recipes from an Edwardian Country House

Recipes from an Edwardian Country House is a book that was repackaged from an earlier book. Frankly, I hate it when publishers do this sort of thing, as I often have

Wednesday, October 31, 2012

PUMPKIN SPICE CUPCAKES

This is a wonderful recipe for several reasons: the cupcakes are super moist and tender, they are mildly spiced and the batter goes together with one bowl and a whisk; what could be easier? They are so tasty, that they really don't need a frosting, although I like to serve them frosted with a simple maple flavored butter cream (pumpkin and maple are MADE for each other). Everyone loves these simple cupcakes!!

In a large bowl, mix together with a whisk:

(1)  15 ounce can of pumpkin (not pie filling)
1 2/3  cup of granulated sugar
1 cup vegetable oil
4 eggs
2 teaspoons ground cinnamon
(scant) 1/2 teaspoon ground cloves
(scant) 1/4 teaspoon ground nutmeg

Whisk together until very well mixed, then add:

2 cups all purpose flour
2 teaspoons baking powder
1 teaspoon baking soda
1 teaspoon salt

Mix well, then stir in 1/2 cup of raisins (optional).

Fill cupcake papers 3/4 full.  Bake in a 350 oven for 23-25 minutes (my electric oven takes 23 minutes) or until toothpick tests clean.  Remove and cool.

After the cupcakes have cooled, dust the tops with powdered sugar or frost with your favorite frosting.


I never measure my "everyday" frosting, but here's a stab at it:

Melt 3 tablespoons butter; add 1 teaspoon vanilla extract and 1/2 teaspoon maple extract.
Add 1 to 1½ cups of powdered sugar and a couple tablespoons of cream.  Whisk till smooth. If it seems a little to dry, add another tablespoon of cream.  If it seems a little too wet, had another spoon of powdered sugar.  

MAKES 24 CUPCAKES

Happy Halloween

Don't Go Into The Attic...

Thursday, October 25, 2012

TRICK or TREAT !!

I recently came across this great trick or treat idea through an old friend who found it on feeling crafty.org   It obviously doesn't need "instructions" or a "recipe" but I just thought it was so clever and I wanted to share it.

I can see a big bowl of these ready for
trick-or-treaters on Halloween!!


Monday, October 22, 2012

SWEET AND SAVORY RICE


I love savory rice and picky-picky husband loves sweet rice. As a matter of fact, his all time favorite rice is plain white rice with butter and sugar on it, go figure!!

Today's rice is one that we BOTH enjoy. It goes very well with almost anything, but we especially like it with pork chops or baked ham.

.
2 ¼ cups chicken broth
1 tablespoon butter
1 cup raw white rice
½ teaspoon onion powder
½ teaspoon salt
¼ teaspoon black pepper
1 teaspoon ground cumin
1 large cooking apple (cored, peeled and diced)
1/3 cup dark brown sugar
1/3 cup golden raisins
½ cup chopped toasted pecans
.
Melt the butter in a medium saucepan and add the RAW rice.  Cook/stir the rice until it turns sort of opaque white. This will help keep the rice grains separate while it cooks.

Add the chicken broth and everything else in the recipe, except the pecans.  Bring to a boil and then turn the heat way down so that it is at a low simmer. Put a tight fitting lid on the pot and let it simmer for 20 minutes (don't peek).

Remove the pan from the heat, gently stir in the toasted pecans and put the lid back on for 5 minutes (but with no heat).

That's it!! The dark brown sugar and fruit lend a mildly sweet flavor to the rice and the ground cumin gives it a full flavor. This rice makes an excellent buffet dish since it also tastes great at room temperature. I hope you will try it.

NOTE: I've also used canned peaches (when I was out of apples) and it tasted great.

NOTE: Use vegetable broth instead of chicken broth if you are vegetarian

Friday, October 19, 2012

MAPLE FLAVORED SYRUP

Our children were raised on homemade pancake syrup for two reasons. First and foremost, it was economical and easy to make. Secondly, the kids didn't care for the (waxy?) aftertaste of commercial pancake syrups, so homemade syrup was their request. 

Now, I know there are people who will write and say they can't eat anything but real maple syrup; I understand that. However, the price of real maple syrup is almost frightening, these days, ($25 for a small jug here in Alaska) and this homemade syrup is a tasty alternative. I like to make it the night before and pour it into a mason jar and let it sit at room temperature (until morning). I then microwave it for a minute or so when the pancakes are done.


If you are one of those people who grew up with homemade syrup, you know that it is a lot thinner than some of today's commercial syrup (especially when its very hot). I'm guessing that commercial syrup is thickened with high fructose corn syrup. On the other hand, it is a little thicker than real maple syrup.

This recipe is SUPER quick and easy:

1 cup water
1 cup granulated sugar
1 cup brown sugar (I use dark brown sugar)
3/4 teaspoon maple flavored extract  (see note)
1/2 teaspoon vanilla extract

Put everything in a large, heavy pan (use a DEEP pan because this syrup will bubble up as it boils).

Boil hard (not stirring) for 3-4 minutes, then remove from heat.   You can use it right away, but it will seem thin.  The syrup thickens as it cools. Use it just like you would any pancake syrup.

We like to eat the syrup warm (not hot).

NOTE: I like to use dark brown sugar, but light brown sugar works just as well (but syrup will be  lighter in color).

NOTE: Bring the ingredients up to a rapid-crazy boil over high heat. The liquid will try to "climb" the walls of the pan, so make sure your pan is big enough. Once it's boiling like crazy (don't stir), turn the heat down to medium high and boil for 3 to 4 minutes. I boil mine for 3 minutes, but if you want the syrup to be a little thicker, go for 4 minutes. If you boil it much longer than that, the syrup will form a few rock candy crystals in the bottom of the jar (fun to eat).

NOTE:  I prefer a maple flavored extract called Mapleine (Walmart carries it), but if you can't find it, regular maple flavored extract works well too. My family says they can't tell the difference.

Monday, October 15, 2012

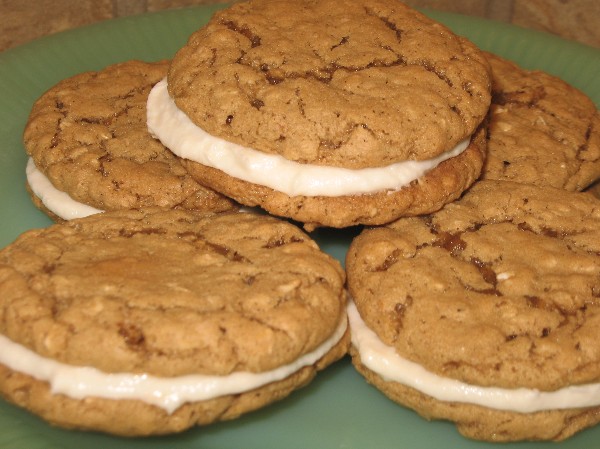
CHEWY OATMEAL WHOOPIE PIES

Whoopie pies are two cookies, layered back to back, with a thick layer of frosting in between. Some have a cake texture, some are crunchy and some (like today's post) are chewy.  I like to wrap them individually so the cookies stay on the soft side (plus, since they are pre-wrapped, they are easy to toss into a lunch box, sort of like home made Little Debbie's oatmeal cookies.

This recipe has the wonderful taste of "oatmeal and autumn" spices. It is also a cookie you can easily make even if the pantry is running low on everything because there are no "special" ingredients in these whoopie pies.

2 cups brown sugar (I like dark brown)
3/4 cup butter (room temperature)
2 eggs
1/2 teaspoon salt
1 teaspoon ground cinnamon
1/4 teaspoon ground nutmeg
1 teaspoon vanilla extract
1 teaspoon baking powder
1 teaspoon baking soda
2 tablespoons boiling water
2½ cups all purpose flour
2 cups quick cooking oats

Preheat oven to 350 and spray cookie sheets with vegetable spray (I don't spray, I just use parchment paper).

Cream together the butter, brown sugar, eggs, salt, cinnamon, nutmeg, baking powder, baking soda and boiling water. Beat until mixture is light in color and fluffy.

Beat in the flour and oats. Let mixture sit for about 5 minutes.

Roll into balls about the size of a small walnut.  These cookies don't "spread" a lot, so you can space them about 3" apart. Just try and make them all the same size.

Place the cookie dough balls on a prepared cookie sheet and bake at 350 for 10 minutes.  The cookies will look like they need another couple of minutes, but they don't. Remove them from the cookie sheet and place on a cooking rack. If the cookies are puffed up... very lightly tap the top of the cookie with the back of a fork.  Cool cookies completely.

COOKIE FILLING

1 cup butter (room temperature)
2 teaspoons vanilla
4 cups powdered sugar
4 tablespoons milk

Mix everything (starting with only 3 tablespoons milk) and add the other tablespoon if the frosting is too stiff.

Use the frosting, generously, to "glue" two cookies together.


Wrap cookies individually or keep them in an airtight container so the cookies will remain chewy and not crunchy.

Tuesday, October 9, 2012

Not A Cookbook -- A Quote


 "There are some of these foodstuffs that I think just taste better when they die in your mouth as opposed to die when you squish them with a hammer or something like that. And of course you could argue that there is a theatrical element to it."   

René Redzepi at the 2012 New Yorker Festival.  The Noma chef was asked about eating bugs or seafood while it is still alive.

Not A Coobook...A Winner

Not a lot of responders, which means your chances of winning were greatly enhanced.   We threw the names into our favorite mixing bowl and Melanie and Wendy scored.   We want to see your Grain Mains creations so send pictures!!! 


Saturday, October 6, 2012

NO KNEAD PIZZA DOUGH

What is easier than a no-knead pizza crust? This recipe (like many I have) are a combination of several recipes, tweaked with years of experimentation on my part. This one is a keeper!!

We love a pizza crust that stays crispy underneath the filling, yet the edges are light and airy with big air pockets inside the dough. The hardest part of this recipe (that's a joke) is to remember to mix the dough the night before (it needs to sit at room temperature for 24 hours). No need to use a mixer and dough hook, just a bowl and spoon; it is super-easy.


3 cups all purpose flour
1 tablespoon yeast
1½ teaspoons salt
1 teaspoon olive oil
¼ teaspoon black pepper (optional)
1 tablespoon sugar
1½ cups warm water

In a large bowl, mix everything, using a wooden spoon.  The dough will be very wet and look more like a batter than a dough. Don't be tempted to add more flour at this stage!!


Cover the bowl with plastic wrap and let it sit at room temperature for 24 hours. After 24 hours, the dough/batter will be nearly triple in size, so use a big bowl, see all those bubbles?


After 24 hours, stir the dough. It's going to be pretty sticky, but don't freak out about it.

Heavily flour your counter top and pour/scoop the dough out onto the flour.  Generously sprinkle flour over the top of the dough too.  Fold the dough back onto itself a few times. This is a little messy/sticky, so keep flouring your hands. After you've coated the dough with flour and folded it over a few times, cut it in half (makes 2 medium pizza's).

Preheat your oven (with pizza stone on center rack) to 450 degrees.
Put each piece of dough on its own piece of parchment paper and using floured hands, gently pat it into a circle, leaving the edges thicker and the center as thin as you can. Add toppings and brush the edges of the crust with a little water (not much).
The dough is going to stay on the parchment paper when you put it onto the hot pizza stone. To do this, I transfer the paper and dough by lifting it with a rim-less cookie sheet, and then I slide the whole thing off of the cookie sheet and right onto the stone. Bake it for 8 minutes.

After 8 minutes, pull the parchment paper out of the oven. Turn the bake cycle off and turn on the broiler cycle for about 1 to 2 minutes (watch closely). The hot pizza stone will continue to bake the underside of the crust, but the broiler will brown the toppings nicely.

We love those light airy pockets inside the crust!!

Monday, October 1, 2012

NO ROLL JELLY ROLL

Last year, I posted a recipe for an old fashioned jelly roll cake.  I heard from several people who said they had fond memories of their mom or grandma making jelly rolls, but they were afraid to make one themselves because they were nervous about rolling the cake.

Rolling the cake isn't hard, as long as you follow a few strict rules, but it IS messy with all of the "sprinkle towel with powdered sugar" stuff. That is why I came up with this "NO ROLL JELLY ROLL".  I think it is every bit as pretty as the classic jelly roll Grandma used to make but it is MUCH EASIER !!


This is definitely going on my holiday table this year

Basically, I baked the same 10 x 15 sponge cake that I use in the jelly roll, but I cut it into thirds and stacked them with jam in between each layer and on the top, then drizzled vanilla glaze over. I'm very happy with how it turned out. It is so simple, I know I will be making it a lot more often.

3 large eggs
1 cup granulated sugar
1 teaspoon butter extract (see note)
1 teaspoon vanilla extract
1/3 cup water (see note)
1 cup CAKE FLOUR
1 teaspoon baking powder
1/4 teaspoon salt
1 cup jelly or jam  (see note)

Preheat oven to 375 then line a 10" x 15" pan with parchment paper and spray the paper with cooking spray, set aside.

Beat the eggs, on high, until very thick and lemon colored (takes about 5 minutes).  After five minutes, and while the mixer is still running on high, slowly add the sugar.

Put the butter extract into a 1/3 measuring cup and then fill the cup with water (extract + water should = 1/3 cup). Add the extract-water and vanilla extract to the egg mixture and mix well.

Sift the cake flour, baking powder and salt into the egg mixture and beat just until the batter is smooth (I do this step with a whisk).

Pour batter into prepared pan and bake in preheated 375 oven for 12-15 minutes (my electric oven takes 15 minutes) or until toothpick in center comes out clean.

Remove from oven and slide a sharp knife around the edges of the cake to loosen them.  Let the cake cool in the pan for 10 minutes before removing.


Place waxed paper or saran wrap on a cookie sheet (spray the paper/plastic wrap with cooking spray) and turn the cake out onto the cookie sheet.  This will help you transport the cake while its still hot.  The cake is much easier to cut and handle if its chilled, so I put the cake in the freezer for about half an hour before I tried to cut it.

When you are ready to assemble the cake, slice a VERY THIN edge off of each side of the cake (not necessary, but looks prettier).  Cut the cake in thirds.

Place the bottom layer on a serving plate and spread with jam (stir the jam to loosen it up before spreading). Repeat with next two layers.

Spread jam on the top of the cake and then drizzle with vanilla glaze. 


VANILLA GLAZE
1/3 cup melted butter
2 cups powdered sugar
1½ teaspoons vanilla extract
¼ teaspoon almond extract
2 tablespoons milk

Mix all together with a whisk.

NOTE: This recipe works best with a jam that doesn't have big pieces of fruit in it. Personally, I like Smuckers Simply Fruit; it not only tastes great but its PERFECT for this cake. Just make sure you stir or whisk the jam before spreading it, it will soften up and get smooth.

NOTE: If you do not have butter extract, just double the vanilla extract.

NOTE: This cake gets more moist after it sits for a few hours because the jam sinks into the cake a little.

Friday, September 28, 2012

PEANUT BUTTER CREAM BARS

I've been making these bars since my kids were little; now I make them for my grandchildren. I think that is the mark of a great recipe, don't you? 

This cookie bar has a creamy (peanut butter and sweetened condensed milk) layer between two chewy oatmeal cookie layers. As if that wasn't enough, the finished bars are drizzled with a peanut butter frosting glaze. They are SO GOOD and they make a great bake sale item.

 
 2 cups raw quick oats
1¾ cups brown sugar
1½ cups all purpose flour
1 teaspoon baking powder
½ teaspoon baking soda
1 cup butter
2 cups chocolate chips (or 1 cup mini chocolate chips)
1 beaten egg
14 ounce can sweetened condensed milk (not evaporated)
1/3 cup creamy peanut butter

Combine the first 5 ingredients in a large bowl and then cut in the butter (like you would for a pie crust). I do this step with an electric mixer, but don't do it with a food processor because it will chop the oatmeal to finely.

Remove 1¾ cups of these crumbs and put them in a small bowl with the chocolate chips and set it aside.

Mix the beaten egg into the remaining crumb mixture (not the part with the chocolate chips) and mix well. Press this mixture into a greased (I use parchment paper instead of grease) 10" x 15" x 2" baking pan and bake in preheated  350 oven for 15 minutes.

While the base is in the oven, whisk the sweetened condensed milk together with the creamy peanut butter and set aside.

When the partially baked crust comes out of the oven, drizzle the milk-peanut butter mixture evenly over the crust. Sprinkle evenly with the reserved crumb-chocolate chip mixture and bake, at 350, for another 15 minutes.

Drizzle the baked bars with peanut butter frosting while they are still warm. Cool completely in the pan before cutting into squares.


NOTE: For ease of cutting, I line the pan with parchment paper and leave the sides a little long, so I can grab the COOLED bars and lift them out of the pan for slicing.

PEANUT BUTTER GLAZE
1/2 cup creamy peanut butter
2 tablespoons butter soft
1 teaspoon vanilla extract
2 cups powdered sugar
4 tablespoons milk

Now keep in mind, I NEVER, and I mean NEVER measure ingredients for a cake glaze, so I'm hoping these amounts work for you.  Heat the peanut butter and butter in the microwave until it is nice and soft.  Add the vanilla, milk and sugar and whisk till smooth.  If it seems a little dry, just add another tablespoon or so of milk. If it seems too soupy, add a tablespoon or so more powdered sugar.  When the glaze is nice and smooth, drizzle it over the warm bars.


Wednesday, September 26, 2012

Grain Mains


What, you might ask, is such a carnivorous loving web site doing reviewing a grain book? Hey, we have done grains before.  We love grains, usually accompanied by a nice rib-eye, but we do love grains.   In fact, last Christmas we got a 5 pound bag of quinoa -- a gift that keeps on giving. 

Let me get this out of the way, Rodale sent out a copy of this book and giveaway books!!  Yes, gentle reader, you too, may get a copy of this very book.  This book, however, was already on our "Wish List."  We often get publishers offering us cookbooks and since we believe in full disclosure and since we rarely write about a book we do not like, we have certain trepidation when accepting such books.  Seriously, what if they suck?  What if they are about baby food?  What if they are just tedious?  We did not feel any of that when we accepted Grain Mains

Why?

First and foremost, we love Bruce Weinstein and Mark Scarbrough.   They wrote one of our Top Ten cookbooks of 2011, Goat: Meat Milk Cheese.   Secondly, they are funny.  We read a lot of cookbooks!  Rarely do they convey joy and humor, but these guys always do and that is a joy.  

An aside:

I have a friend who is in his 86, which as it turn out, is also his weight.  I never see him that he does not eventually get around to talking about Red Meat.  It is a killer.  It make you fat -- he looks at me.  It is bad for you, not just me.  Fat, cholesterol, mad cow... the mind wanders.  If you love food, you know this person and you do your best to duck and cover.  One worries that someone who actually writes a cookbook about "grain" might be a heavy-handed.  Not so in Grain Mains.


Another problem...

Corn and rice -- we can cook that.

Barley?  OK once, as a child we had Campbell's Beef and Barley soup.

Millet?  Wasn't she that poet? Edna something Millet.

Amaranth? Teff? Job's Tears?   How the frack do I cook this?  Do not despair.  Weinstein and Scarbrough give the reader a simple and easy primer on each grain.  It's flavor, texture, and a little history.  They also provide a ratio of liquid to solid for cooking  and a time frame. Yes, Virgina, you can cook Kamut.

Let's review:

We got the book for free and we are having a give away.    Bruce Weinstein and Mark Scarbrough are funny and not holier-than-thou health food nuts.  If you can cook rice you can cook quinoa.   

Grain Mains: 101 Surprising and Satisfying Whole Grain Recipes for Every Meal of the Day does just that.  The cookbook offers up a series of recipes featuring a whole grain main ingredient that moves beyond oatmeal.  Want an interesting choice for breakfast?  Try their Quinoa Cashew Muffins or Breakfast Polenta Cake with Kamut Crunch Topping. 

We find salads are a great place for introducing whole grains into a meal.  The grains add an amazing texture and elevate the most ordinary salad.   By adding wheat berries to a simple olive and feta salad, Weinstein and Scarbrough offer up the familiar with a Grain Mains twist.   They make a Reuben Salad (and I thought I was the only one who made a Reuben Salad) and add rye berries, which makes perfect sense and gives the creamy cabbage, pastrami and cheese a nice chewy bite.  And speaking of pastrami, while most of the recipes in the book are vegan or vegetarian, there is ham, chorizo, bacon and tuna to please those carnivores among us, while providing animal-free options. 

The biggest testament to the power of grains is the section on grain burgers.   The most finicky of eaters will devour most anything slapped between two buns and Grain Mains offers up several inviting creations including this one:

Black Quinoa and Black Bean Burgers

2/3 cup black quinoa
1 (15 ounces) can  black beans, drained and rinsed
2/3 cup old-fashioned rolled oats (do not use quick-cooing or steel-cut)
3 tablespoons barbecue sauce
Up to 2 tablespoons pickled jalapeno rings
1 tablespoon Worcestershire sauce
1 tablespoon sweet smoked paprika
1 tablespoon chile powder
1 teaspoon ground cumin
3 tablespoons nut oil, such as walnut, pecan, pistachio, or hazelnut


1.  Fill a large saucepan about halfway with water, pour in the quinoa, and bring to a boil over high heat.  Reduce the heat to low and simmer until the grains have developed their halos and are tender, about 10 minutes.  Drain in a fine mesh sieve or a lined colander set in the sink.

2. Scrape the quinoa into a large food processor. (Believe it or not, this is the hardest part of this entire recipe: getting all those grains out of the sieve.)  Then add the black beans, oats, barbecue sauce, jalapenos, Worcestershire sauce, smoked paprika, chile powder and cumin,  Process to make a paste like batter, scraping down the inside of the bowl once or twice.  Scrape down and remove the chopping blade.

3.  Heat a large skillet over medium heat and swirl in the oil.  Use dampened hands to form the batter into 6 even, round, fairly flat patties.  Slip these into the skillet and cook until deeply browned, about 4 minutes.  Flip them and continue cooking until well browned and crisp on the other side, about 4 more minutes.  
 Gosh, burgers, salads, stews, casseroles, muffins, cakes all filled with whole grains.  Your cardiologist will love you, as will most everyone else you might just be cooking for.  Give Grain Mains a try.  We will make it ever so easy, just comment and win... maybe.

Monday, September 24, 2012

Real Cajun


We have been on a bit of New Orleans kick as of late.  No that that is a bad thing.  (Actually, it can be a bad thing. Spending just under one year in New Orleans, I managed to gain 40 pounds.  I had to leave while I could still fit in the car, but I digress...)

Reading Donald Link's Real Cajun:Rustic Home Cooking for Donald Link's Louisiana, it is not hard to fathom gaining 40 pounds!  Unlike some chefs who end up in a place, or move to an area, of like the climate and choose to open a restaurant, Donal Link grew up in Louisiana.

"My two sets of grandparents lived a quarter mile from one another, and we settled about a mile from them. Between my mother and father , I have thirty-four aunts and uncles. That's ten brothers and sisters on Mom's side and seven on Dad's."
A truly inconceivable fact to grasp for an only child!

During a particularly popular wave of Cajun cooking, fish got blackened to the point of extinction, and over-bearing spices removed and distinction between flavors.  That was not the food Donald Link grew up eating.  It is no surprise that he titled his book "real" Cajun.  Link wanted to convey the joy and flavors and love he tasted from his family who truly lived off the land.

When that land was devastated by Katrina, Donald Link lied, snuck, and cajoled his way back into the city that he loved.  Nothing, not floods, National Guard, nor walk-in freezers full of rotting food was going to keep him from cooking.   All he wanted was to get his restaurant, Herbsaint, open for those people who were determined to re-build.  Re-build they did, as Link knew they would.  Heck, in the midst of the turmoil he opened another restaurant, Cochon, and he still had time to write a cookbook!


Recently, I was craving fried shrimp, but alas, the only shrimp I could find in West Virginia had been frozen for about a decade, maybe less, but i am guessing at least a decade.  Since I couldn't make my own fried shrimp, the next best thing was read Donald Link and live vicariously.

Southern-Fried Shrimp 

2 dozen large shrimp, peeled
1/2 teaspoon plus 1 1/2 tablespoons salt
1/4 teaspoon plus 1 tablespoon ground black pepper
2 cups all-purpose flour
2 teaspoons cayenne pepper
Peanut oil, for frying
1 cup well-shaken buttermilk
2 teaspoons Creole (or whole-grain) mustard (optional–if you want your shrimp tangier)


Place the shrimp in a medium bowl and season with 1/2 teaspoon salt and 1/4 teaspoon black pepper.

In a separate bowl, whisk together the flour with the remaining salt, pepper, and the cayenne.

Heat 3-4 inches of oil in a large pot until very hot, about 350 degrees F.

Pour the buttermilk (and mustard, if using) over the seasoned shrimp and combine. Working in batches, use a slotted spoon to remove the shrimp from the buttermilk and transfer to the seasoned flour. Using a separate dry spoon or your fingers, toss to evenly coat. Carefully slip the battered shrimp into the fryer and fry until golden brown and crisp, about 5 minutes; drain on paper towels. (Don’t overcrowd the fryer with too many shrimp, as this will lower the temperature of the oil and the shrimp won’t crisp up as quickly or nicely as they should.)

When I was a kid, fried shrimp were my go-to restaurant food.  I refused to eat cocktail sauce and demanded French dressing for dunking.  Not, perhaps, real Cajun, but a memory just the same.

Saturday, September 22, 2012

HANDY KITCHEN TIPS

I love handy kitchen tips, don't you?  I don't know how many times I've had one of those Homer Simpson "D'oh!!" moments when I see something that I never thought of...yet seems so obvious...like this tip:

Did you know that the plastic lid from a Parmesan container will also fit a regular mouth mason jar?  How handy is that !?!??


This next tip is super handy for gift wrapping season, never have to "find" the end of the tape....D'ho!!


Did you know that cranberry sauce freezes well? We are empty nesters and I hate opening a can of cranberry sauce, (or worse yet...make it) and then not be able to use it all.  I found that if you put it in a mason jar (with plenty of head room) it freezes well. It never freezes solid, so you can scoop out what you need (completely frozen it is still the consistency of ice cream) and then put the rest of the jar back in the freezer.  15-20 minutes at room temp or an hour in the fridge and it is just as good as fresh cranberry sauce!! We use a lot more these days (for baked chicken) because its always in the freezer!!

Remember Tang?  I buy it in gallon cans from Costco and once a month or so, I put 2 cups of it in my dishwasher and run a super hot cycle through. The dishwasher gets sparkling clean and smells fantastic!!

I buy ground beef in bulk packages, then divide and freeze it.  I found that if you wrap the ground beef (tightly) with plastic wrap BEFORE you put it into a Ziploc bag, there will be ZERO freezer burn or ice crystals. Also, since there is just the 2 of us, I divide the burger into a wide range of sizes...some as little as 1/4 pound; I then put all of the mini-packages into one big Ziploc bag and freeze...it works great and a lot less waste.

Do you need room temperature cream cheese in a hurry?  Take an 8 ounce block out of the wrapper and microwave it, on high, for 13 seconds. Do you need room temperature butter in a hurry?  Grate the butter onto a piece of waxed paper and let it sit for a few minutes.


This little refrigerator magnet, in the shape of a Pyrex measuring cup has been on my fridge for at least 20 years and I refer to it all of the time.  I've had it so long that I can't even remember where it came from, I just know that it has been ultra handy and has answered many cooking questions for me over the years. If you ever see one, or find a similar one...grab it, you will not be sorry.


Food In Jars


Over at Lucindaville we posted photos of the new Canning Jar Closet and what better accompaniment to those photos than to feature one of new favorite canning cookbooks.  Food in Jars by Marisa McClellan grew out of her wildly popular blog, Food in Jars.  I just love to click onto Food in Jars, especially on those days that are not going so well.  A brief click on oozing jams, bright jellies, and comfy conserves and I am a happy camper.

So one can just imagine how ecstatic I was to find that Marisa was doing her very own Food in Jars cookbook.  I waited and waited and it finally arrived.  What can I say, some girls love jewelry, I love shiny jewels suspended in canning jars.  The book did not disappoint.  There is very practical information for those of you who have never canned before.  She debunks the myth that canning requires specialized equipment (or a canning jar closet for that matter!) as well as my favorite myth, that canning must be done in industrial sized batches.  Long ago, before there was a Trader Joe, one did need to provide for the family for those long winter months while the garden was under snow.  And there were times when women canned gigantic quarts of tomatoes and beans, but those days are waning.   Today we just want lovely little jars of our own jam.  And while one does not need specialized canning equipment, it was Marisa who caused me to buy one of my favorite specialised canning tools the Kuhn 4th Burner Pot which can be used for various other things besides canning three small jars of jam, but I digress...

Another of my favorite cooking techniques that Marisa employs is the slow cooker.  I do love my slow cooker for apple butter and Maris shown a light on the multiple other butters one could make.  This a favorite.

Slow Cooker Blueberry Butter

8 cups of pureed blueberries
2 cups/ 400 g granulated sugar
Zest and juice of 1 lemon
2 teaspoons ground cinnamon
1/2 teaspoon freshly grated nutmeg

Put the pureed blueberries in a 4-quart capacity slow cooker. Cover and turn it to low. After it has cooked for 1 hour, remove the lid and stir. From this point forward, you will want to keep the lid slightly  cracked.  Propping it open with  a wooden spoon or chopstick allows for the evaporating steam to escape.

This butter needs between 4 to 8 hours total in the slow cooker.  The time varies depending on how hot you slow cooker cooks.  Check the butter at least once and hour to check the progress.
In the final hour add the sugar, lemon zest and juice, and spices.  If you want to speed the evaporation, remove the lid and turn the cooker up to high.  If you do this, make sure you check the butter every 10 minutes to prevent scorching.

(When the butter is nearing completion,prepare a boiling water bath and 4 regular-mouth 1-pint/500 ml jars  and lids according to processing. )

Once it is thick as ketchup and spreadable, determine whether you like chunky or smooth butter. Puree the butter for a smooth texture; for slight chunkiness, leave it as is.
 (Ladle into jars and process for 10 minutes.)


The great thing about this book is the range.   From beginner to advance jam maker, there is something to get you into the kitchen. For those days you can't get into the kitchen, check out the blog!  Either way you will find yourself very happy.

Monday, September 17, 2012

Crescent City Cooking


After Katrina there were a spate of New Orleans cookbooks, and frankly, they began to be a bit monotonous.   So we totally overlooked Susan Spicer's Crescent City Cooking.  What on earth were we thinking?

Here is the big disclaimer:  While we would never, ever think that we could be swayed by that evil television hanging on the wall, one must admit that we were drawn to Susan Spicer's cookbook after finding out that she helped develop the wildly popular HBO series, Treme.  Especially Kim Dickens' character Janette Desautel, who may be our favorite character.   OK we admit we were swayed by television.

While we might have been swayed by the TV, we were won over by Spicer's conviction to the food an flavors of the South in general and New Orleans in particular.  Flipping trough the book it is often hard to place it in The Crescent City, as it feels more deeply Southern than specifically New Orleans.   Subtitled Unforgettable Recipes from Susan Spicer's New Orleans, one realizes that the recipes, while rooted in New Orleans, have a broader appeal.

Spicer was born in Florida, but as an "Navy Brat"  her family traveled and her mother cooked with a broad stroke of the palate.  Spicer spent much of her young life in New Orleans and was always drawn back.  When she finally decided to cook in earnest, she came to New Orleans.

Here is an example of a recipe that has a New Orleans "ring " to it.   Rename it  Fried Chicken over Beans and Corn and it would fit in any Southern cookbook.


Cajun-Style Chicken Breast with Chili Bean Maque Choux

4 boneless, skinless chicken breasts (about 6 ounces each)
1 tablespoon olive or other vegetable oil, plus 1-2 tablespoons veg. oil for sauteing
2 tablespoons Creole or whole-grain mustard
1 teaspoon salt
1/2 teaspoon each black and cayenne pepper
2 tablespoons chopped scallion

If you plan on grilling the chicken, light the coals about 1/2 hour before you're ready to cook.

Rinse the chicken breasts and pat dry.  Combine the olive oil, mustard, salt, and spices and smear it on the chicken.

Refrigerate for at least 15 minutes, or up to several hours, until you’re ready to cook.  Meanwhile make the maque choux.

To cook the chicken, heat the vegetable oil in a large non-stick skillet over medium-high heat.  Pat excess marinade from the breasts then sear for 3-4 minutes on each side, or until nicely browned,  Alternatively, you can grill the chicken over hot coals or broil it.

To serve, place a scoop of maque choux on each plate, garnish with chopped scallions, and top with a chicken breast.  The corn and beans together provide a good amount of starch, so this s dish needs nothing more than a tossed salad or a simple green vegetable,  Of course, a big slice of warm corn bread would be delish too.


Maque Choux

2 ears sweet white or yellow corn, shucked and silk removed, or 1-1/2 cups frozen corn kernels, thawed
1 tablespoon olive or vegetable oil
2 tablespoons butter
1/2 medium yellow onion, diced
1 jalapeno, seeded and minced
1 garlic clove, minced
1/2 cup peeled, seeded, and diced fresh tomato, or canned tomato (with juices)
1 14 ounce can red beans, kidney beans, or chili beans (for a bit more heat), drained and liquid reserved
Salt
Hot Sauce

Cut the corn kernels from the cob, being careful not to cut too close to the cob (where the kernels become dry and starchy).  Heat the oil and 1 tablespoon butter in a skillet to foaming. Add the onion and cook for 2-3 minutes.  Then add the corn, jalapeno, and garlic and stir to mix.  Cook b for about 3 more minutes, then add the tomato, beans, and 1/4 cup of water or reserved bean liquid and season to taste with salt and a little hot sauce. Stir and cook until heated through, then swirl in the remaining tablespoon of butter. Keep the vegetables warm while cooking the chicken.

Its not to late to jump on the bandwagon.  Grab this book and catch Season 3 of Treme