Recipes from an Edwardian Country House

Recipes from an Edwardian Country House is a book that was repackaged from an earlier book. Frankly, I hate it when publishers do this sort of thing, as I often have the first book and then end up with another copy of the same book .

Seasonal Recipes From The Garden

For a long time my cable provider didn't provide a PBS station. It seemed weird, no PBS, but I learned to live it. After changing providers, I suddenly had PBS again.

Favorite Recipes of Famous Men

We are suckers for collections of recipes by "famous" folk. So naturally, Favorite Recipes of Famous Men a 1949 cookbook collection by Roy Ald is a great one.

Spoonbread and Strawberry Wine

There is not a single member of Norma Jean and Carole Darden's family that you want to hang out with. While most of them are gone now, they live on in this delightful cookbook and memoir.

Recipes from an Edwardian Country House

Recipes from an Edwardian Country House is a book that was repackaged from an earlier book. Frankly, I hate it when publishers do this sort of thing, as I often have

Thursday, May 28, 2009

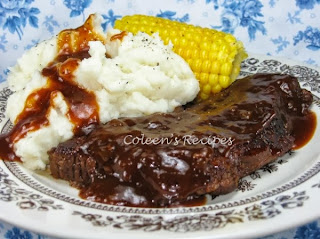
OVEN BARBECUE STEAK

I had big plans to barbecue outside today, and then Mother Nature decided to rain on us all day, I went for plan B (the oven). The outcome was not as good as grilling outdoors, but an excellent alternative, for sure. Cooking "low and slow" in the oven, gives you a steak more tender than you could ever get on a grill.


1 tablespoon olive oil
1 cup chopped onion
1/2 cup chopped celery
3/4 cup beef broth (or water)
1 cup favorite barbecue sauce
2 tablespoons lemon juice
2 tablespoons brown sugar
2 tablespoons Worcestershire sauce
1 teaspoon DRY mustard
1/2 teaspoon black pepper
3 pound chuck steak (1" thick)

Cut the chuck steak apart, into serving size pieces (cutting out some of the obvious fat lines). Brown the meat in the olive oil until it gets a nice crusty brown surface, then put it in a 9x13 baking pan.

In the same pan you browned the meat in, saute the veggies until they wilt. Add the rest of the ingredients (not the meat) and simmer for a couple of minutes.

Pour sauce over meat and cover the baking pan with foil (tightly). bake at 300 degrees for 2 to 2½ hours or until "fall apart" tender. Thicken sauce if necessary.

NOTE:  It is VERY IMPORTANT to bake at 300° to get the MOST TENDER steak........anything higher than that, will not work.

NOTE: It is also VERY IMPORTANT to brown the meat well before you bake it to get the maximum flavor.

Wednesday, May 27, 2009

PEANUT BUTTER CANDY (sort of like a Pay Day candy bar)

If you like Pay Day candy bars, you will love this recipe. It tastes very similar, but SO much fresher and better. This recipe makes a 9 x 13 pan of candy, which would be an excellent addition to your children's birthday party menu! They take just a few minutes to put together and then an hour or so in the fridge, to "set".


 4 cups honey roasted peanuts
(1) 10½ ounce bag miniature marshmallows
1/2 cup butter (melted)
(1) 14 ounce can sweetened condensed milk (not evaporated)
(1) 10 ounce bag peanut butter chips
1/2 cup peanut butter

Line a 9 x 13 dish with foil and spray it with cooking spray (I spray my foil with cooking spray then blot it with a paper towel so it doesn't make the candy greasy). Set aside.

In a large (heavy bottomed) saucepan, mix the marshmallows and melted butter. Heat over medium-low heat until completely melted (you do not want the marshmallows to boil, but you want to see a little bubble now and then). Keep it at this temperature for about a minute.

Stir in the sweetened condensed milk, peanut butter chips and peanut butter. Stir until everything is melted and smooth.

Pour this mixture over the peanuts in the pan and spread out evenly. Sprinkle the other half of the peanuts over the hot mixture and press the nuts into the surface of the hot mixture (with your hand). Chill in the fridge for 1-2 hours or until firm. Cut into pieces and serve. Store covered in fridge. Makes 60 pieces of candy.

Tuesday, May 26, 2009

BREAD MACHINE CINNAMON ROLLS (and a Thank You)

Until I started digging through my old recipes for this blog, it never occurred to me how many recipes I have for hubby’s sweet tooth! It has been quite an eye opener. Here is yet another favorite. I tried to make cinnamon rolls out of bread dough for years with minimal success. They were always tasty while still warm, but got “tough” when they cooled off. The addition of egg, makes all the difference. This recipe is very good (warm or cold) and it’s made in a bread machine, so it is as easy as it gets.

¼ cup water
¼ cup butter, melted
(½) of a 3.4 ounce box instant vanilla pudding
1 cup warm milk
1 egg room temperature
1 tablespoon sugar
½ teaspoon salt
4 cups bread flour
1 packet of yeast (I use 1 tablespoon)

FILLING
¼ cup butter, softened
1 cup brown sugar
4 teaspoons cinnamon
¾ cup chopped pecans or walnuts

FROSTING
½ of an 8 oz. cream cheese, softened
¼ cup butter, softened
1 cup powdered sugar
1 teaspoon vanilla
1 ½ teaspoons milk

BREAD MACHINE INSTRUCTIONS: In pan of machine, mix water, melted butter, pudding mix, warm milk, egg, 1 tablespoon sugar, salt, flour and yeast. Set machine on dough cycle and press start. When dough cycle has finished, turn dough out onto lightly floured counter and roll 17” x 10”. Spread with soft butter. Mix brown sugar, cinnamon & nuts and sprinkle over dough. Roll dough up (start with long side). Slice into 16 one inch pieces and place in 9x13 buttered pan. Let rise in warm place until double (about an hour). Bake in 350° PREHEATED oven for 15-20 minutes. Take out of pan and frost with cream cheese frosting.

NOTE: I don’t own a bread machine, so I do this the old fashioned way and it works great. I don’t cut 16 one inch pieces, John likes thicker rolls, so I cut about 8-10 of them.

Monday, May 25, 2009

FUDGESICLES (and some questions for you)

With warm weather approaching and kids already out of school, it is time for kid friendly recipes. These fudgesicles are not only tasty, but they are inexpensive to make using every day ingredients from your pantry. If you do not have Popsicle molds, just use 3 ounce waxed paper (bathroom) cups and popsicle sticks.


In heavy bottom, medium size saucepan, mix:
3 cups milk
¼ cup cornstarch
1/8 teaspoon salt
½ cup corn syrup (light)
1 teaspoon vanilla

Bring to gentle boil on medium high and boil 1 minute (make sure you stir constantly). Remove from heat and add 1 cup of milk chocolate chips, stir to melt.

Pour into Popsicle molds (or 3 ounce waxed paper cups). Freeze overnight.
NOTE: About an hour or so after you put the paper cups into the freezer, insert a Popsicle stick in the center, and return to freezer.

Wednesday, May 20, 2009

TROPICAL FRUIT QUICK BREAD

This tropical quick bread was still too hot to cut when I photographed it, so I don’t have a photo of the inside of the bread, but trust me, it is excellent. To give you an idea of what it tastes like, it has bananas, pineapple, coconut, walnuts, vanilla & rum extract in it.

1¾ cups all-purpose flour
2/3 cup white sugar
1/3 cup butter flavored Crisco
¼ teaspoon baking soda
2 teaspoons baking powder
½ teaspoon salt
1 cup mashed RIPE bananas
(1) 8 oz. crushed pineapple, well drained
1 cup sweetened shredded coconut
2 eggs
1 cup chopped walnuts
1 teaspoon vanilla
1 teaspoon rum extract
Cream the butter and sugar together, then add everything else and mix until smooth. Place in a greased 8½ x 4½ x 2½ loaf pan (the bigger loaf pan) and bake at 350 for one hour. Remove from pan and cool on rack.


NOTE: Some people in my family complain that coconut shreds get stuck in their teeth, so I run the coconut through the food processor just for a few seconds to make the shred a little finer.
NOTE: It is my cardinal rule that you never eat quick breads like this on the first day. Always wrap them tightly while hot and do not unwrap them until day two. If you do this, the flavors develop AND the bread will be much more moist.

Tuesday, May 19, 2009

FAMILY STYLE ITALIAN PENNE BAKE

When my children were little, I tried to “invent” recipes but I was not very good at it. One recipe that is embarrassing to admit was a combination of plain tomato sauce, ground beef and Italian seasonings (cooked for about 20 minutes) and then mixed into elbow macaroni; that was it…not even any cheese! It was horrid by today’s standards, but the kids always ate a lot of it and I did not know any better. Hey…that was 30+ years ago! I have learned a few cooking tricks since then.

Today’s family style penne bake is one of our favorites these days. It is rich, filling, very satisfying and leftovers reheat extremely well on day two. Served with a veggie, salad and dinner rolls, it is good enough for company. 1 pound extra lean ground beef
1 cup onion chopped
1 cup celery chopped
1 cup chopped carrot
1 to 2 cloves garlic minced
1 15 ounce can tomato sauce
1 12 ounce can tomato paste
4 cups water
1 teaspoon salt
½ teaspoon pepper
1 teaspoon dry oregano
2 teaspoons dry sweet basil
½ teaspoon fennel seed
1 tablespoon white sugar
1 pound Barilla mini-penne pasta
1 pound Monterey Jack cheese (grated)
1 tablespoon butter


In large pan, sauté ground beef until no longer pink (drain well). Return meat to pan and add onion, celery, carrot and garlic; sauté until veggies start to wilt. Add tomato sauce and tomato paste, 4 cups of water, salt and pepper, oregano, basil, fennel seed and sugar. Mix well and SIMMER two hours (stirring occasionally). What you want is for the sauce to reduce to a nice thick consistency (do not add any extra water).

After sauce has cooked down, boil the mini-penne (using directions on penne box) and drain. Stir in a tablespoon of butter to coat pasta, then stir in sauce and half of the (grated) cheese into a greased 9 x 13 baking dish. Top with other half of cheese and bake at 350° for about 30 minutes or until bubbly and cheese has browned a little, like this:NOTE: Once you get this sauce to the simmering stage, you can put it in the crock pot and let it cook in there all day. If you do that…just prop the lid open just a little, so the sauce can reduce and thicken.

Sunday, May 17, 2009

ALMOST SNICKERDOODLES

What is that saying…necessity is the mother of invention? Well, the other day, I set out to make Girlichef’s Snickerdoodle cookie recipe. I was almost finished with the dough, when hubby came into the kitchen and glanced at the recipe. He looked at me and said, “cinnamon, huh?” one of those semi-non-committal offerings that tells me (after 38 years of marriage) that he would rather I made his beloved peanut butter cookies. Now…what to do; I have the cookie batter 75% done, so there was no backing out. Solution? I put the cinnamon back in the pantry and added vanilla extract, butter extract and rolled them in plain sugar. The results were huge 4” sugar cookies that hubby is thoroughly enjoying. Whew!

So, here is Dar’s recipe with a couple of hubby approved changes:

2¼ cups all purpose flour
2 teaspoons cream of tartar
1 teaspoon baking soda
½ teaspoon salt
1½ sticks unsalted butter, room temperature
¼ cup butter flavored Crisco
1½ cups white sugar
2 large eggs
1 teaspoon vanilla extract
1 teaspoon butter extract
white sugar for rolling cookies

Preheat oven to 400° and line baking sheets with parchment paper.

In stand mixer, cream butter and Crisco until light and creamy (about 1½ minutes). Scrape down the sides of the bowl and add eggs and extracts; continue to beat another 30 seconds. Mix all dry ingredients together and add to butter-egg mixture. Mix just until combined (about 20 seconds).

Roll dough into 1½” balls (a slightly heaping tablespoon full) and roll in plain white sugar. Place on parchment paper lined cookie sheet and flatten slightly with the bottom of a glass dipped in sugar. Bake cookies for 9-11 minutes and immediately transfer to a baking rack to cool.
NOTE: These are big 4” cookies, so do not place them too close together on the cookie sheet (they spread). If you want smaller cookies, just make the dough balls smaller.
NOTE: If you want to frost these cookies, melt 1 tablespoon of butter and add 1 teaspoon of vanilla extract, ¼ teaspoon almond extract, 2 teaspoons milk and 1½ cups of powdered sugar (whisk until smooth). You can add a little more milk if it is too thick or another spoon of powdered sugar if it is too thin.

Saturday, May 16, 2009

VEGGIE RICE

When my carnivorous husband grills, I usually make this for myself instead . It is filling, healthy, spicy and delicious. Topped with cold avocado, sweet cherry tomatoes, a little cheddar, light sour cream and a piece of whole wheat garlic bread, it is my guiltless pleasure!

CLICK ON PHOTO TO ENLARGE
1 cup of chopped onion
1 clove of garlic minced
½ cup celery chopped

1/2 cup carrot chopped
1 cup chopped red bell pepper
1 cup raw rice
3 teaspoons chili powder
½ teaspoon ground cumin
1 teaspoon salt
½ teaspoon black pepper
1 (15 oz) black beans
1 cup fresh corn
1 (15 oz) can diced tomatoes
1½ tomato cans of water
(1) 4 ounce Ortega mild green chilies


Sauté onion, garlic, celery, bell pepper in 1-tablespoon canola oil until onion is transparent. Stir in raw rice and let it sauté with veggies until it become opaque. Add the diced tomatoes, water, black beans, corn, carrot and flavorings. Cover the pan and lower the heat to a simmer and cook for 20 minutes (do not raise the lid). After 20 minutes, rice should be cooked and veggies tender. Stir in mild green chilies. Mix well and serve with cold avocado, cherry tomatoes, cheddar cheese and light sour cream.

NOTE: This reheats very well and is even tastier on day two.
NOTE: I also like to eat this rolled up in a warmed tortilla.

Sunday, May 10, 2009

CARAMEL PECAN PIE

This sinfully rich and heavenly caramel pecan pie will be a hit at your next potluck, trust me! Baked in a shortbread type piecrust, it is perfection. I like to chop the pecans fairly small so that it is easier to slice (and easier for kids to eat). It is the perfectly sweet ending to any special meal.

36 Kraft caramels (individually wrapped kind)
¼ cup butter
¼ cup milk
½ cup white sugar
3 eggs
½ teaspoon vanilla extract
¼ teaspoon salt
1 cup chopped pecans
9" Shortbread pie crust (recipe below)


In a saucepan with a heavy bottom, heat caramels, butter, and milk over low heat (keep stirring) until melted and smooth. Remove from heat and set aside.
Stir together sugar, eggs, vanilla and salt; add melted caramel mixture gradually. Stir in chopped nuts and pour into unbaked piecrust. Bake in preheated 350° oven for 45 to 50 minutes or until crust is golden. Remove from oven and allow to cool until filling is firm.

SHORTBREAD PIE CRUST:
In large electric mixer bowl, mix 1 cup flour (spoon into cup and level off), ½ cup butter flavored Crisco, 1 teaspoon sugar and ¼ teaspoon of salt. Mix until crumbly. While mixer is running, add 2 tablespoons ice water, 1 tablespoon of beaten egg and ¾ teaspoon white vinegar. Beat until dough forms a ball. Use fingers to press dough into 9” pie plate (and up the sides). I use a two-piece 9” tart pan.

Saturday, May 9, 2009

CHICKEN FINGERS

Chicken Fingers are an excellent appetizer for parties (for all age groups). It is also a quick “go to” meal for a weeknight dinner. Simple and delicious, what more can you ask for? If you have any leftovers, this chicken (chopped up) makes a fantastic chicken and grilled cheese sandwich on day two.


6 boneless, skinless chicken breast halves
2 cup of buttermilk
1 teaspoon garlic powder
2 cups flour
2 eggs, beaten
1 teaspoon salt
1/2 teaspoon black pepper
1/2 teaspoon onion powder


Combine the buttermilk, beaten egg and garlic powder and pour it into a large Ziploc bag. Cut the chicken breast into long half inch wide strips and put them in the same Ziploc bag. Refrigerate this until you are ready to cook (or at least 2 hours). In another large Ziploc bag, combine the flour, salt, pepper and onion powder.

When it is time to cook, follow these steps:
1. Drain chicken (saving liquid) and coat chicken in flour mixture.
2. Shake off excess flour mixture and put BACK INTO liquid again.
3. Repeat step one, then THROW AWAY BUTTERMILK LIQUID
Fry chicken fingers in ½” vegetable oil until golden. Keep warm in oven.
photo


BARBEQUE DIPPING SAUCE
1 cup ketchup
1/4 cup white vinegar
1/2 cup brown sugar
2 tablespoons chopped onion (sautéed)
1 teaspoon Worcestershire sauce
1/2 teaspoon liquid smoke
1/4 teaspoon black pepper
1/4 teaspoon celery salt
1/2 teaspoon powdered mustard
Combine and simmer slowly for about 10 minutes.


We like barbeque flavored Chicken Fingers. To do that, I simply put one half cup of barbeque into a large frying pan, let it heat up.

Then I put the cooked chicken fingers in
the sauce and toss lightly.


 NOTE: Personally, we like this recipe best with boneless, skinless chicken thighs because they are so moist. This is also excellent with chicken tenders as well.

Friday, May 8, 2009

ANGEL FOOD CAKE

Have you ever tried an angel food cake made from scratch? They are a little intimidating, at first, but the flavor and texture is extraordinary and you will never be happy with a bakery angel food cake again. They are worth every bit of effort!! It is amazing how tall this cake gets!


Read these instructions at least twice before you start baking…then follow the instructions to a "T". This is one cake you shouldn’t experiment with.

1 cup of cake flour
1 ½ cups white sugar (divided)
12 egg whites
1 teaspoon vanilla extract
½ teaspoon almond extract
1 ½ teaspoon cream of tartar
½ teaspoon salt


Preheat oven to 375°. Be sure that your 10” (two piece) angel food pan is TOTALLY FREE of any grease or oil and it needs to be an angel food pan that is NOT Teflon coated. Make sure your mixing bowl, beaters and mixing spoons are all totally grease free. Remember, grease is the enemy when making an angel food cake because the cake is mostly egg whites. The cake needs to “grab onto” the sides of the pan in order for it to raise, and if there is grease (or Teflon), it can’t do that.
Do ahead: Sift 1 cup of CAKE flour with ¾ cup of white sugar and set aside.
In a large bowl, whip the egg whites, vanilla, cream of tartar and salt with an electric mixer, on high, until you get medium peaks (it takes about five minutes). Continue to whip and SLOWLY add ¾ cup of the sugar into the whites. Continue beating until the whites get to the stiff peak stage.

Next FOLD the flour/sugar combo into the whipped egg whites a tablespoon at a time. Make sure you FOLD, this mixture into the egg whites, DO NOT use mixer to do this and DO NOT stir. Gently fold from top to bottom. This process is necessary so you do not deflate the egg whites.

Put the batter into the angel food pan and smooth the top a little. Bake for 45 minutes. When the cake is done, the top will spring back just a little when you lightly touch it and the cake top will be dry to the touch. Remove from oven and immediately invert the pan and cool for a couple of hours. To remove the cooled cake from the pan, use a long slender bladed knife (I like my bread knife) and run it around the sides of the pan in small sawing motions. Next do the same around the center tube of the pan. Lift the cake out and run your knife under the cake, it should then life right off of the pan.
NOTE: Separate your egg whites into a small bowl before you add them to your mixing bowl so you don’t get ANY yolks into the batter.
NOTE: Save the yolks in a clean jar in the fridge. They will be good for a couple days at least.
NOTE: I usually run my utensils through the hottest dishwasher setting before I make this recipe, to insure they are totally grease free.


I hope I haven’t scared you away from trying this cake. It is delicious and worth every bit of effort.

Thursday, May 7, 2009

PEACH COFFEE CAKE

If you are cooking for your mother, mother-in-law, wife (or yourself) on Mothers Day, I hope you consider this recipe. Its humble title, “Peaches and Cream Coffee Cake” does not accurately describe it. The base is a vanilla cake, partially baked (25 minutes), then topped with a mixture of sweetened condensed milk, cream cheese, chopped peaches, toasted pecans and a cinnamon streusel topping. It is then put back in the oven for another 35 minutes. It is divine!
2 and 1/3 cups all purpose flour
1 and 1/3 cups white sugar
¾ teaspoon salt
¾ cup butter flavored Crisco shortening
2 teaspoons baking powder
¾ cup milk
2 eggs
1 teaspoon vanilla
(1) 3 ounce cream cheese (room temp)
(1) 14 ounce sweetened condensed milk (NOT evaporated milk)
(1) 29 ounce can peaches well drained (reserve syrup)
1/3 cup reserved peach liquid
2 teaspoons cinnamon (divided)
1 cup toasted pecans (divided)
1/3 cup brown sugar (firmly packed)
Preheat oven to 350° and spray a 9” x 13” baking dish with vegetable spray (set aside).

In a mixing bowl, combine flour, sugar and salt; cut in the Crisco until crumbly. Remove one cup of these crumbs and set them aside. To the rest of the crumbs, add baking powder, milk, eggs and vanilla. Beat on medium speed two minutes. Spread batter in prepared 9”x13” baking pan and bake 25 minutes (cake will be only partially baked).

While cake is baking, beat the cream cheese until fluffy. Gradually beat in sweetened condensed milk and peach juice. Chop the drained peaches and add them to the milk mixture. Stir in ONE teaspoon of cinnamon and half cup of toasted nuts (set aside).

Make the streusel topping by combining the 1 cup of reserved cake crumb mixture, ½ cup of toasted chopped pecans and ONE teaspoon of cinnamon (set aside).

After the cake base has baked for 25 minutes, remove it from the oven and pour the peaches and cream mixture over it, spreading the peaches evenly. Top the peaches and cream mixture with the streusel topping and return to the oven for 35 more minutes

NOTE: When cutting the Crisco into the flour and sugar, try to get crumbs as fine as possible. I use my pastry cutter to get most of it worked in, but then I use my electric beaters and it will turn the crumbs into a very fine powder, which is what you want.
NOTE: I have never tried to substitute butter for the Crisco in this recipe.
NOTE: This cake is excellent, served warm (or room temperature) with whipped cream or ice cream.

Happy Mothers Day to all of you Mom’s out there! This Sunday is also my birthday (my birthday lands on Mothers Day every 7th year), so it will be a great day for me too!

Peach on Foodista

Tuesday, May 5, 2009

CHIPOTLE COLESLAW

This is a quick side dish for today’s Cinco de Mayo dinner. It has traditional coleslaw veggies with just a slight twist on the dressing.

1/3 cup mayonnaise
1 tablespoon limejuice
2 teaspoons honey
¼ teaspoon ground cumin
1/8 to ¼ teaspoon ground chipotle chile pepper
3 cups shredded green cabbage
½ cup chopped red cabbage
1/3 cup chopped red onion
¾ cup chopped red (or yellow) bell pepper
2 tablespoons chopped cilantro (optional)


Stir together mayonnaise, juice, honey, cumin and ground chipotle pepper (set aside). Combine remaining ingredients, pour chipotle dressing over, and toss to mix. Serve immediately (or chill up to 24 hours).
 

Monday, May 4, 2009

CROCKPOT TURKEY BREAST

WEEK DAY TURKEY DINNER!!


Have you ever cooked a whole turkey breast in the crockpot? I did, for the first time, this weekend, and I can tell you I will be doing it again and again. It was super tender without being dried out (in fact it was quite moist and flavorful) and it makes enough broth to make a wonderful gravy too!
5 pound bone-in turkey breast
1 envelope dry onion soup mix
3 stalks celery chopped
1/2 cup chicken broth
black pepper


The size of your crockpot will determine how many pounds of turkey you can cook. I've found turkey breasts weighing as little as 4 1/2 pounds and as much as 7 pounds.
 Wash and pat dry your turkey breast. Trim the meat so that it will fit into the crockpot ( I had to remove a little of the rib bones to get it to fit into my crockpot). Coat the surface of the turkey with minimal butter and rub the dry onion soup mix and pepper all over the surface of the turkey. Put the chopped celery into the bottom of the crockpot and add 1/2 cup of chicken broth. Lay the turkey breast (breastbone or skin side down) on top of the chopped celery. Cook on low for 5-7 hours (see notes below).
NOTE: You are going to be tempted to add more than 1/2 cup of broth to the crockpot, but do not. The turkey will produce plenty of liquid (for gravy) and don't worry about an over-powering onion soup taste, you won't even know its in there, but it really makes a great addition to the gravy.
NOTE: Everyone’s crockpot cooks at a different temperature, so you will have to decide how long you cook this turkey. We like our turkey to come easily off the bone, and that took 6 hours on low for a 5 pound (bone-in) turkey breast. Just start testing it after 5 hours.

This is a great (fool proof) cooking method for turkey breast. I can see so many uses for it like extra turkey if you are having a big holiday dinner, great for turkey sandwiches, casseroles, soups, salads, etc. Tons of possibilities, not to mention a great way to have a nice hot turkey dinner without heating up the kitchen.


Saturday, May 2, 2009

SHORTBREAD COOKIES

A delicious shortbread cookie that has only six very common ingredients and makes a ton of cookies, what more can you ask for? This recipe has the classic shortbread taste (sort of like a Lorna Doone cookie but so much better) and it is So simple, you just mix and pat it into a pan and bake.
5 cups all purpose flour
1 cup sugar
½ teaspoon salt
2 cups COLD butter (no substitutes)
1 teaspoon vanilla
Mix flour, sugar in large mixing bowl. Cut the butter into the dry mixture along with vanilla until it turns into fine crumbs. Pat crumbs into an UNgreased 10” x 15” baking pan. Prick all over with fork tines and bake at 350° for 45 minutes. Cool in pan for 15 minutes then cut into small squares. Cool to room temperature.
NOTE: I found it way too tiring on the arms to cut the butter into the flour by hand. Instead, I grated it on a cheese grater and mixed it into the flour best I could. Then I transferred the flour butter mixture to my stand mixer and used the whisk attachment on medium high for about 20 seconds…PERFECT crumbs. I am guessing a food processor would work well too. These are SO good.
NOTE: I was not able to poke holes in my cookies right away (the crumbs seemed too dry). I put them in the oven for about 15 minutes and then took them out and poked holes all over the dough with a fork and it worked fine.

Friday, May 1, 2009

LIGHT AS AIR PINWHEELS

I found this fabulous recipe for Phyllo Pinwheels on a blog called Cindy’s Place. It is very quick and easy and yet so impressive to look at. They are deliciously light as air and would look fantastic on a baby shower or wedding shower table.
1 package of Pepperidge Farm phyllo dough (freezer section)
1 egg
maraschino cherries


Thaw both sheets of phyllo dough for 40 minutes or until soft enough to handle. Work with one sheet at a time. Unfold the phyllo dough and press out any fold marks. Cut the phyllo dough into 3 full length rectangles, then cut each rectangle into 3 squares each (total 9 per sheet).

For each square, cut (starting in the corners) ¾ of the way to the center (see diagram). Lift a cut corner and secure it in the center (using a micro-dot of water if necessary).Repeat for other corners like this:

Place pinwheels on parchment paper lined baking sheet and brush them with egg wash (1 egg beaten with a little water). Set half of a maraschino cherry in the center. Bake in preheated oven (350°) for 30 minutes or until golden. Remove to cooling rack. Bring 1 cup of powdered sugar + 2 tablespoons of water + 1 teaspoon of vanilla extract + ¼ teaspoon of almond extract to a boil and remove from heat. Brush the cooked pinwheels with this glaze. The glaze will dry to the touch after a little while. These are SO tasty!

NOTE: Cindy's web page is in Portuguese, however, she has been more than helpful in interpreting recipes. I hope you go visit her.